General Information
TrustLogix supports the following access policy definitions on the below objects
- Database
- Schema
- Tables, Views and Materialized Views
- Row Access and Column masking
- Entitlement (Mapping table use case)
(Currently the above options will grant SELECT, INSERT, UPDATE, DELETE, TRUNCATE and USAGE privileges.)
Before defining any access policies, please register the Snowflake data source in the TrustLogix control plane UI and ensure it is in the active state.
Note :- Snowflake database access for the TrustLogix control plane role
TrustLogix uses the Snowflake show command to list all the objects which are rendered in the Access policy create UI page. TLX_CP_ROLE needs to have read only access on the appropriate snowflake database objects.
Provide usage grants to the objects selectively on which an Access policy needs to be created. The below sample grants are needed for the TLX_CP_ROLE.
grant usage on database to role TLX_CP_ROLE -- To list databases i
grant usage on all schemas in database to role TLX_CP_ROLE -- To l
grant usage on future schemas in database to role TLX_CP_ROLE -- T
-- Below grants are needed to define table,view level grants grant references on all tables in database to role TLX_CP_ROLE --
grant references on future tables in database to role TLX_CP_ROLE
grant references on all views in database to role TLX_CP_ROLE -- T
grant references on future views in database to role TLX_CP_ROLE
grant references on all materialized in database to role TLX_CP_RO
grant references on future materialized in database to role TLX_CP
If the above grants are not provided then the various Snowflake objects will not show up on the UI
Policy Creation flow :
Step1 : Navigate to the policy List page

- User can navigate to the policy list and the policy creation page by clicking on the data source or by choosing select view details link in the vertical ellipsis.
- Click on Access Policies tab
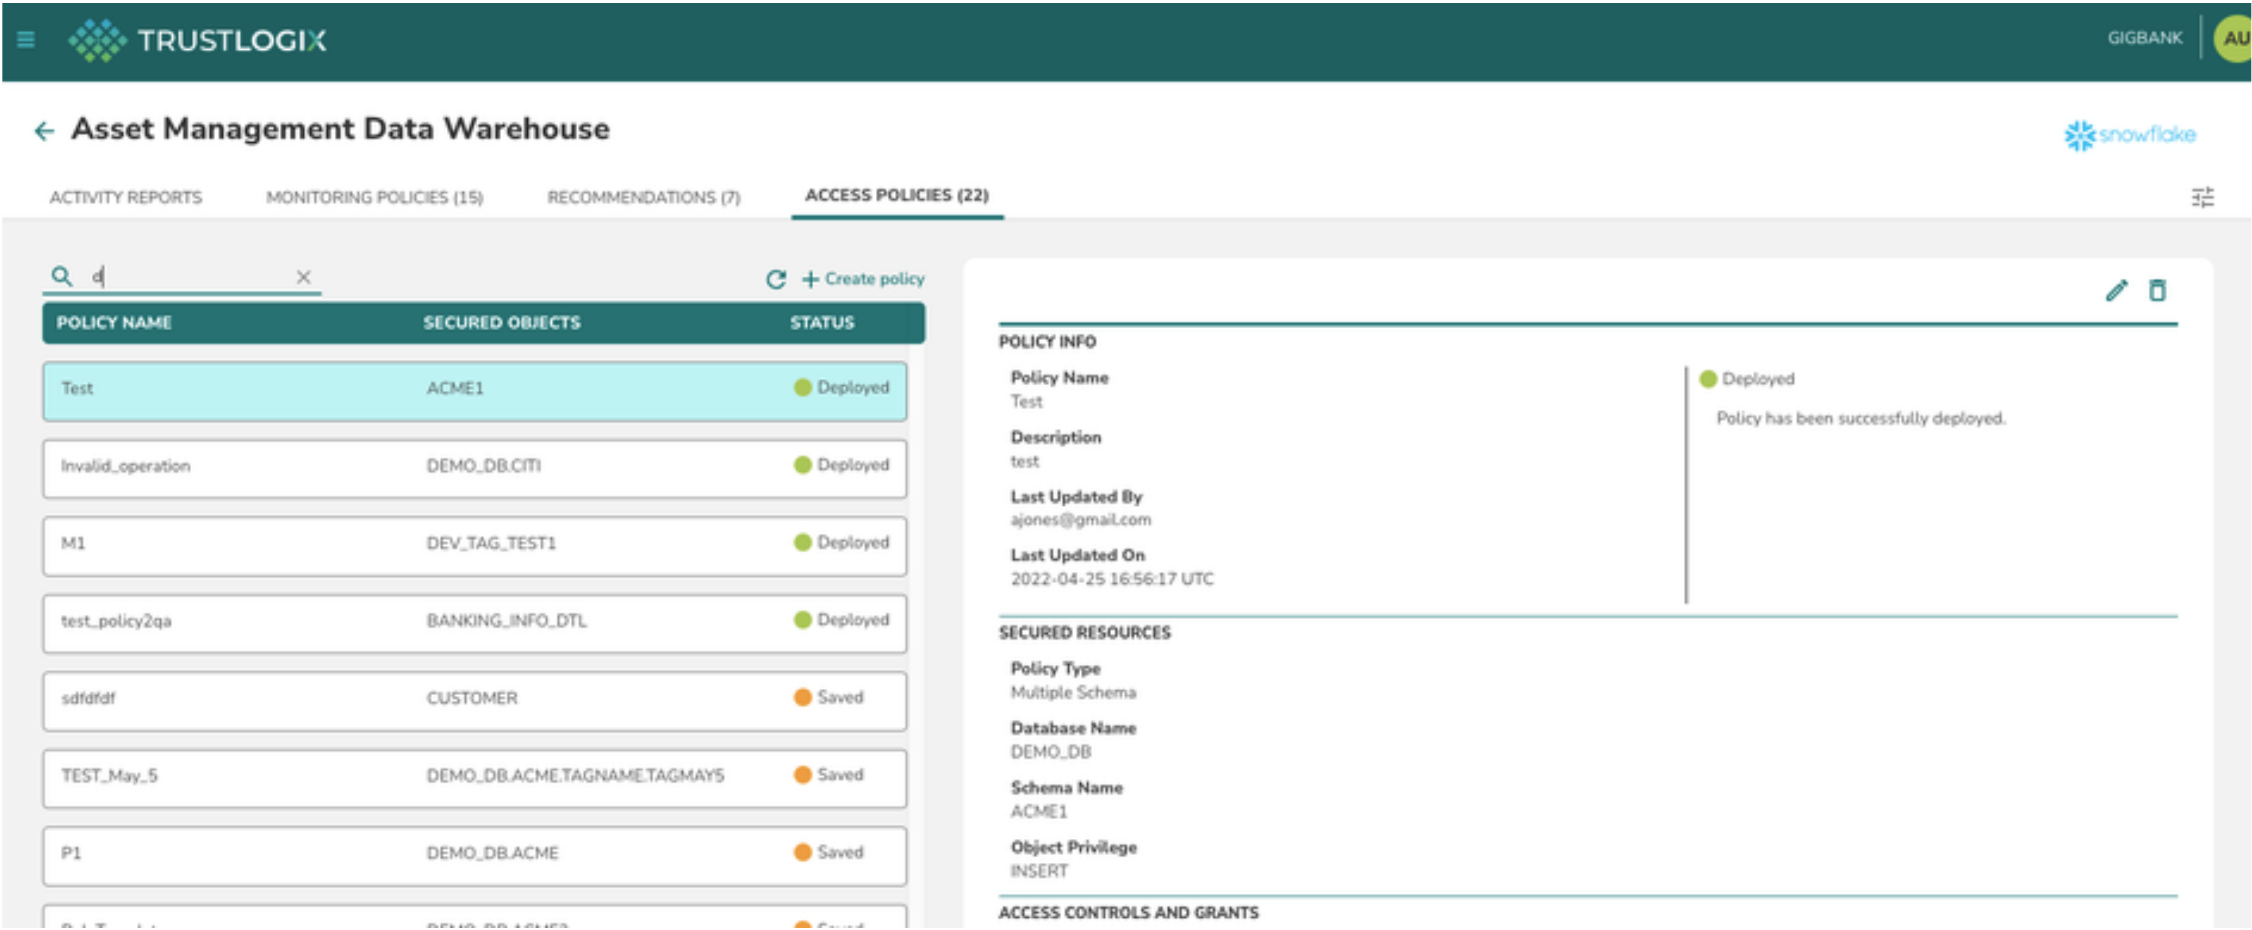
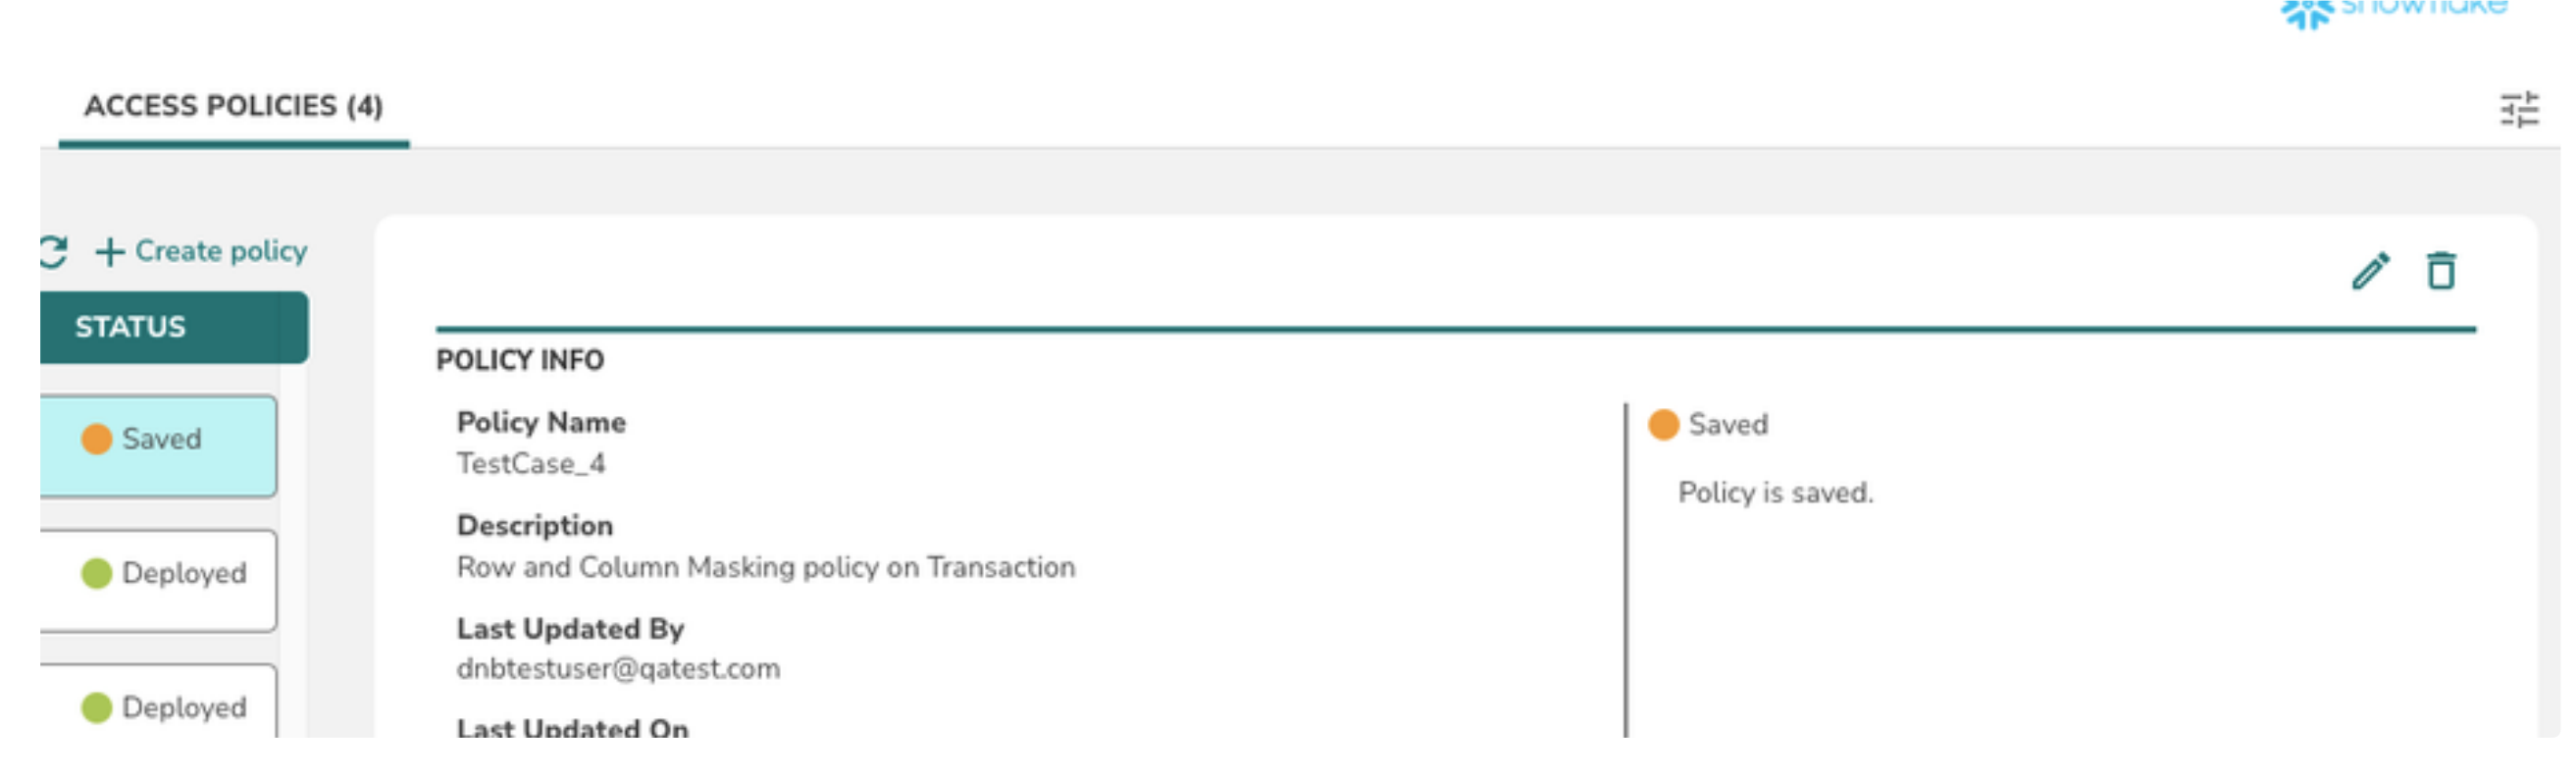
Create an Access Policy
The above page provides the list of defined policies as well as the link to create or edit the access policies
To create a new Access policy click on + Create Policy link on the top of the policy list page.
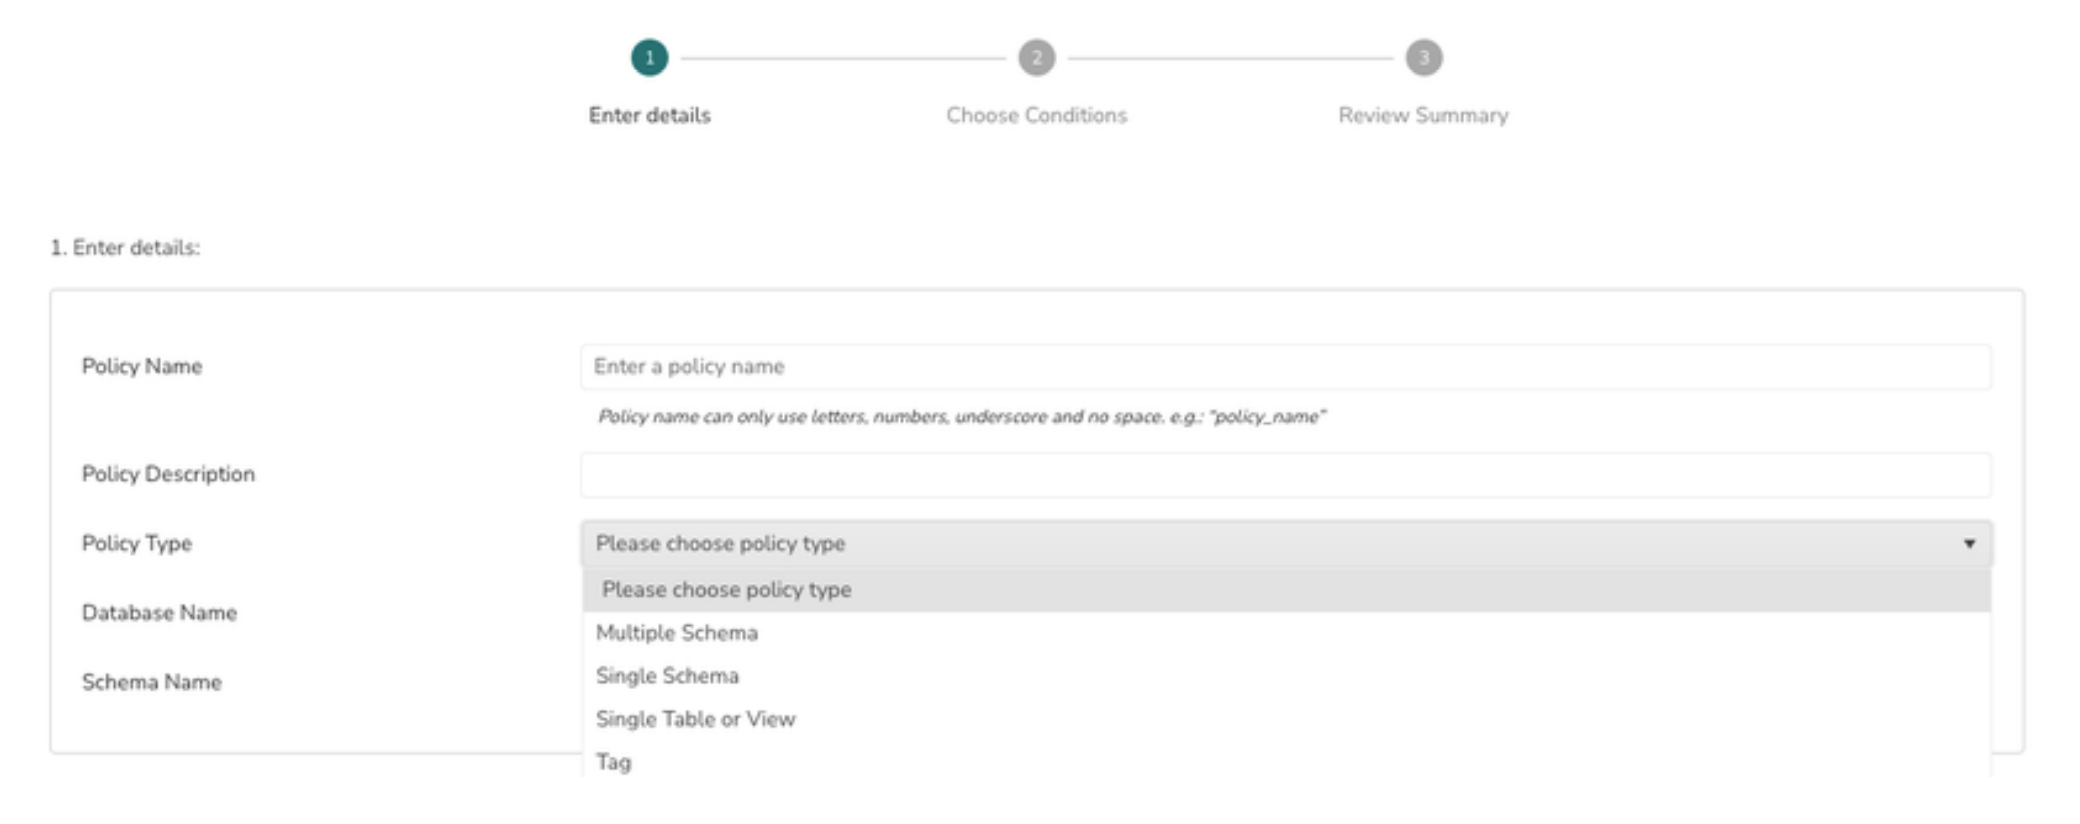
Create an Access Policy on objects at Database level
Use this policy type to grant usage on the Database and Schemas, Future Schemas
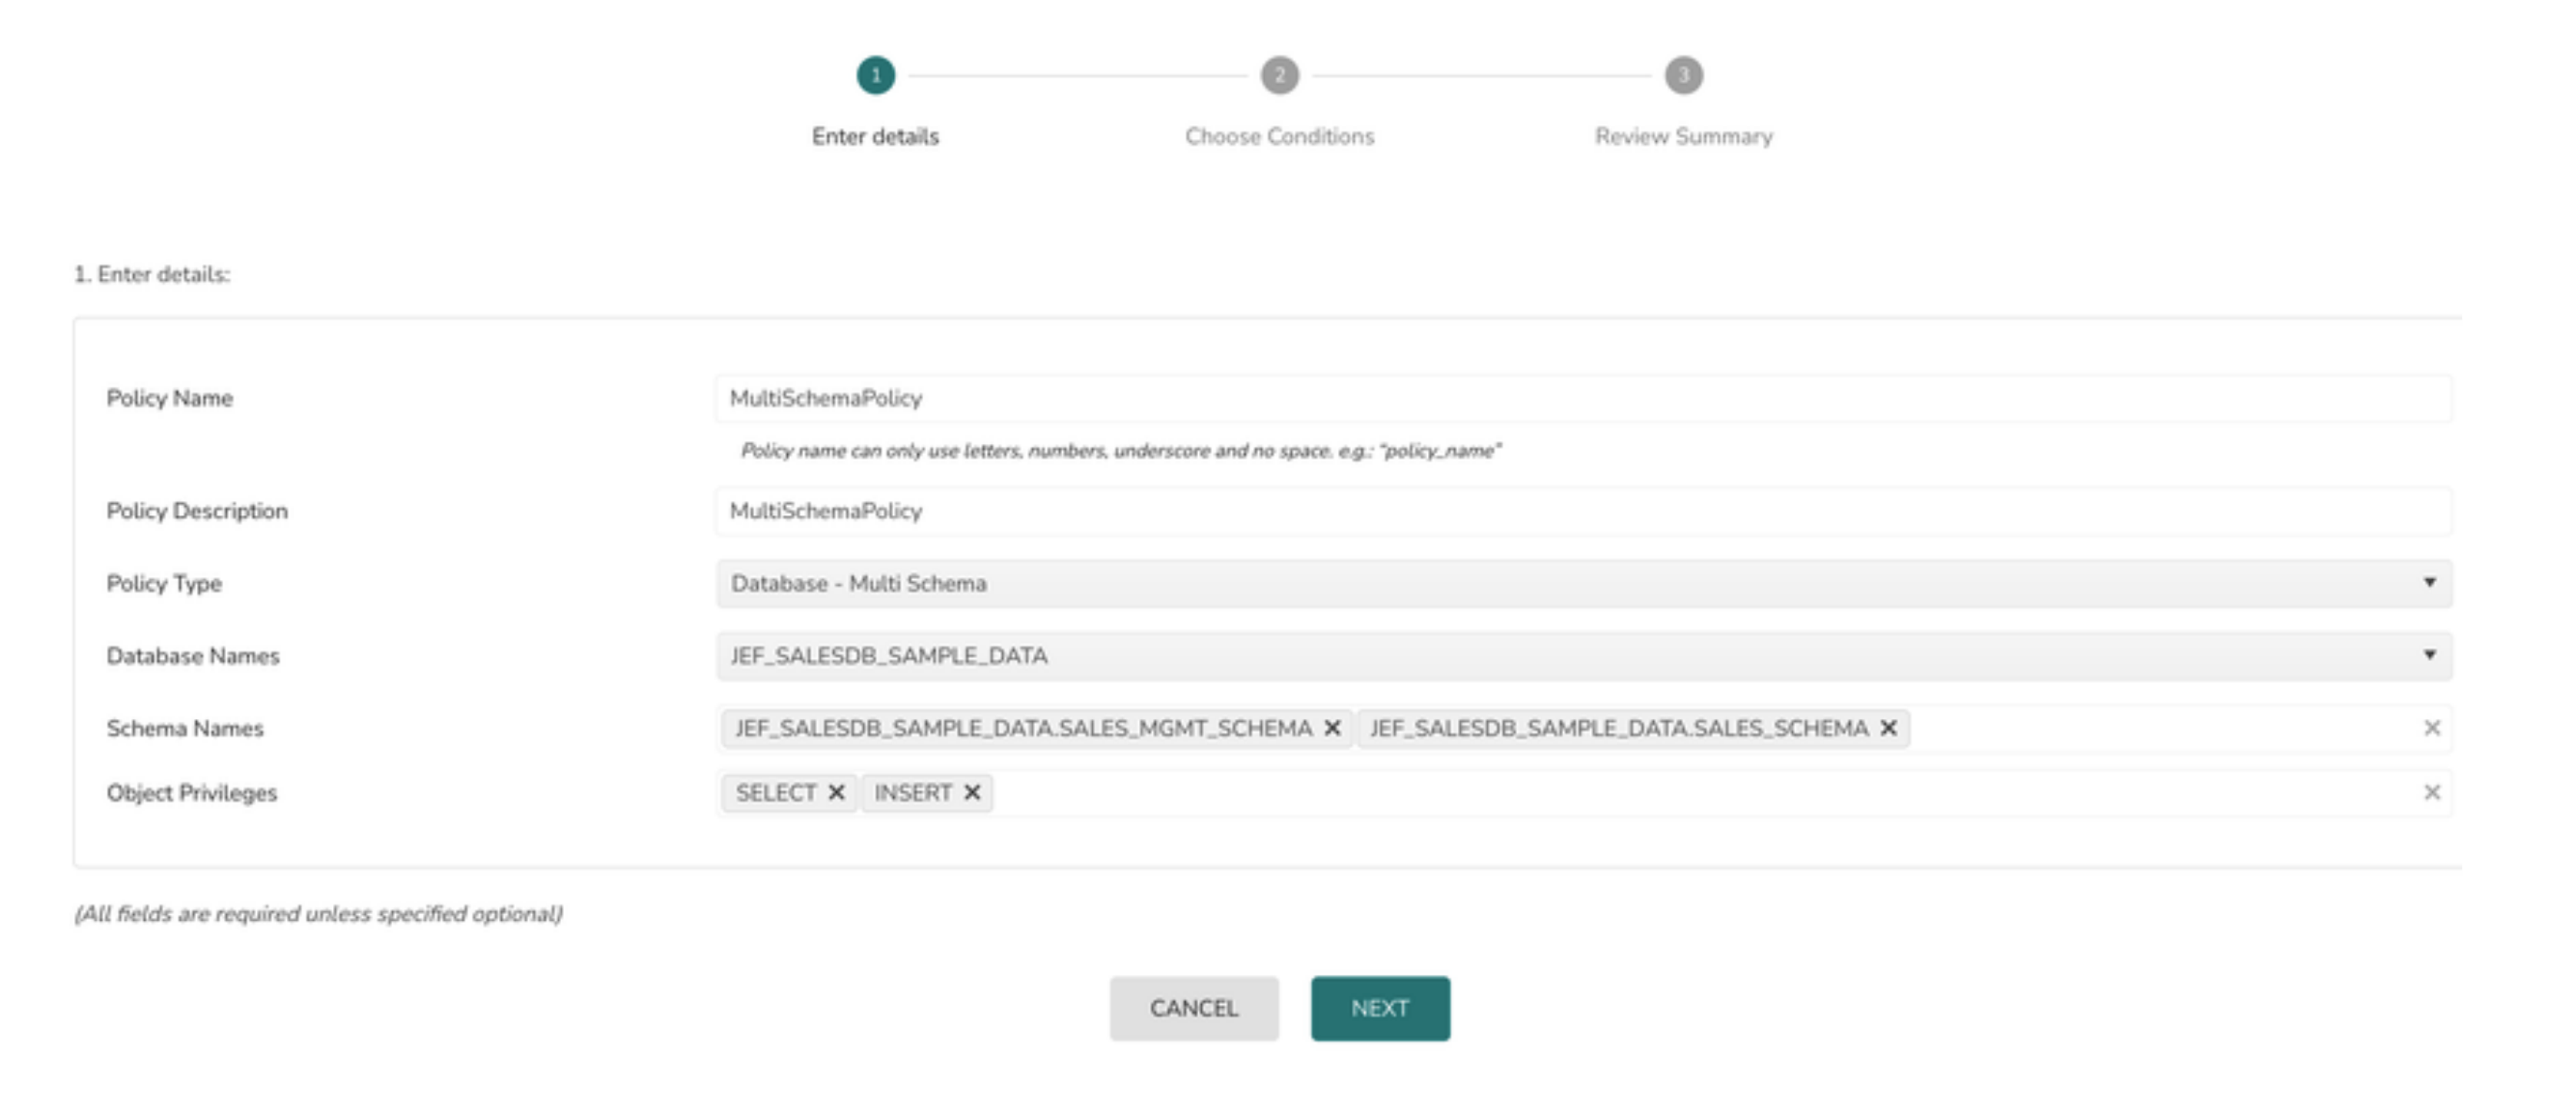
1> Select the Policy Type as Database - Multi Schema
2> Choose a Database from the drop down list of Database names
What to do if this list is empty. Please check if the role used to register the datasource (TLX_CP_ROLE) has the reference or usage permissions on Snowflake Database
3> Select the ALL option from schema
4> Select the appropriate privileges from the object privilege list
5> Click on the Next button
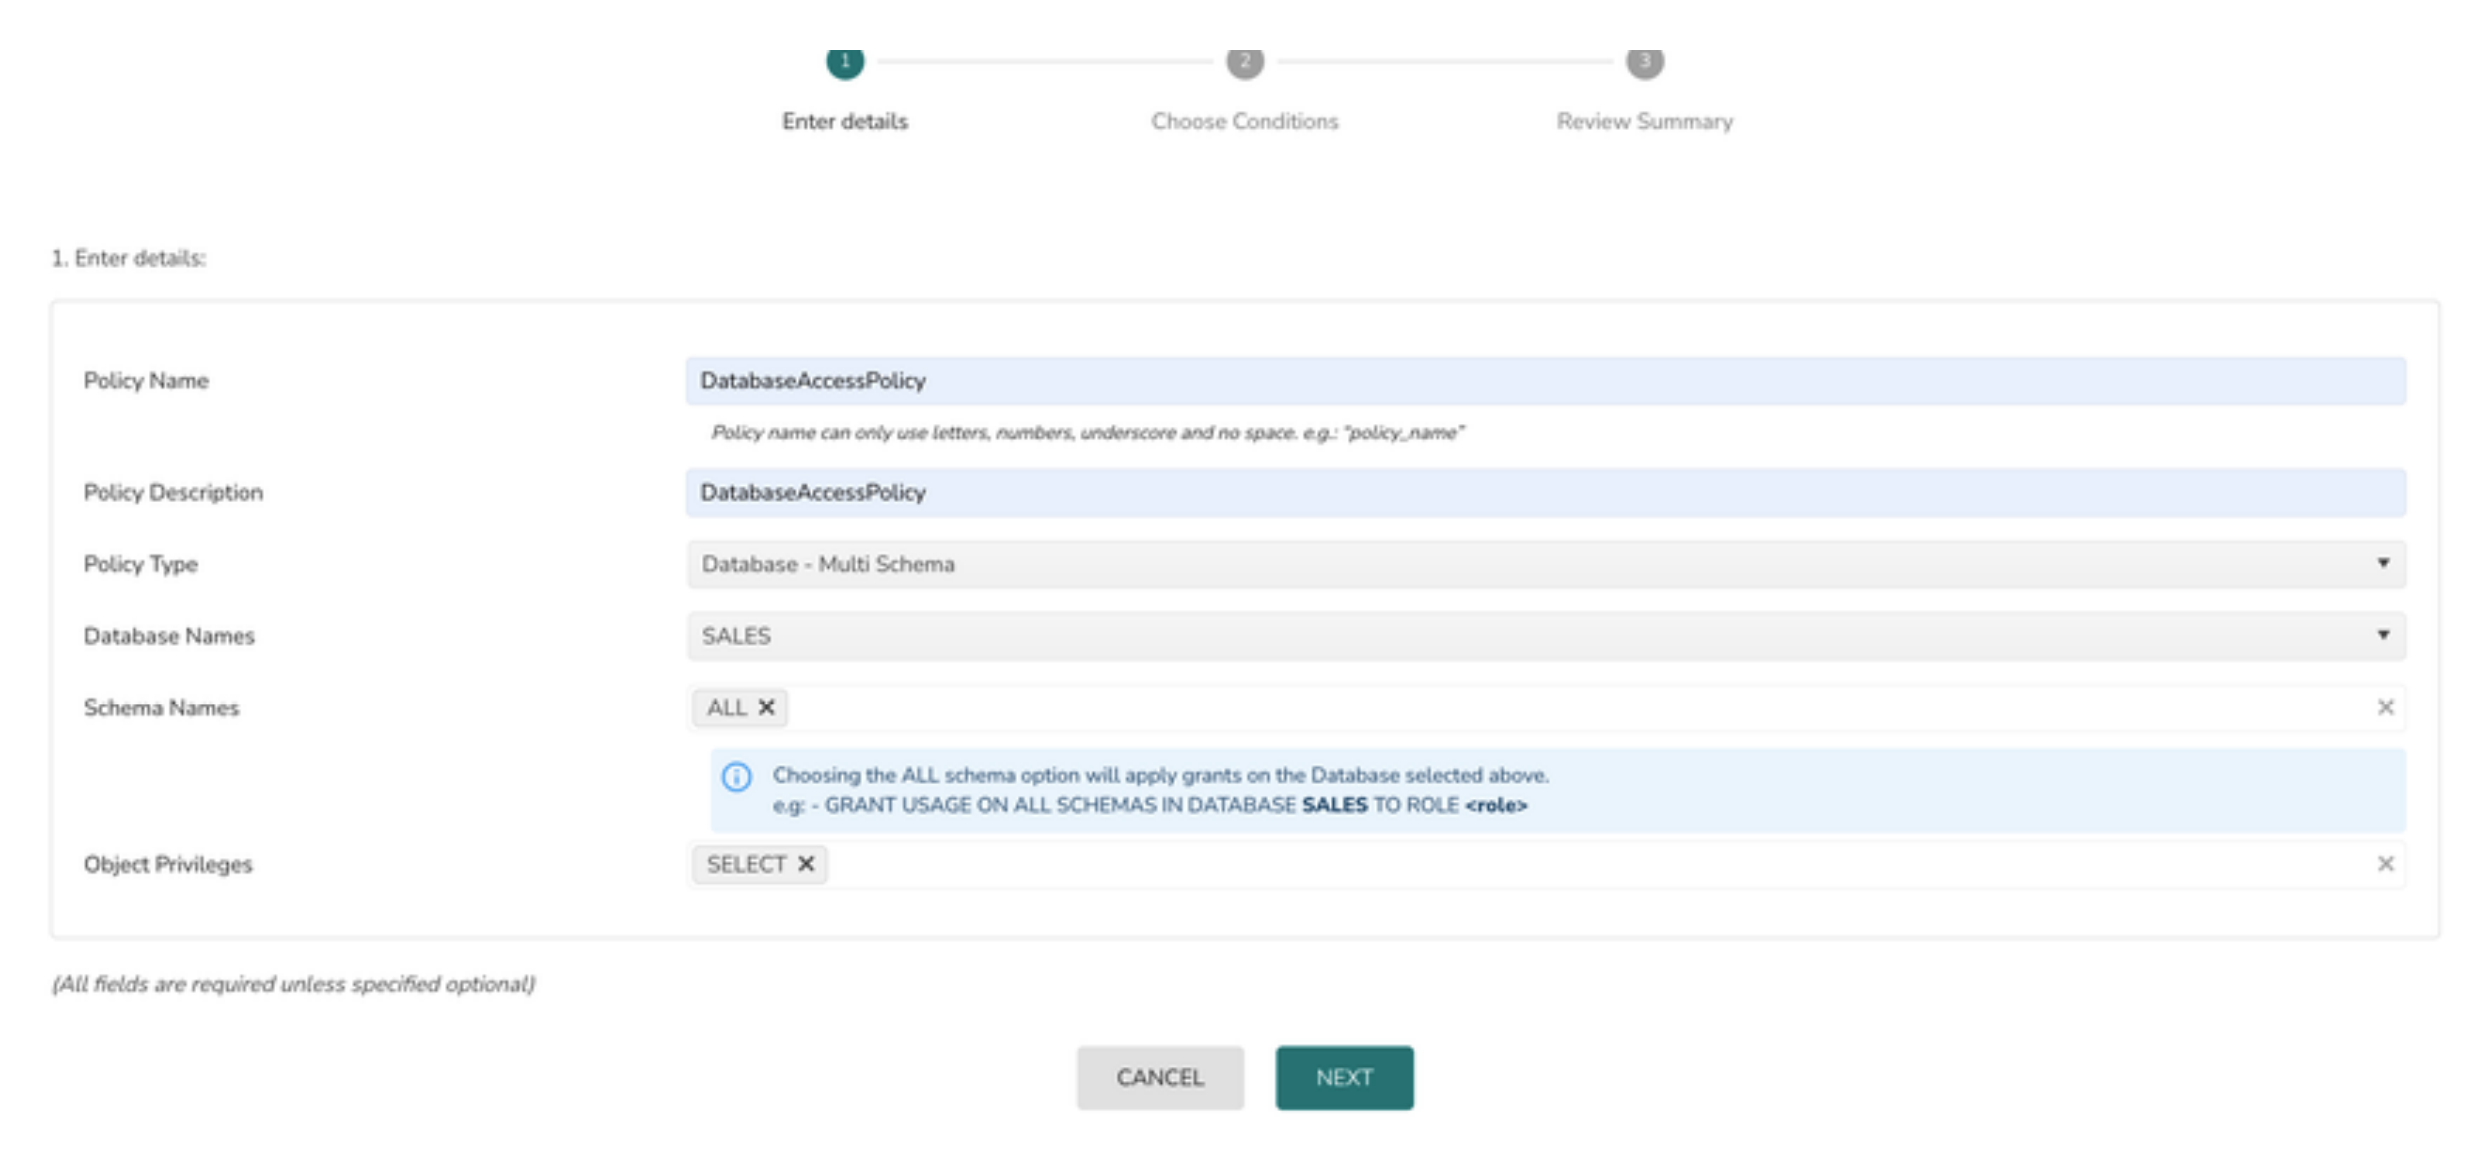
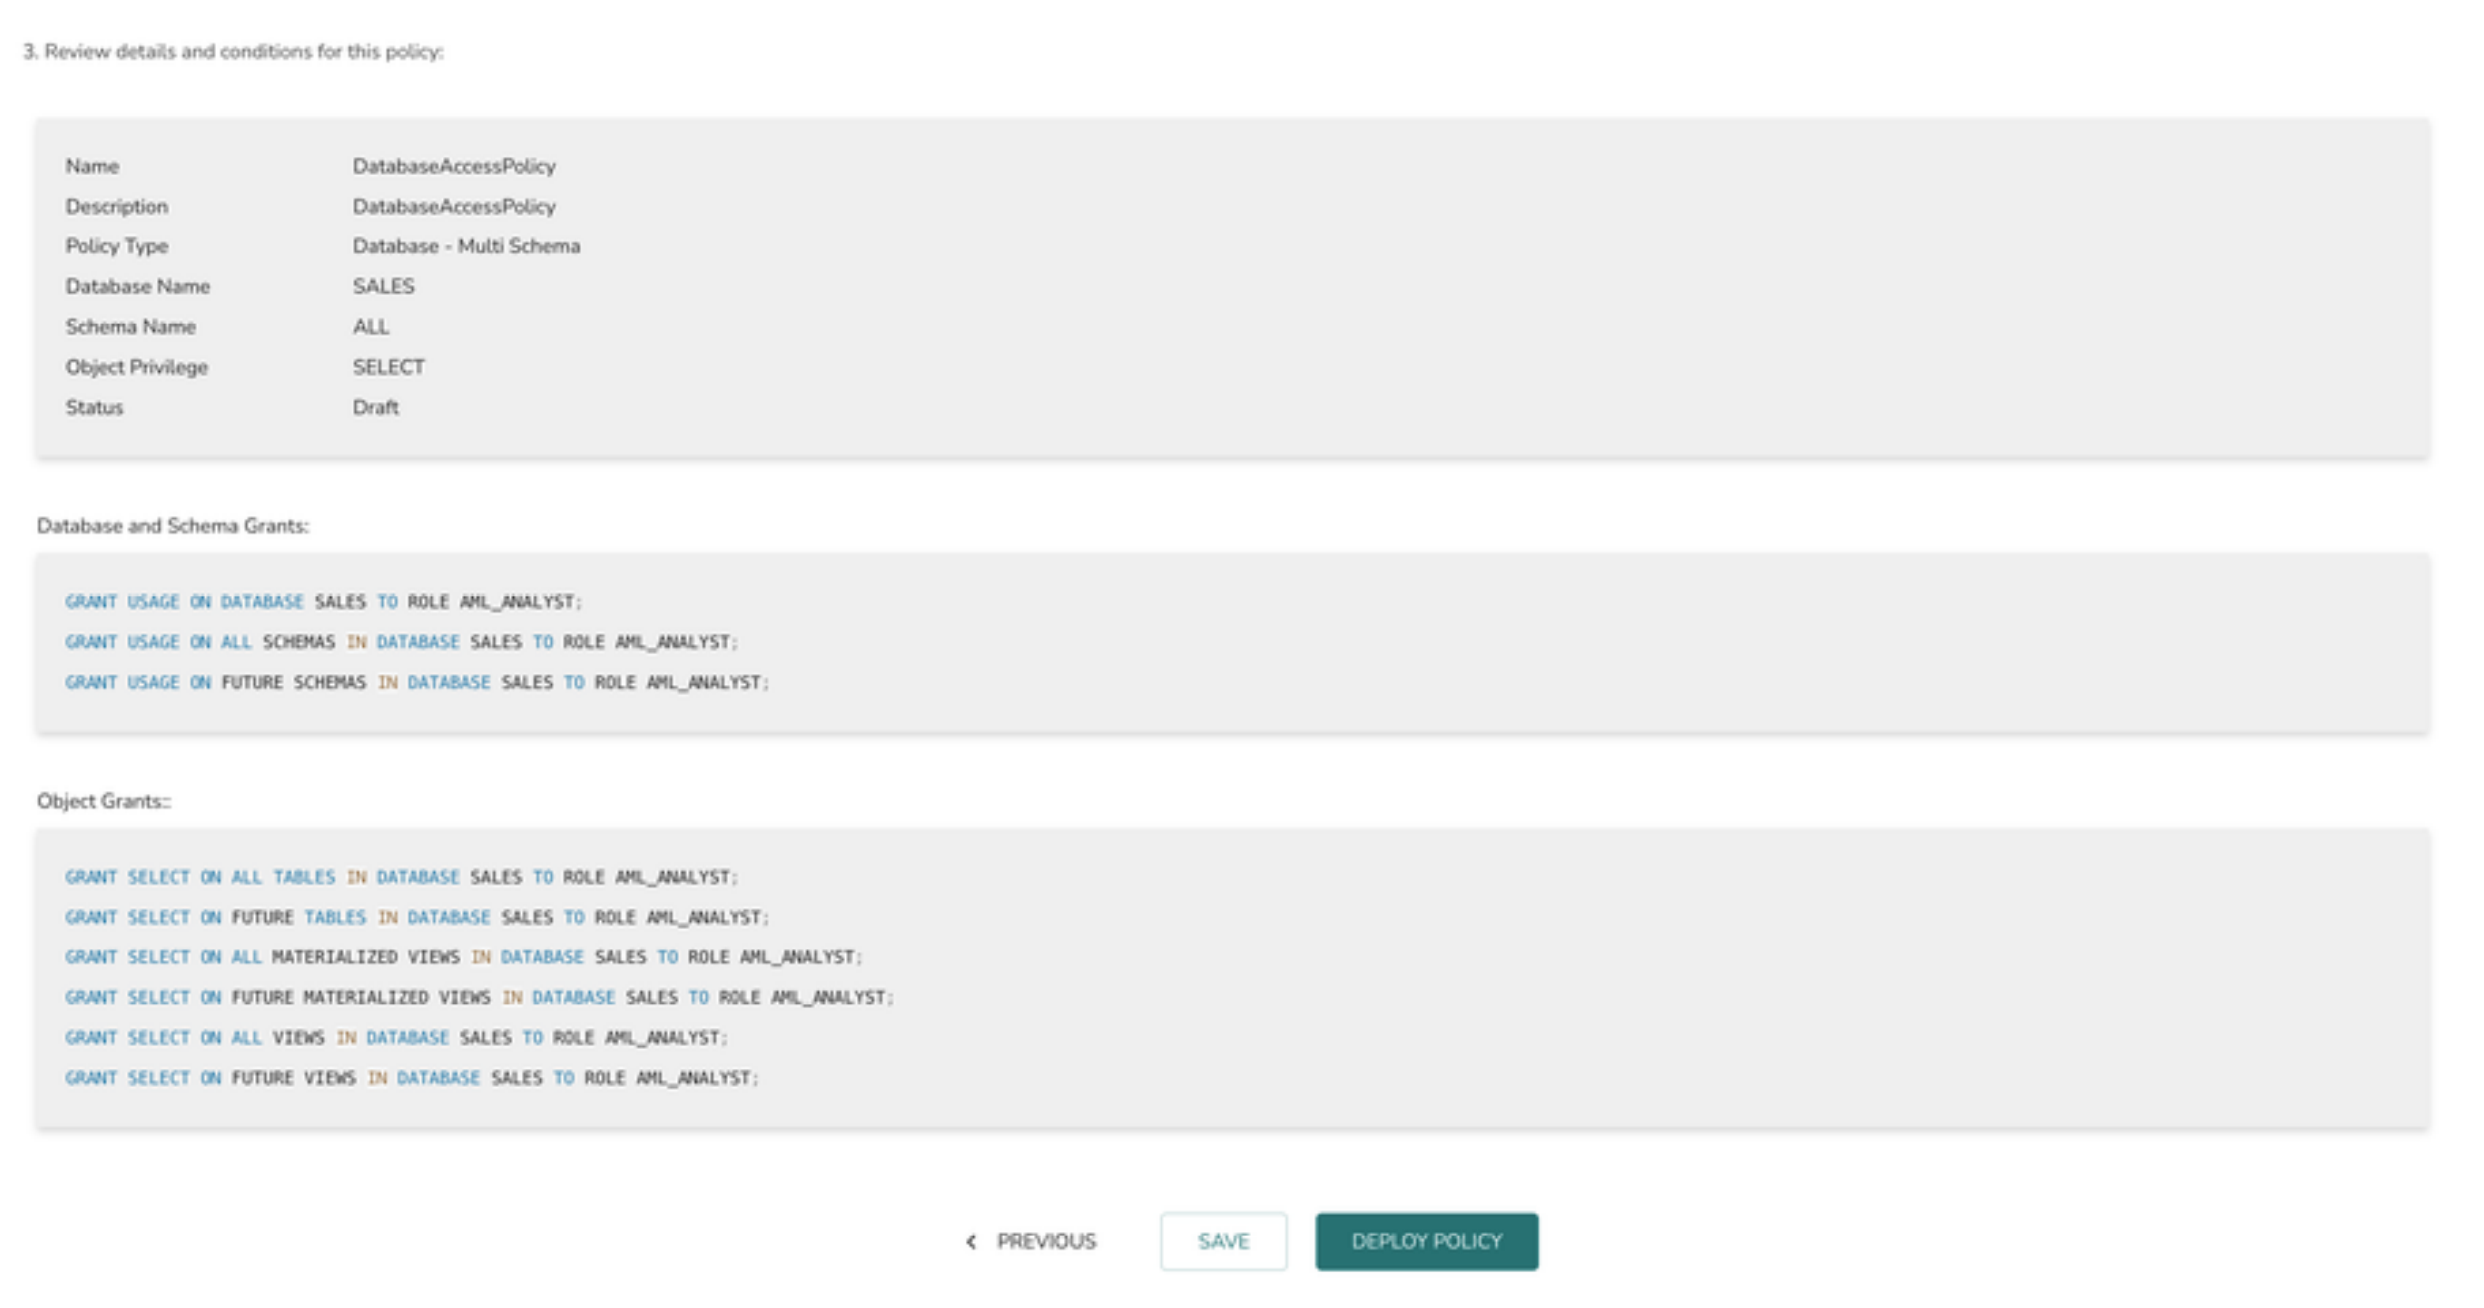
Implicit Grants generated
GRANT USAGE ON DATABASE TO ROLE ;
GRANT USAGE ON ALL SCHEMAS IN DATABASE TO ROLE ;
GRANT USAGE ON FUTURE SCHEMAS IN DATABASE TO ROLE ;
6> Select the Role from the drop down and click on the Next button
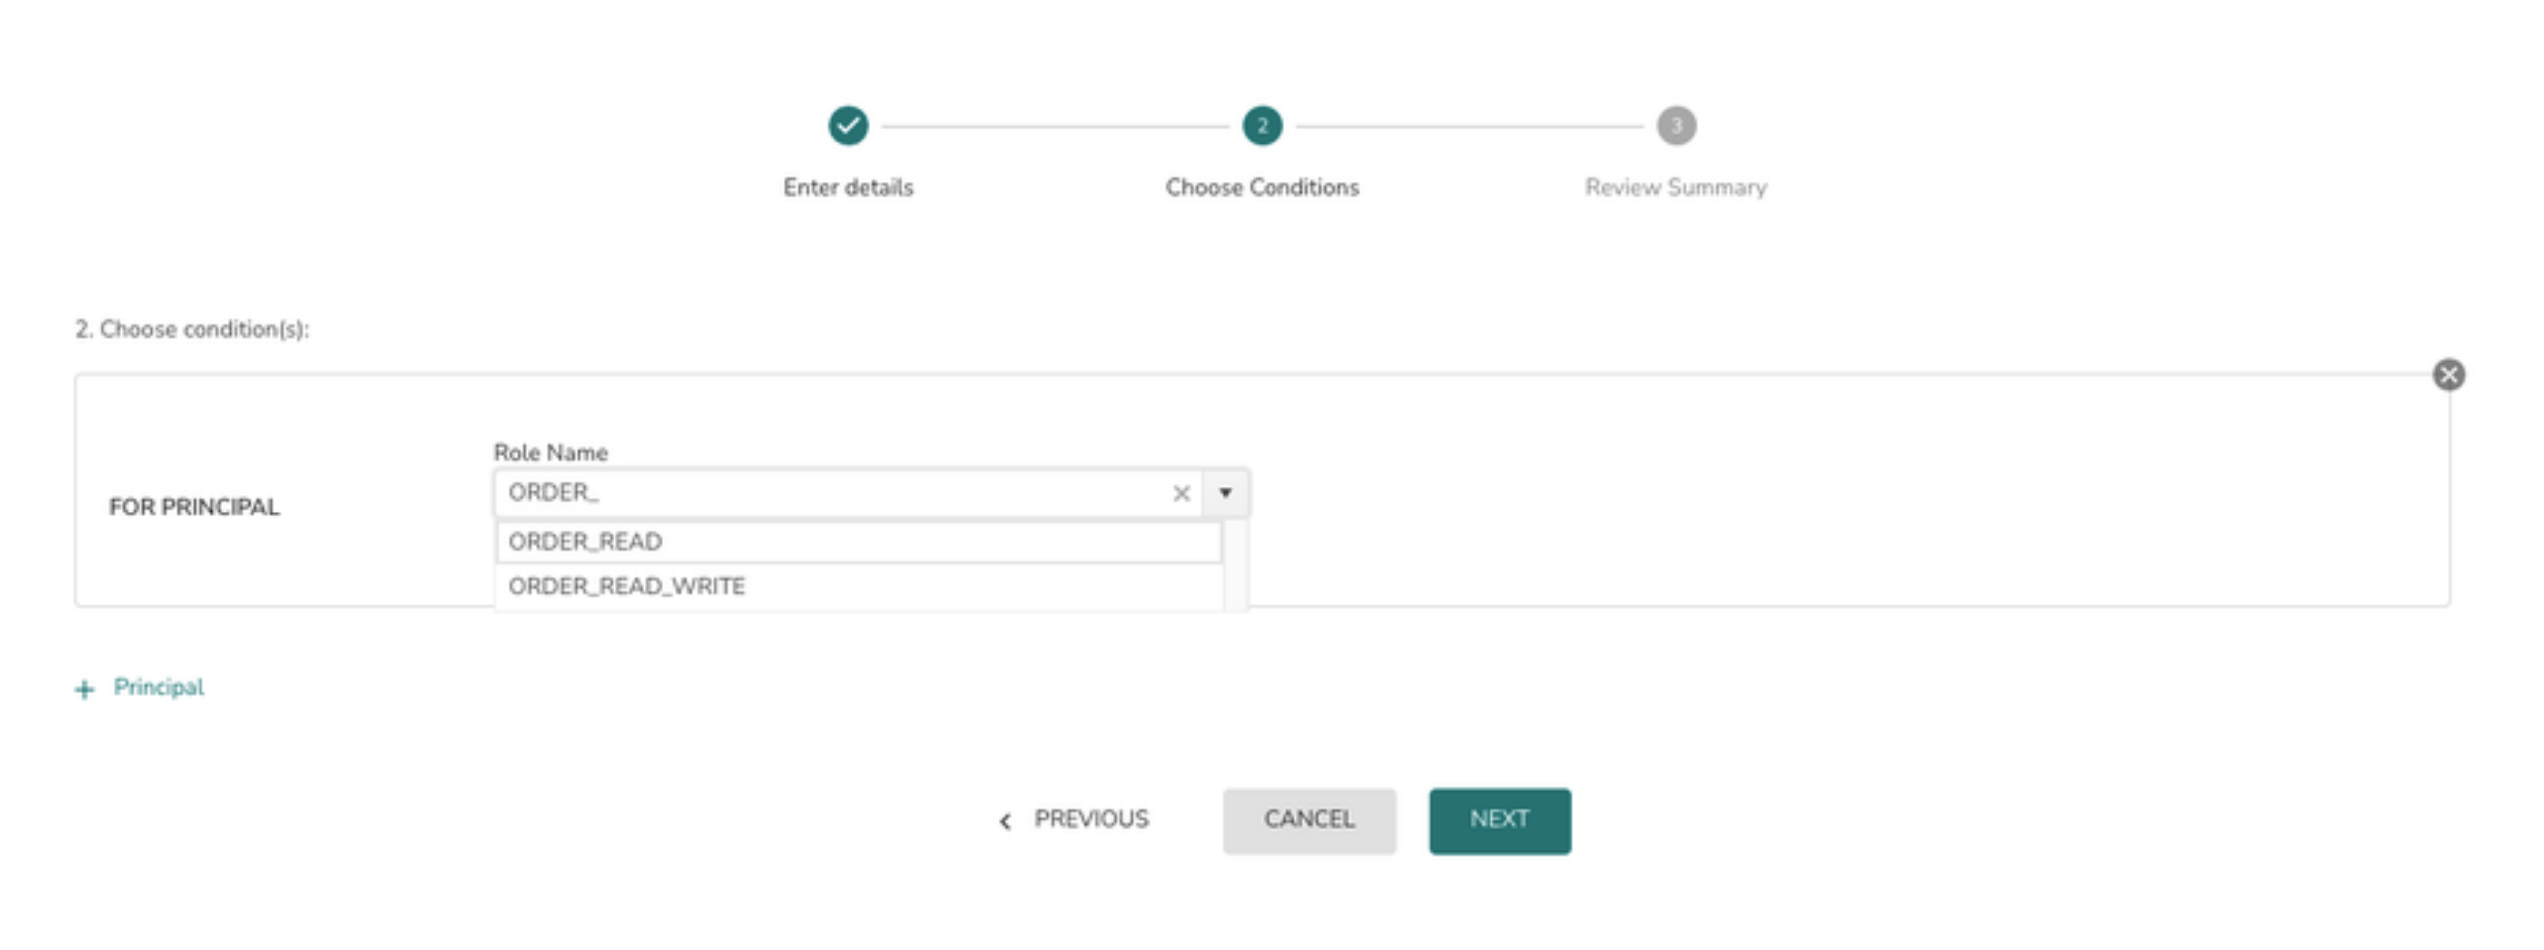
To add more roles to the policy (assign grants) click on + Principal and follow #6 again.
7> The final page displays the summary view of the policy definition. Click on the “DEPLOY POLICY” button to deploy the policy or “SAVE” button to save the policy and deploy it later.
Clicking on Next will Save the policy and generate the grants.
Create an Access Policy on objects at Schema level
To create any policy on specific schemas
1> Select the Policy Type as Database - Multi Schema
2> Select the Database from the database dropdown
3> Select one or more schemas from schema dropdown
What to do if this list is empty. Please check if the role used to register the datasource (TLX_CP_ROLE) has the reference or usage permissions on Snowflake Database and usage on Schemas
4> Select the appropriate privileges from the object privilege list
5> Click on the Next button
6> Select the Role from the drop down and click on the Next button
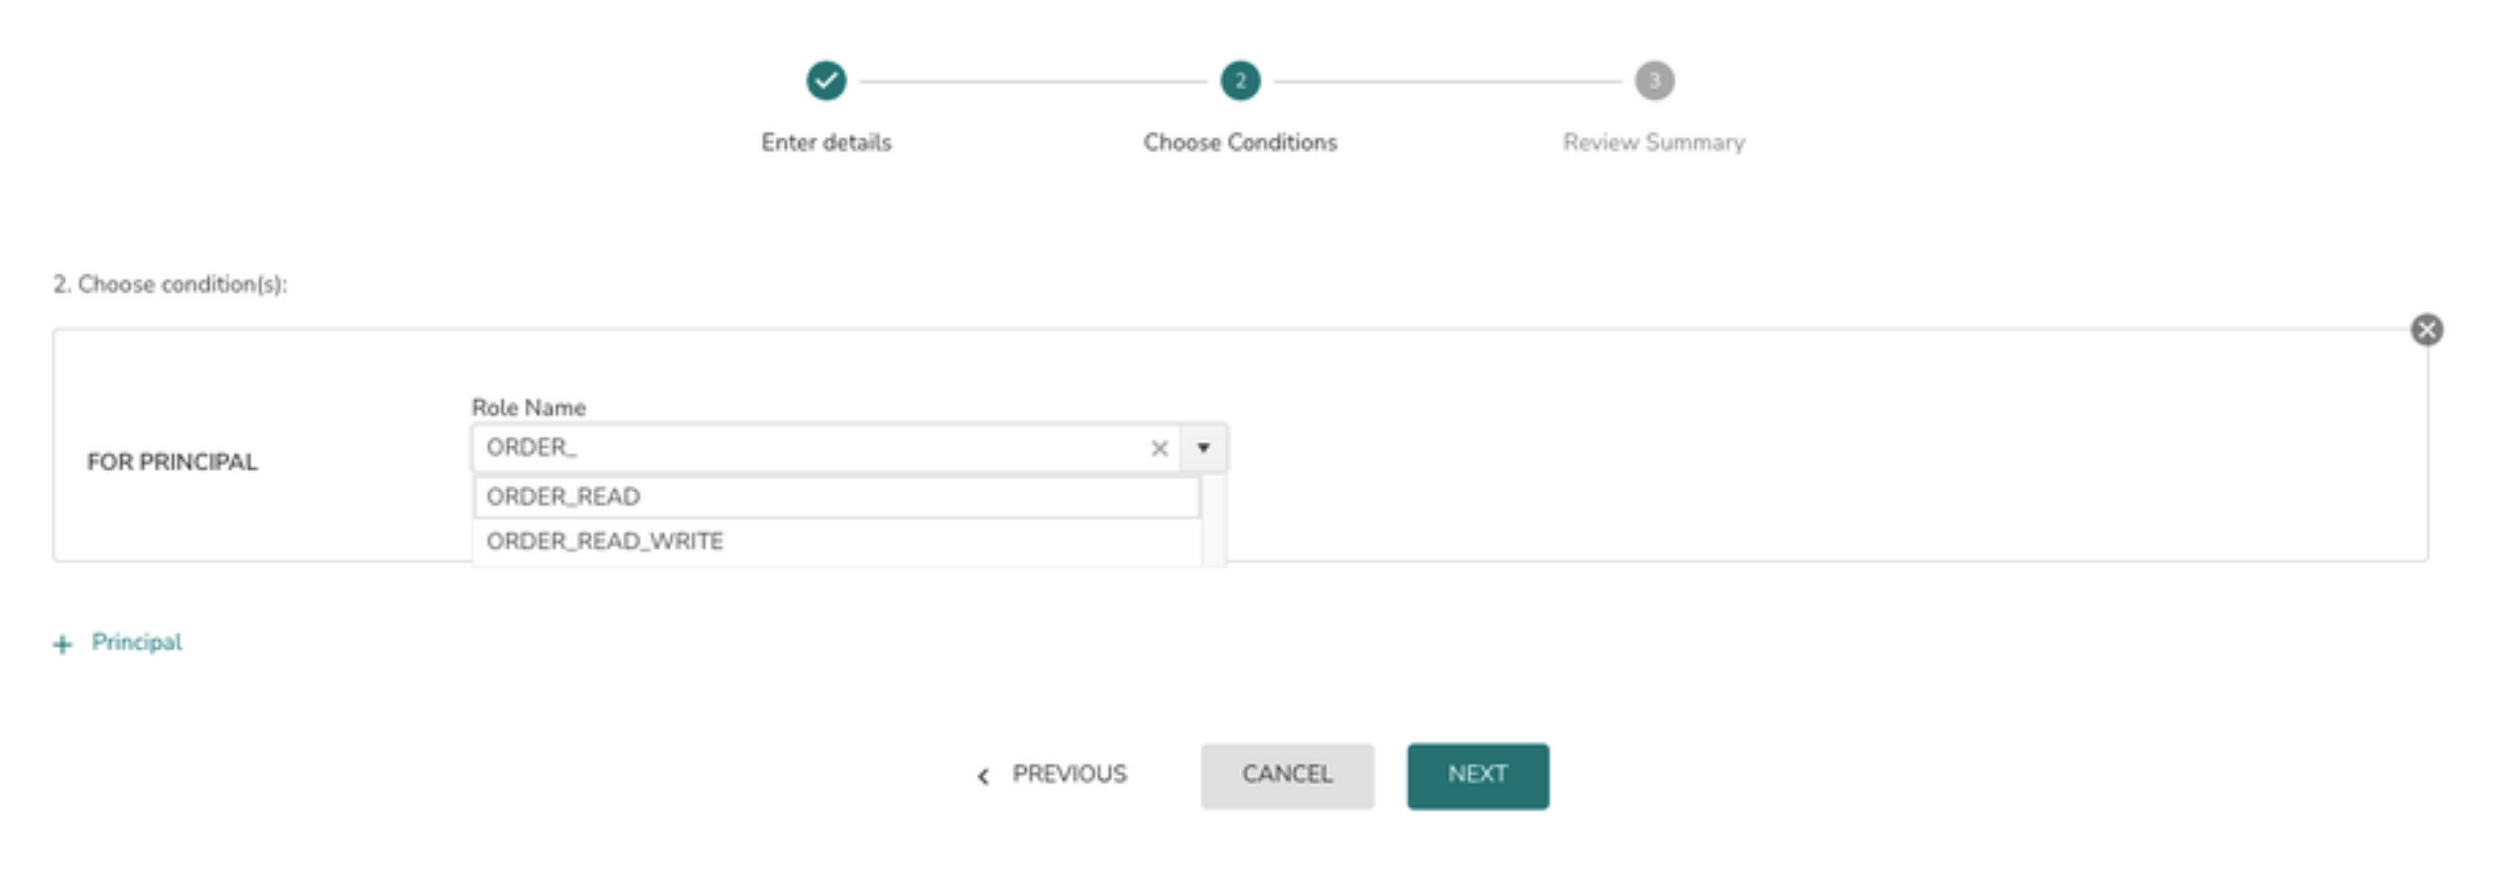
To add more roles to the policy(assign grants) click on + Principal and follow #6 again.
7> The final page displays the summary view of the policy definition. Click on the “DEPLOY POLICY” button to deploy the policy or “SAVE” button to save the policy and deploy it later.
Implicit grants generated
GRANT USAGE ON DATABASE TO ROLE ;
GRANT USAGE ON SCHEMA TO ;
Create an Access Policy on multiple objects in a Single Schema
To create an Access policy on multiple objects in a schema (Table, View and Materialised view object types)
1> Select the Policy Type as Schema - MultiObject
2> Select the Database from the database drop down
3> Choose a schema from schema option drop down
4> Select a single or multiple objects
5> Select the appropriate privileges from the object privilege list
6> Click on the Next button

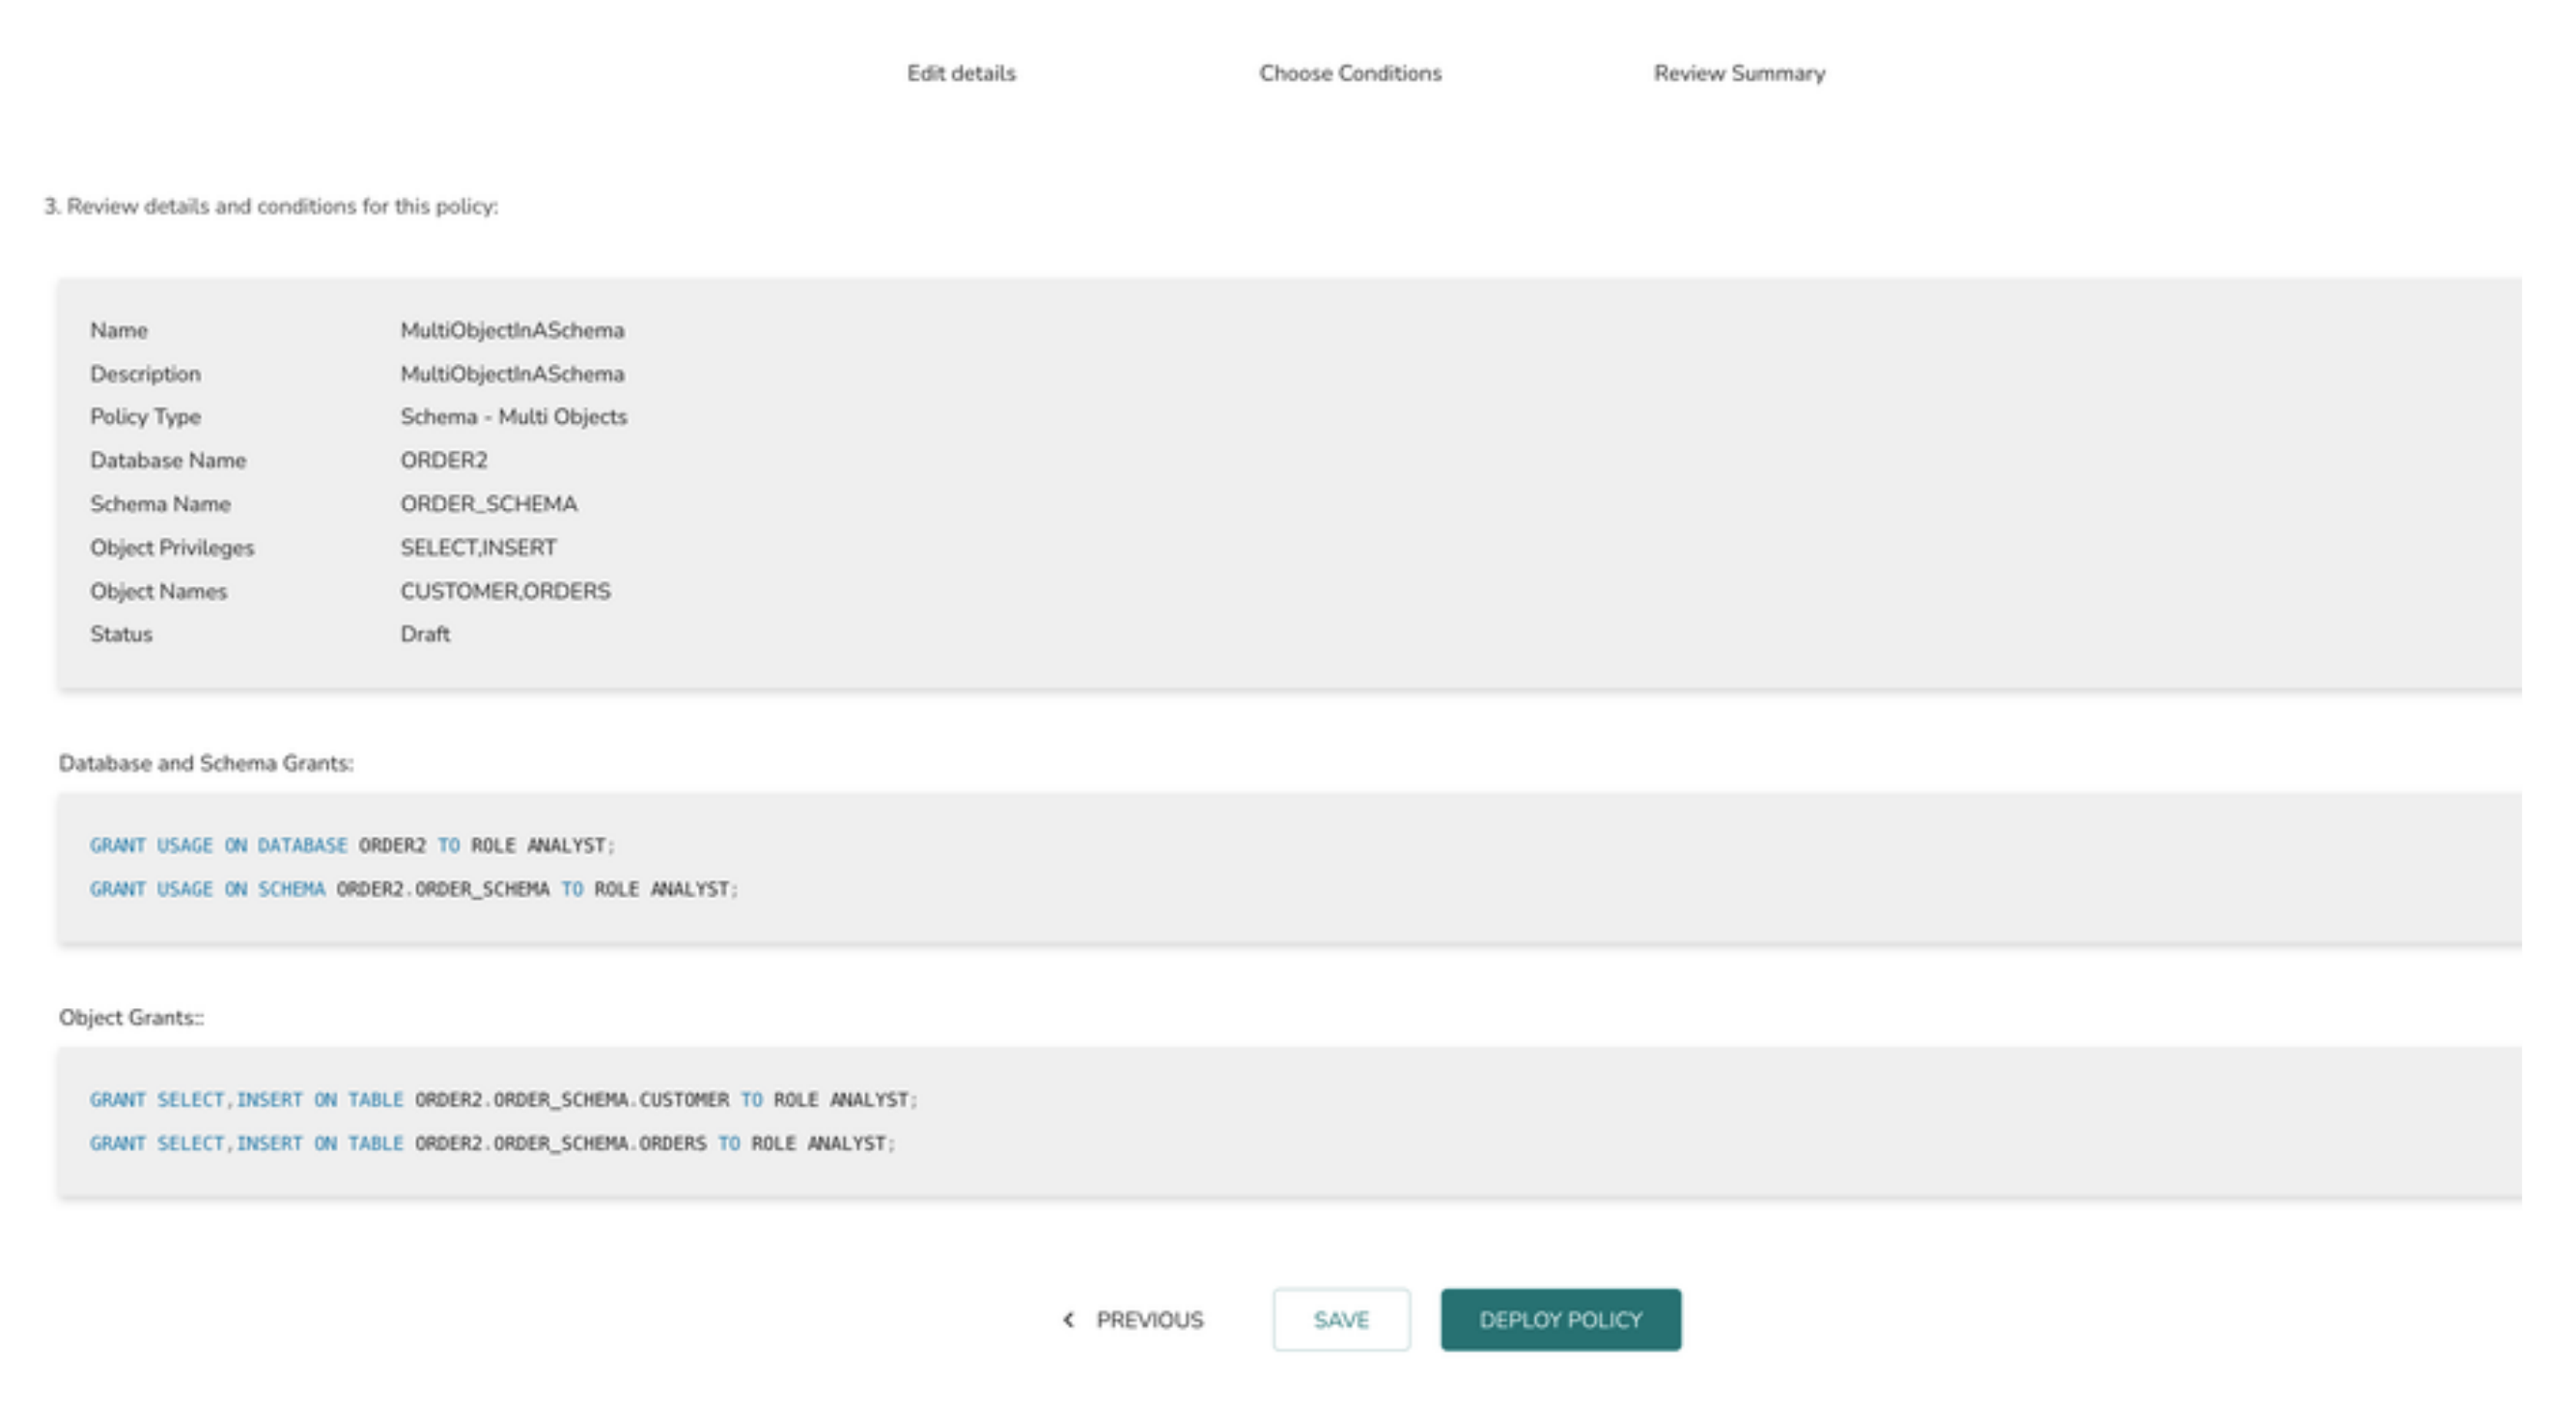
Implicit grants generated
GRANT USAGE ON DATABASE TO ROLE ;
GRANT USAGE ON SCHEMA TO ;
7> Select the Role from the drop down and click on the Next button
To add more roles to the policy(assign grants) click on + Principal and follow #7 again.
8> The final page displays the summary view of the policy definition. Click on “DEPLOY POLICY” button to deploy the policy or “SAVE” button to save the policy and deploy it later.
The privilege grants will be applied based on the type of objects selected in the drop down. In the above example SELECT & INSERT privilege options are selected for Table object type. Hence both the privileges are shown in the grant statement. If the object name selected is a view and the privileges selected are SELECT & INSERT then only the SELECT privilege is generated as INSERT privilege is not applicable for View object type.
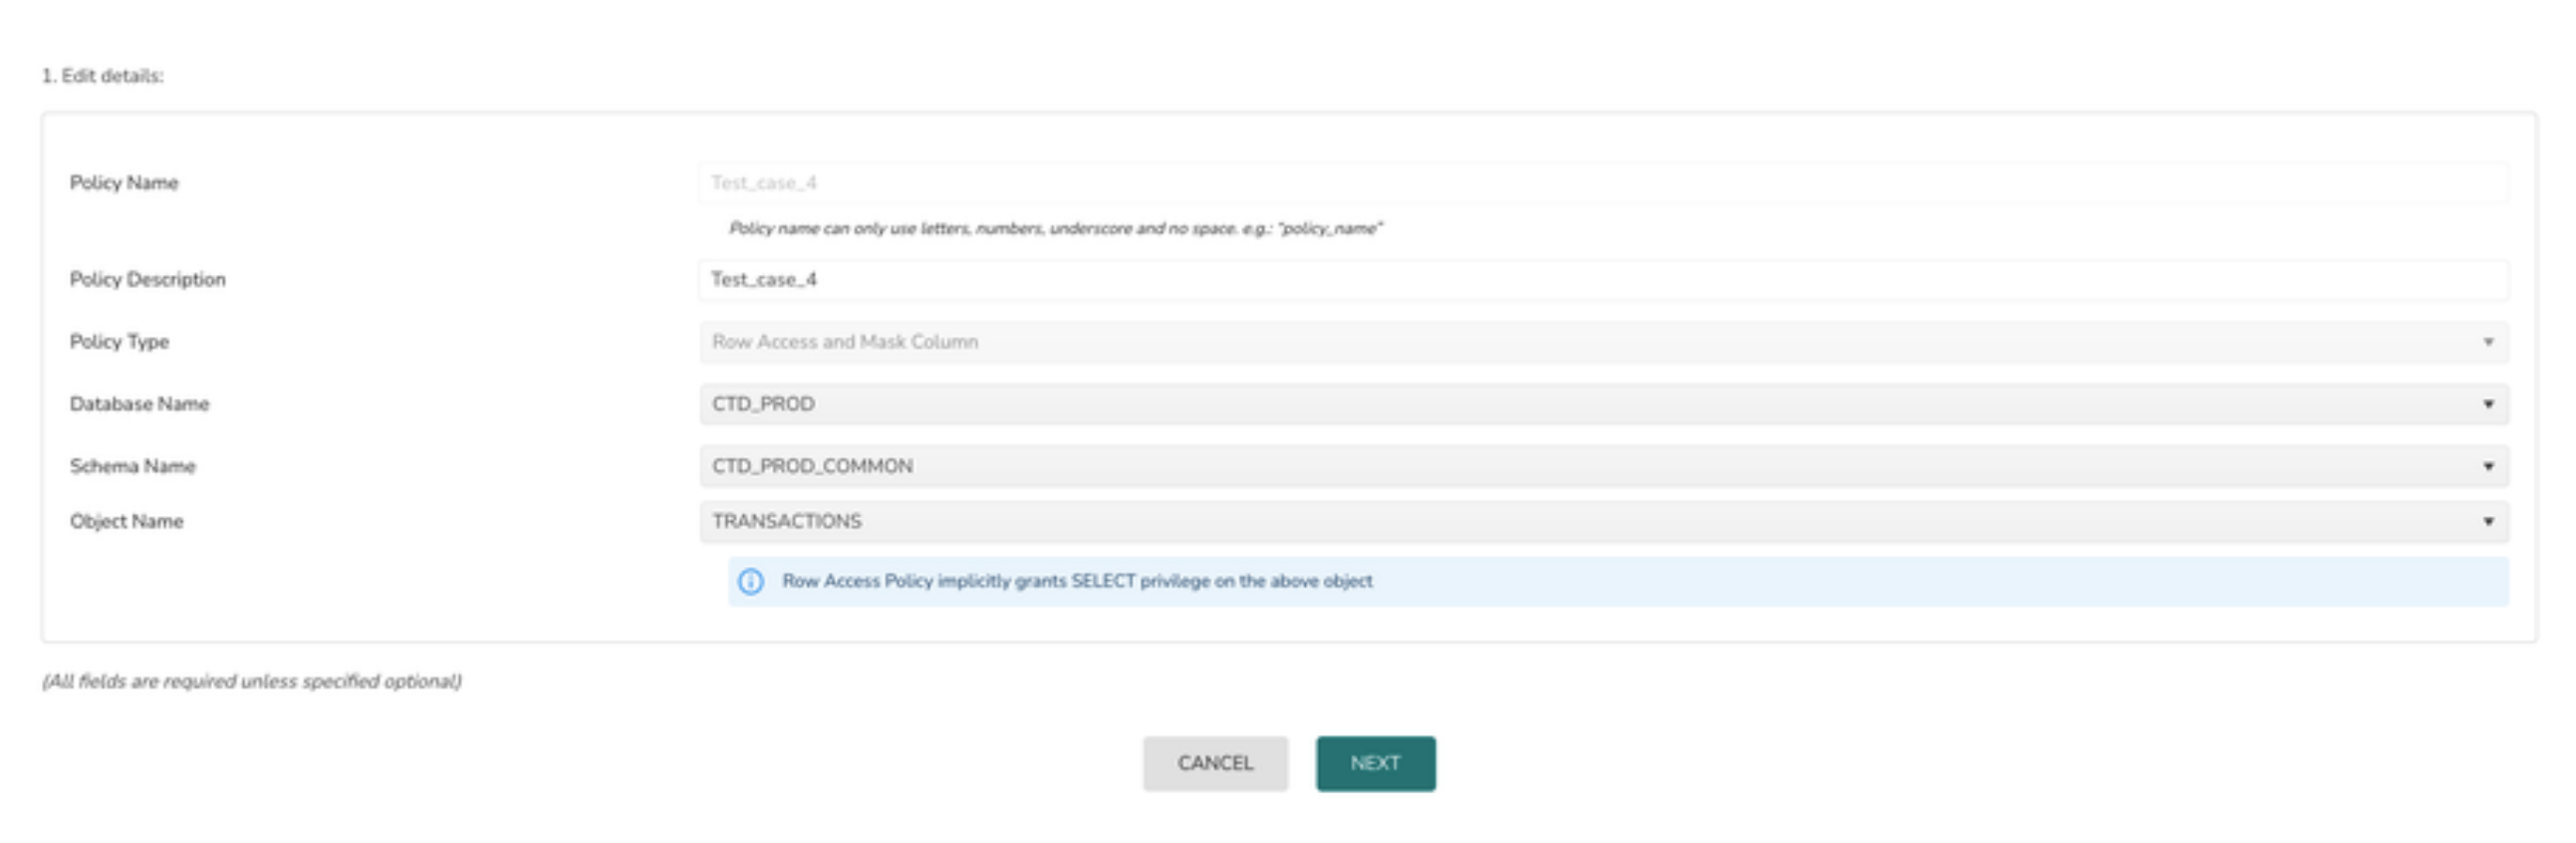
Create a Row Level Access Policy
1> Select the Policy Type as Row Access & Masking Policy
2> Select the Database from database drop down
3> Select the Schema from schema drop down
4> Select the object name from Object Name drop down
5> Click on the Next button
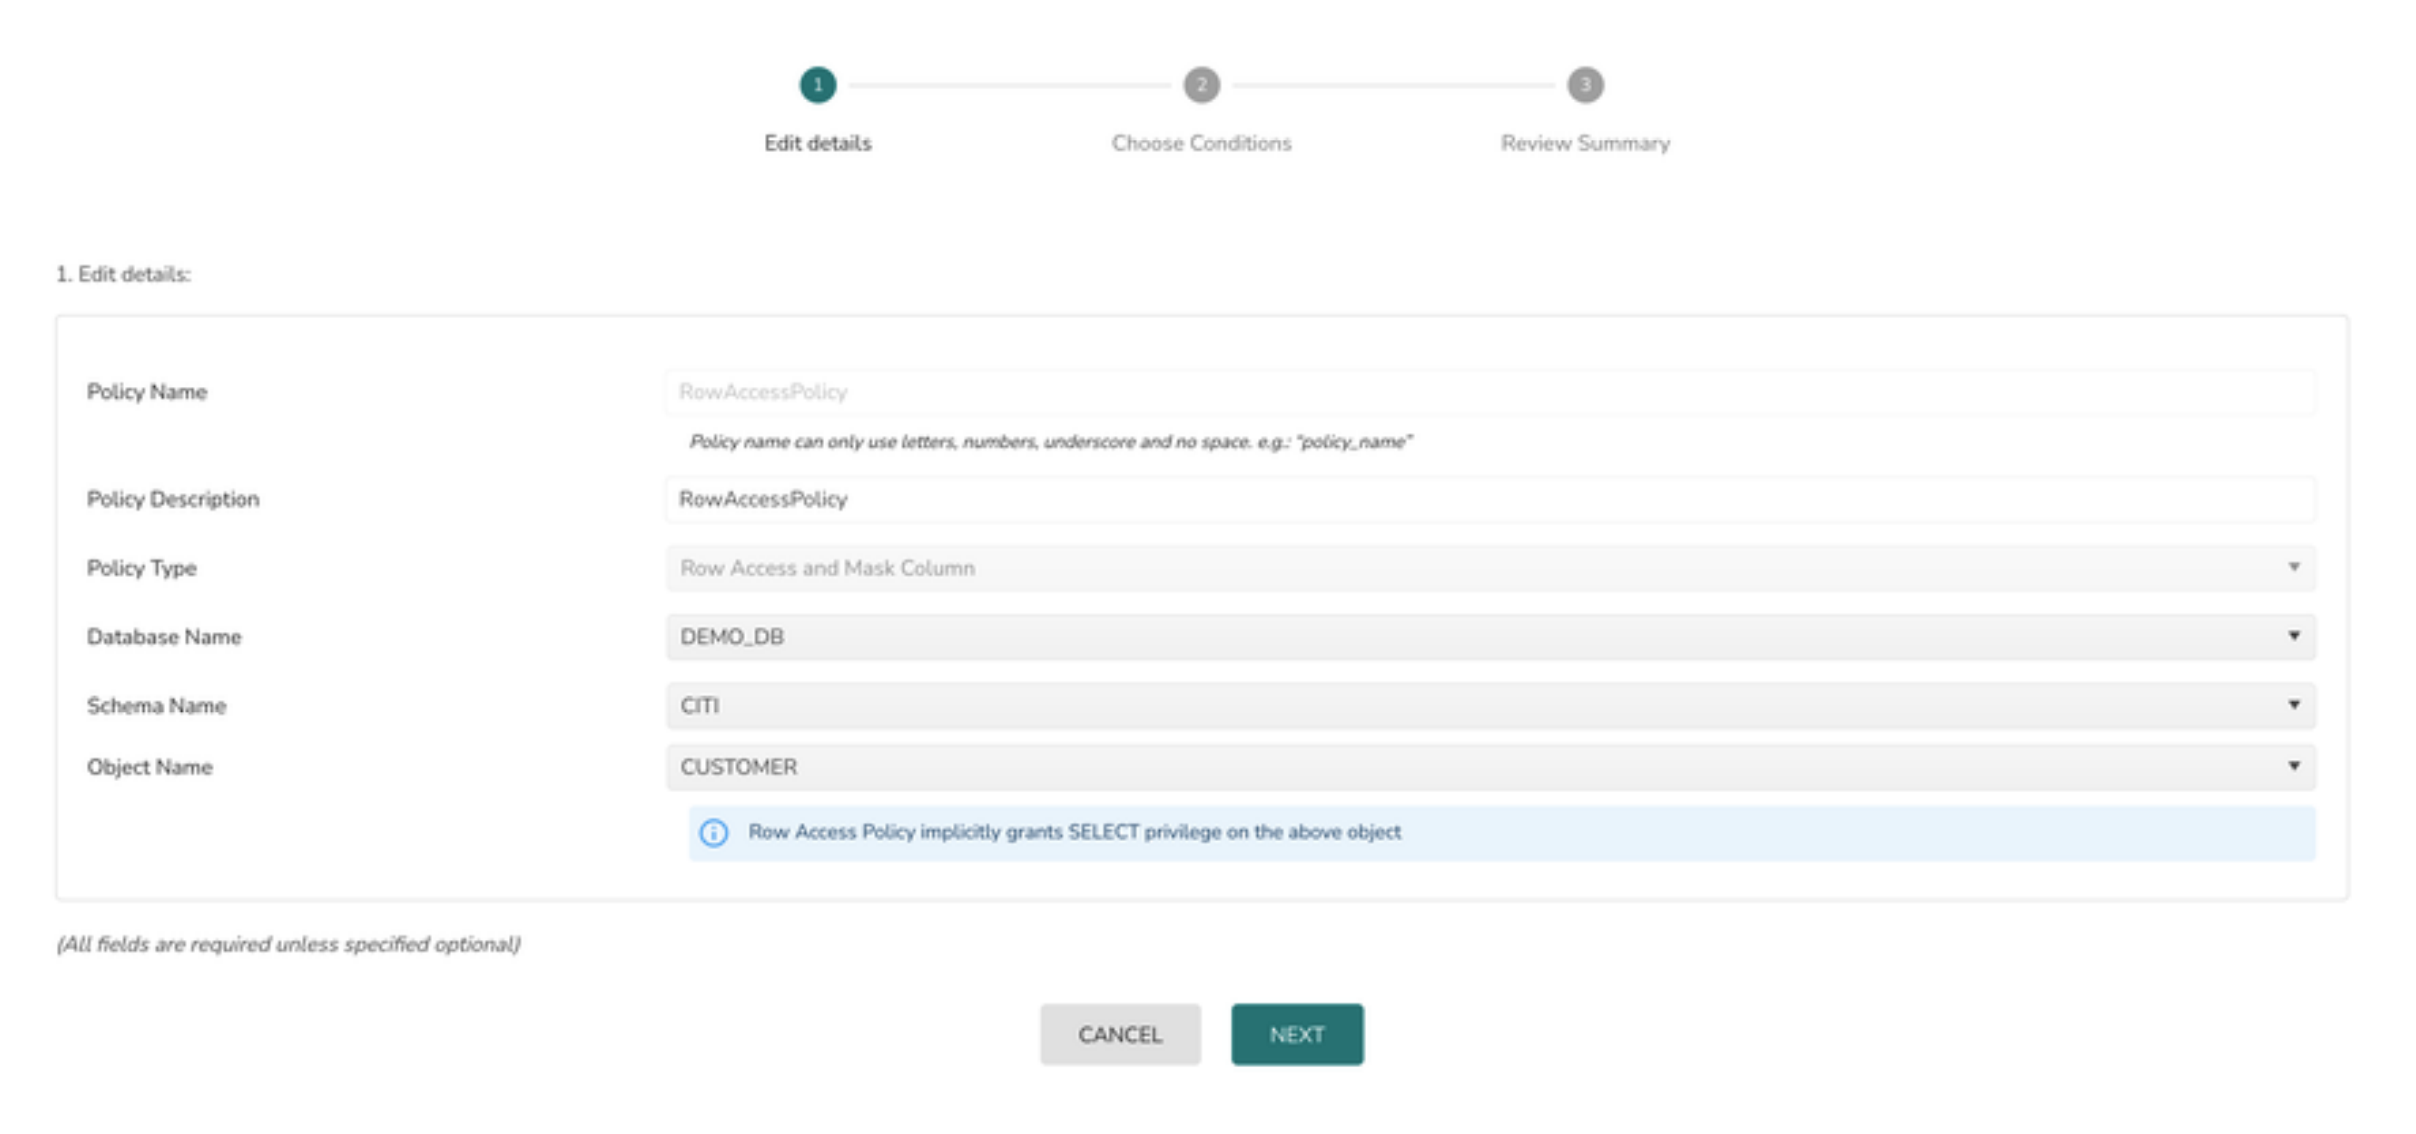
Implicit grants generated
GRANT USAGE ON DATABASE TO ROLE ;
GRANT USAGE ON SCHEMA TO ;
GRANT SELECT ON TABLE TO ;
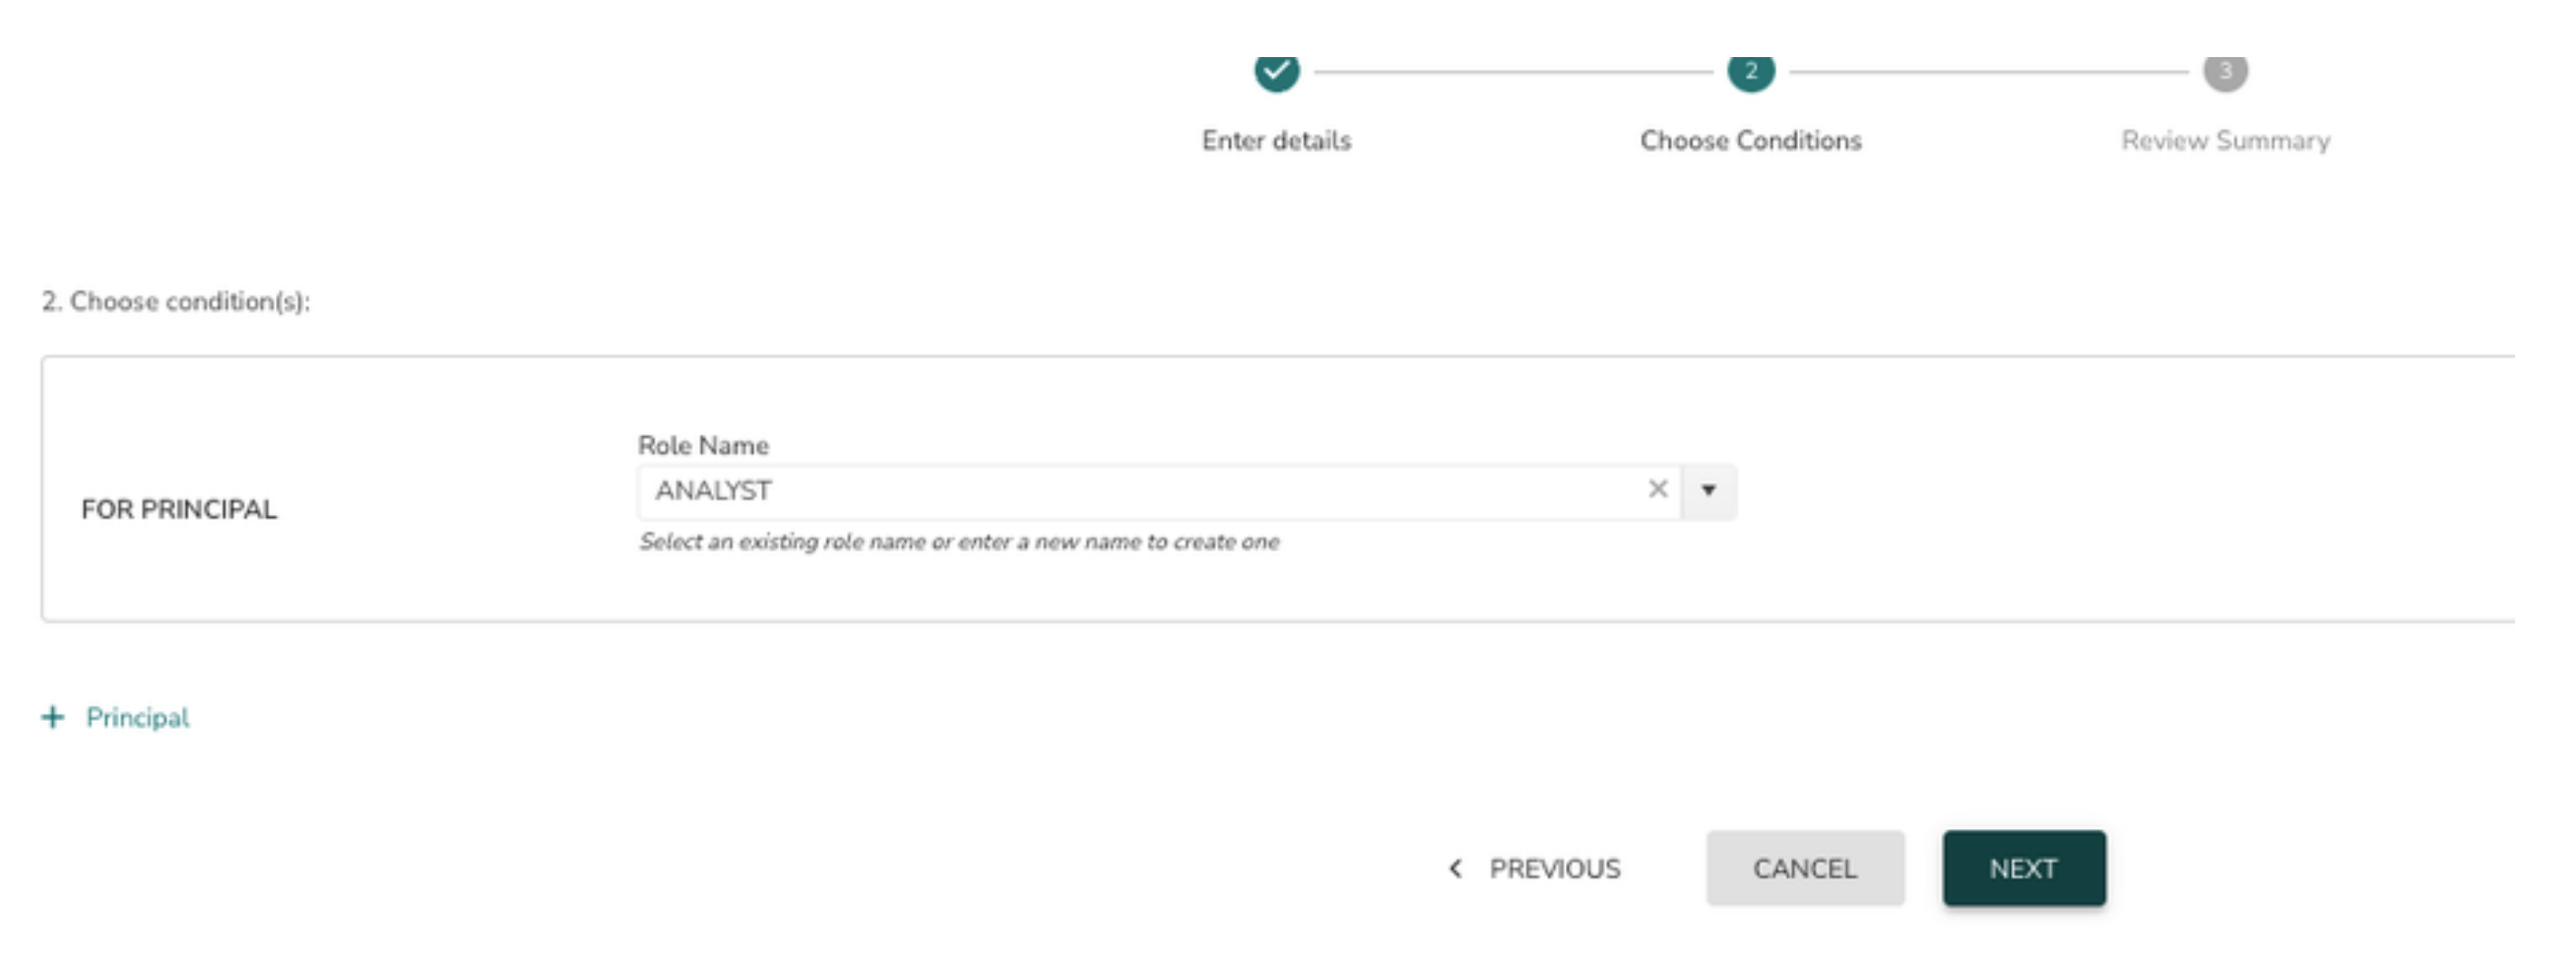
6> Select the Role from the drop down and click on the Next button
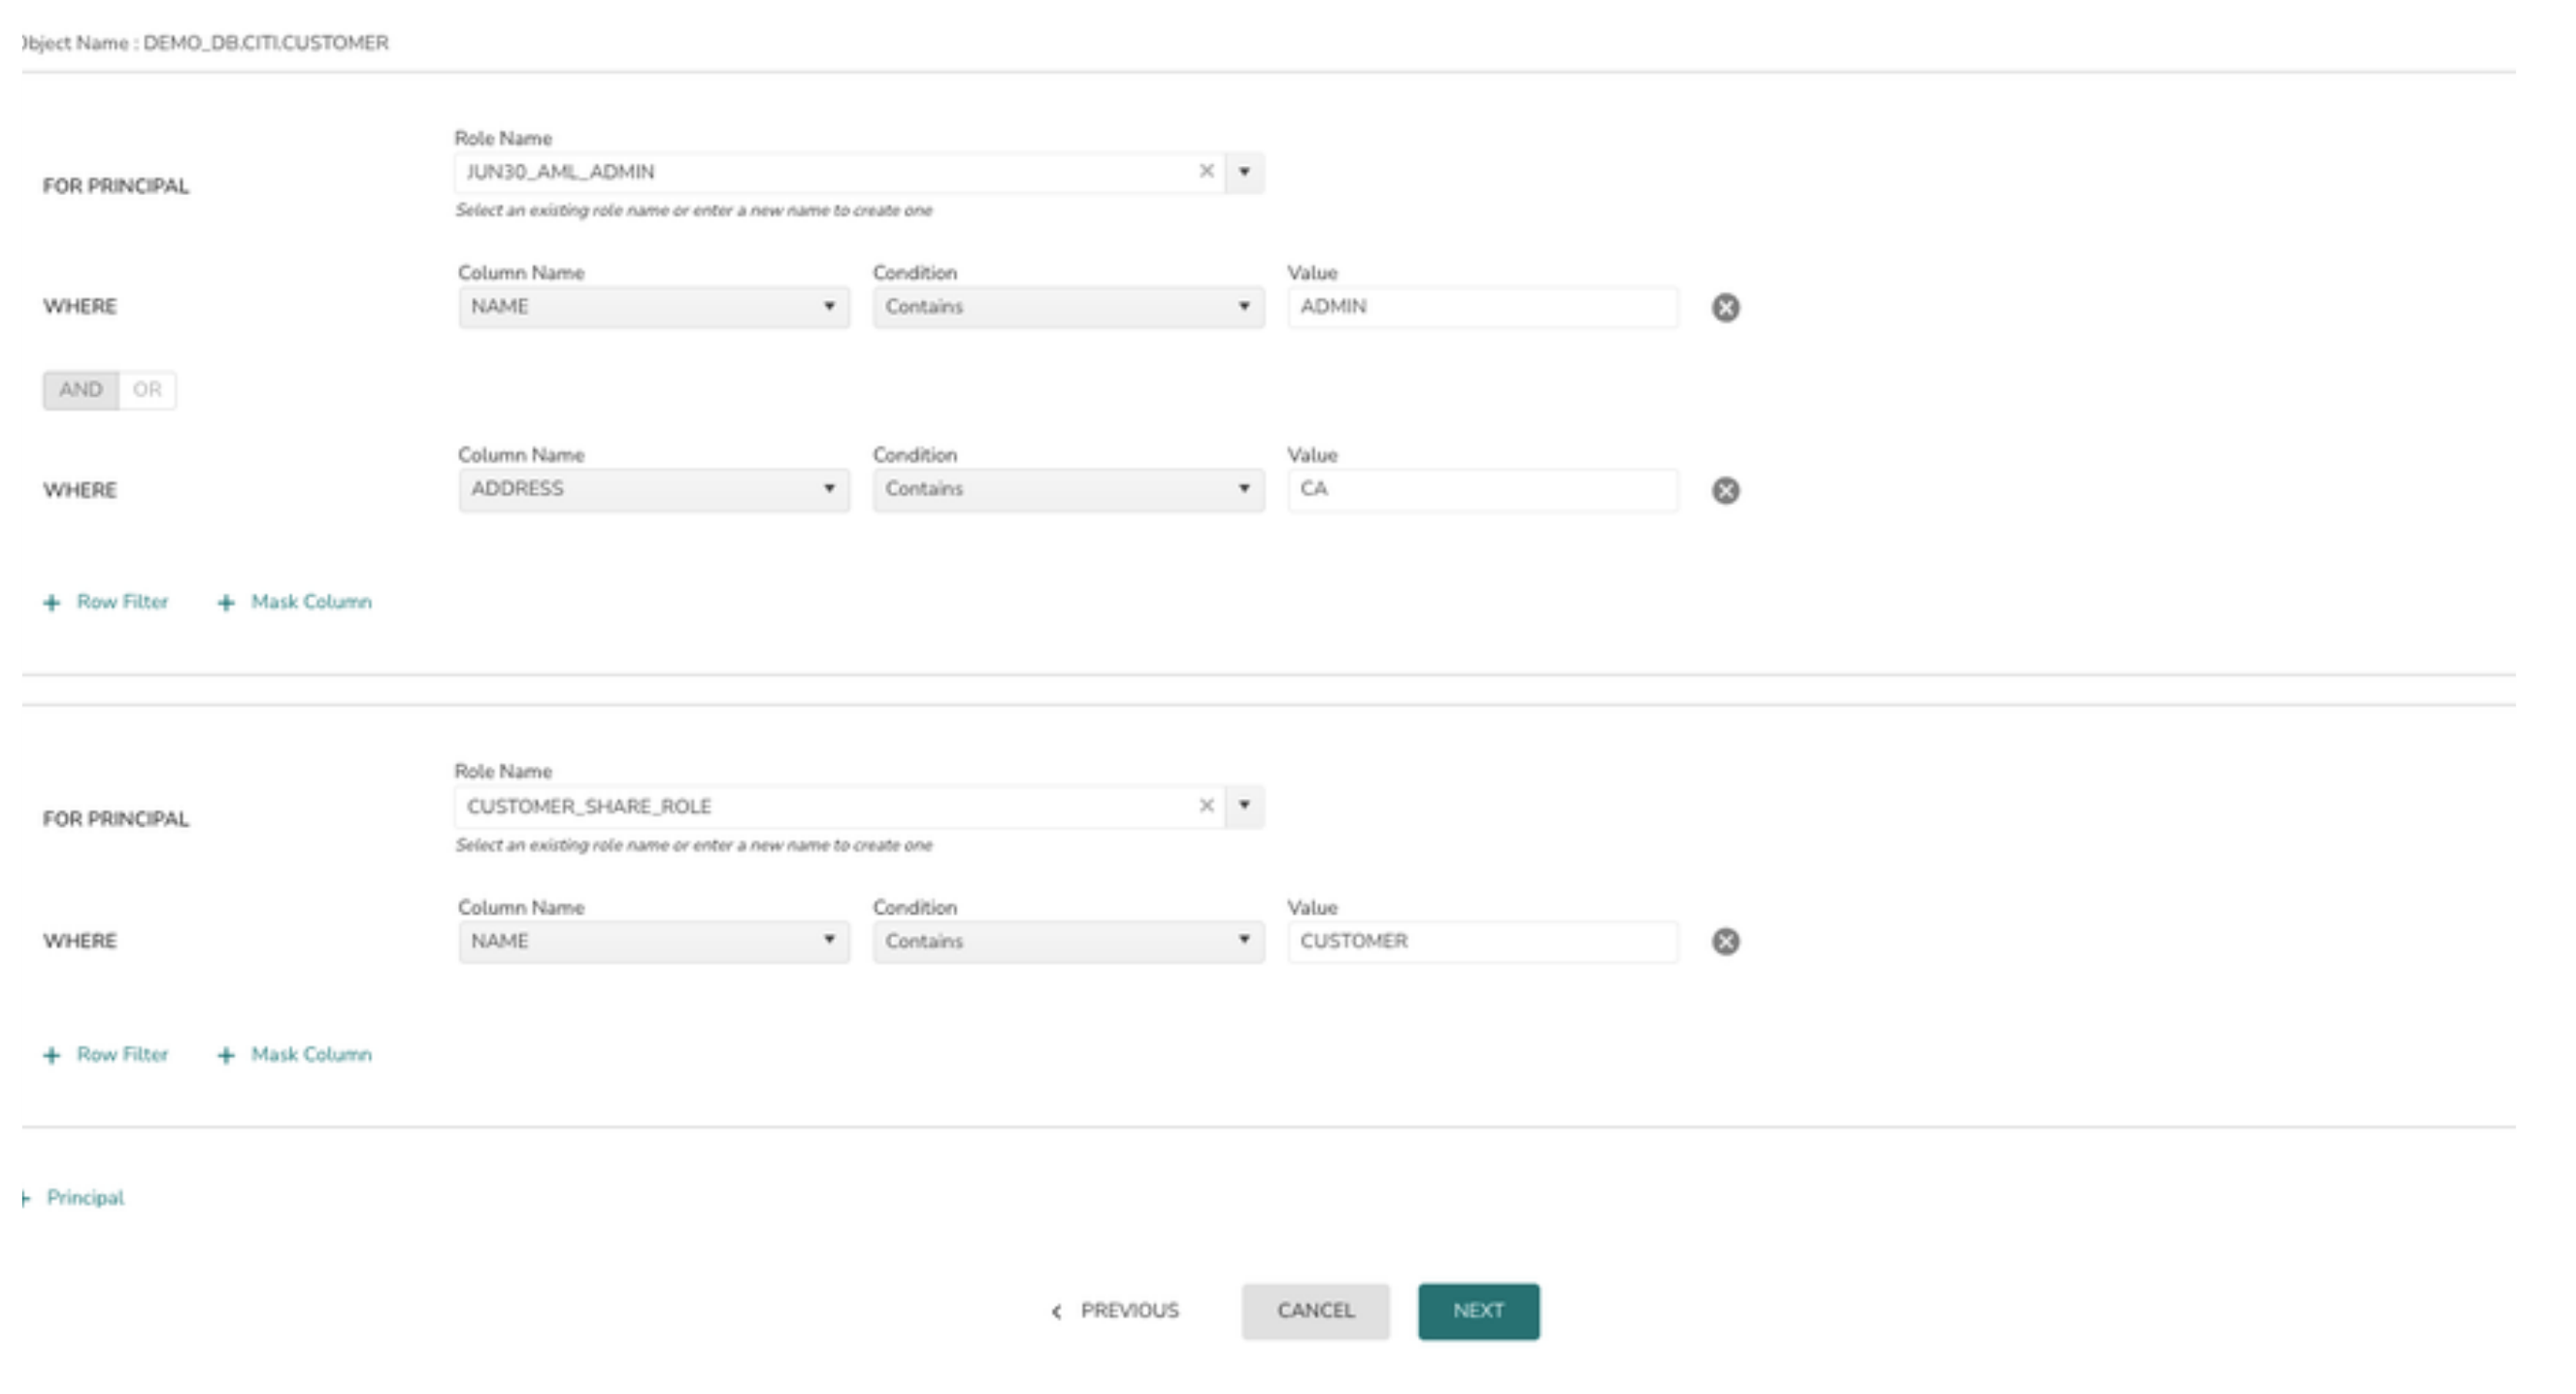
7> Click on +Row Filter to add all the conditions for a Row Access Policy
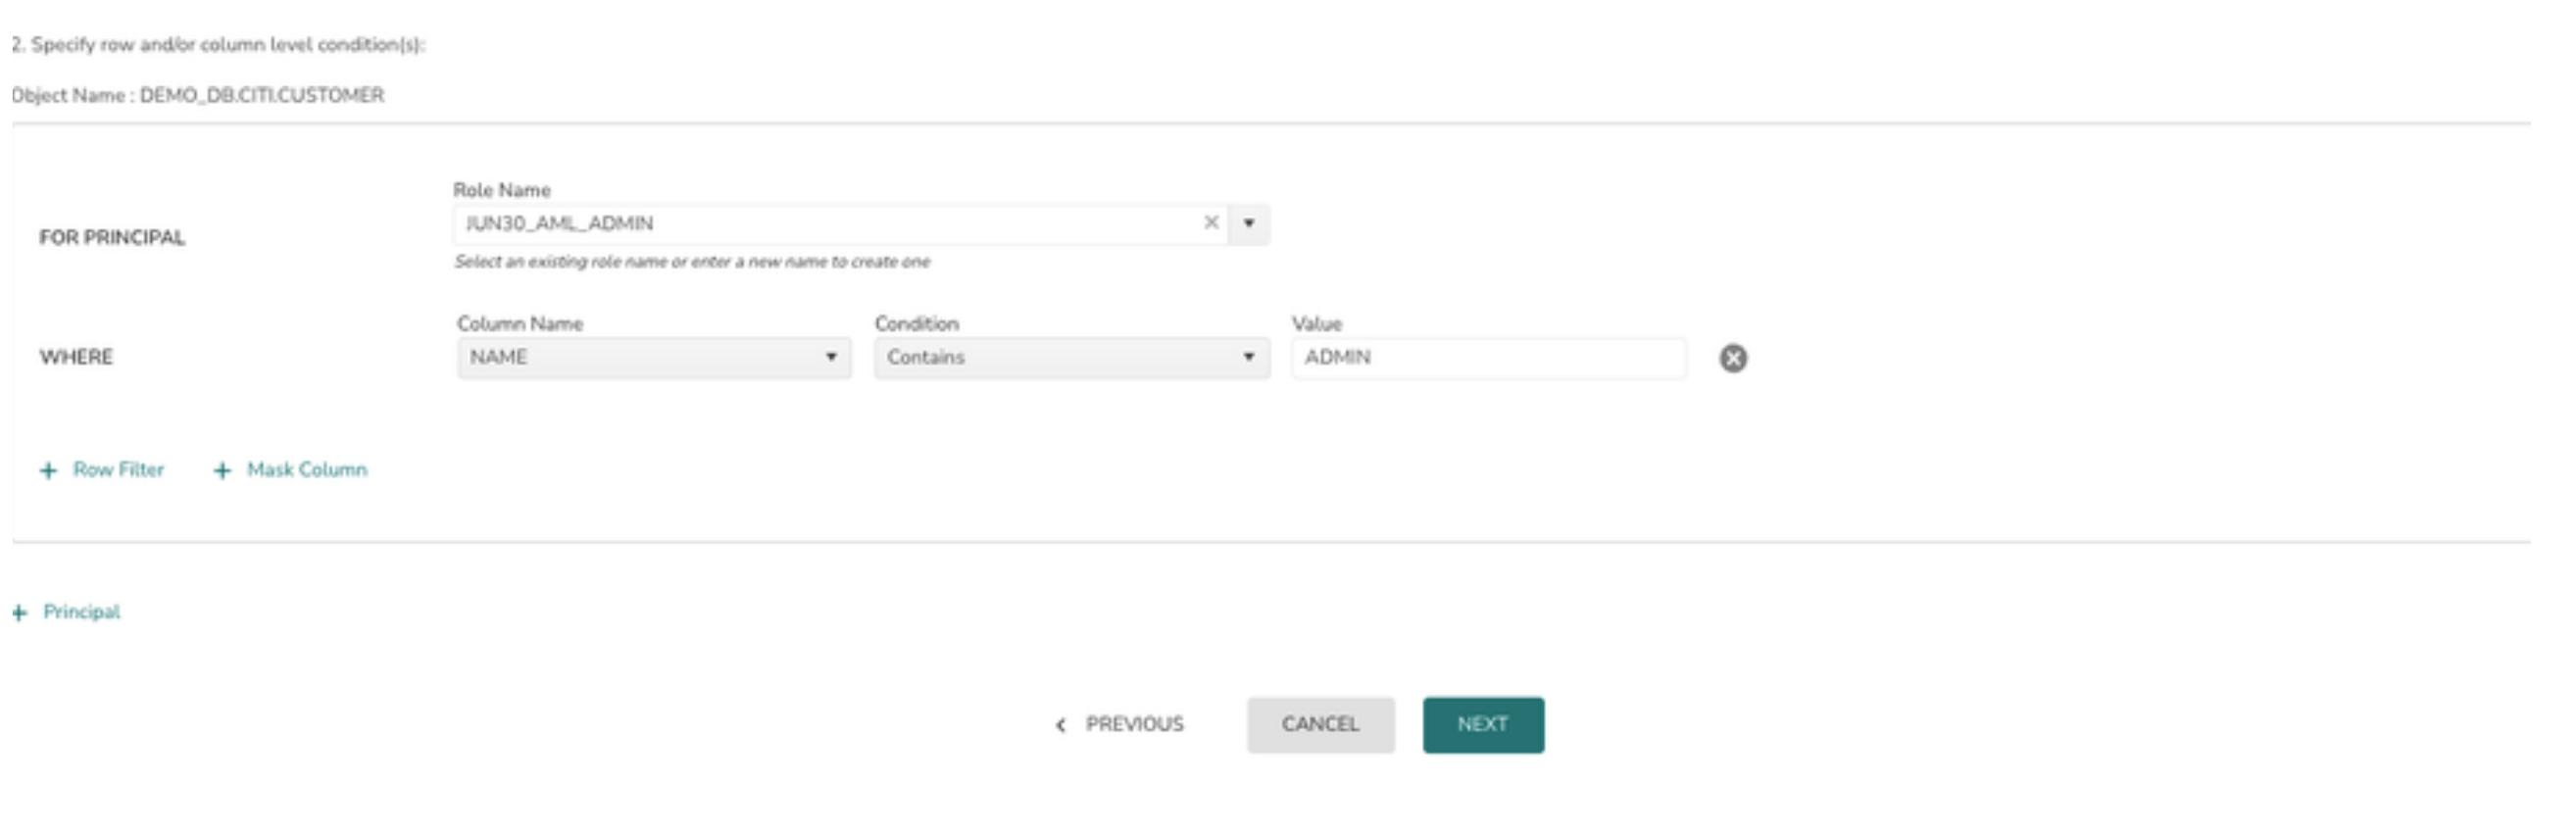
Additional conditions in the WHERE clause can be added by clicking on + Row Filter
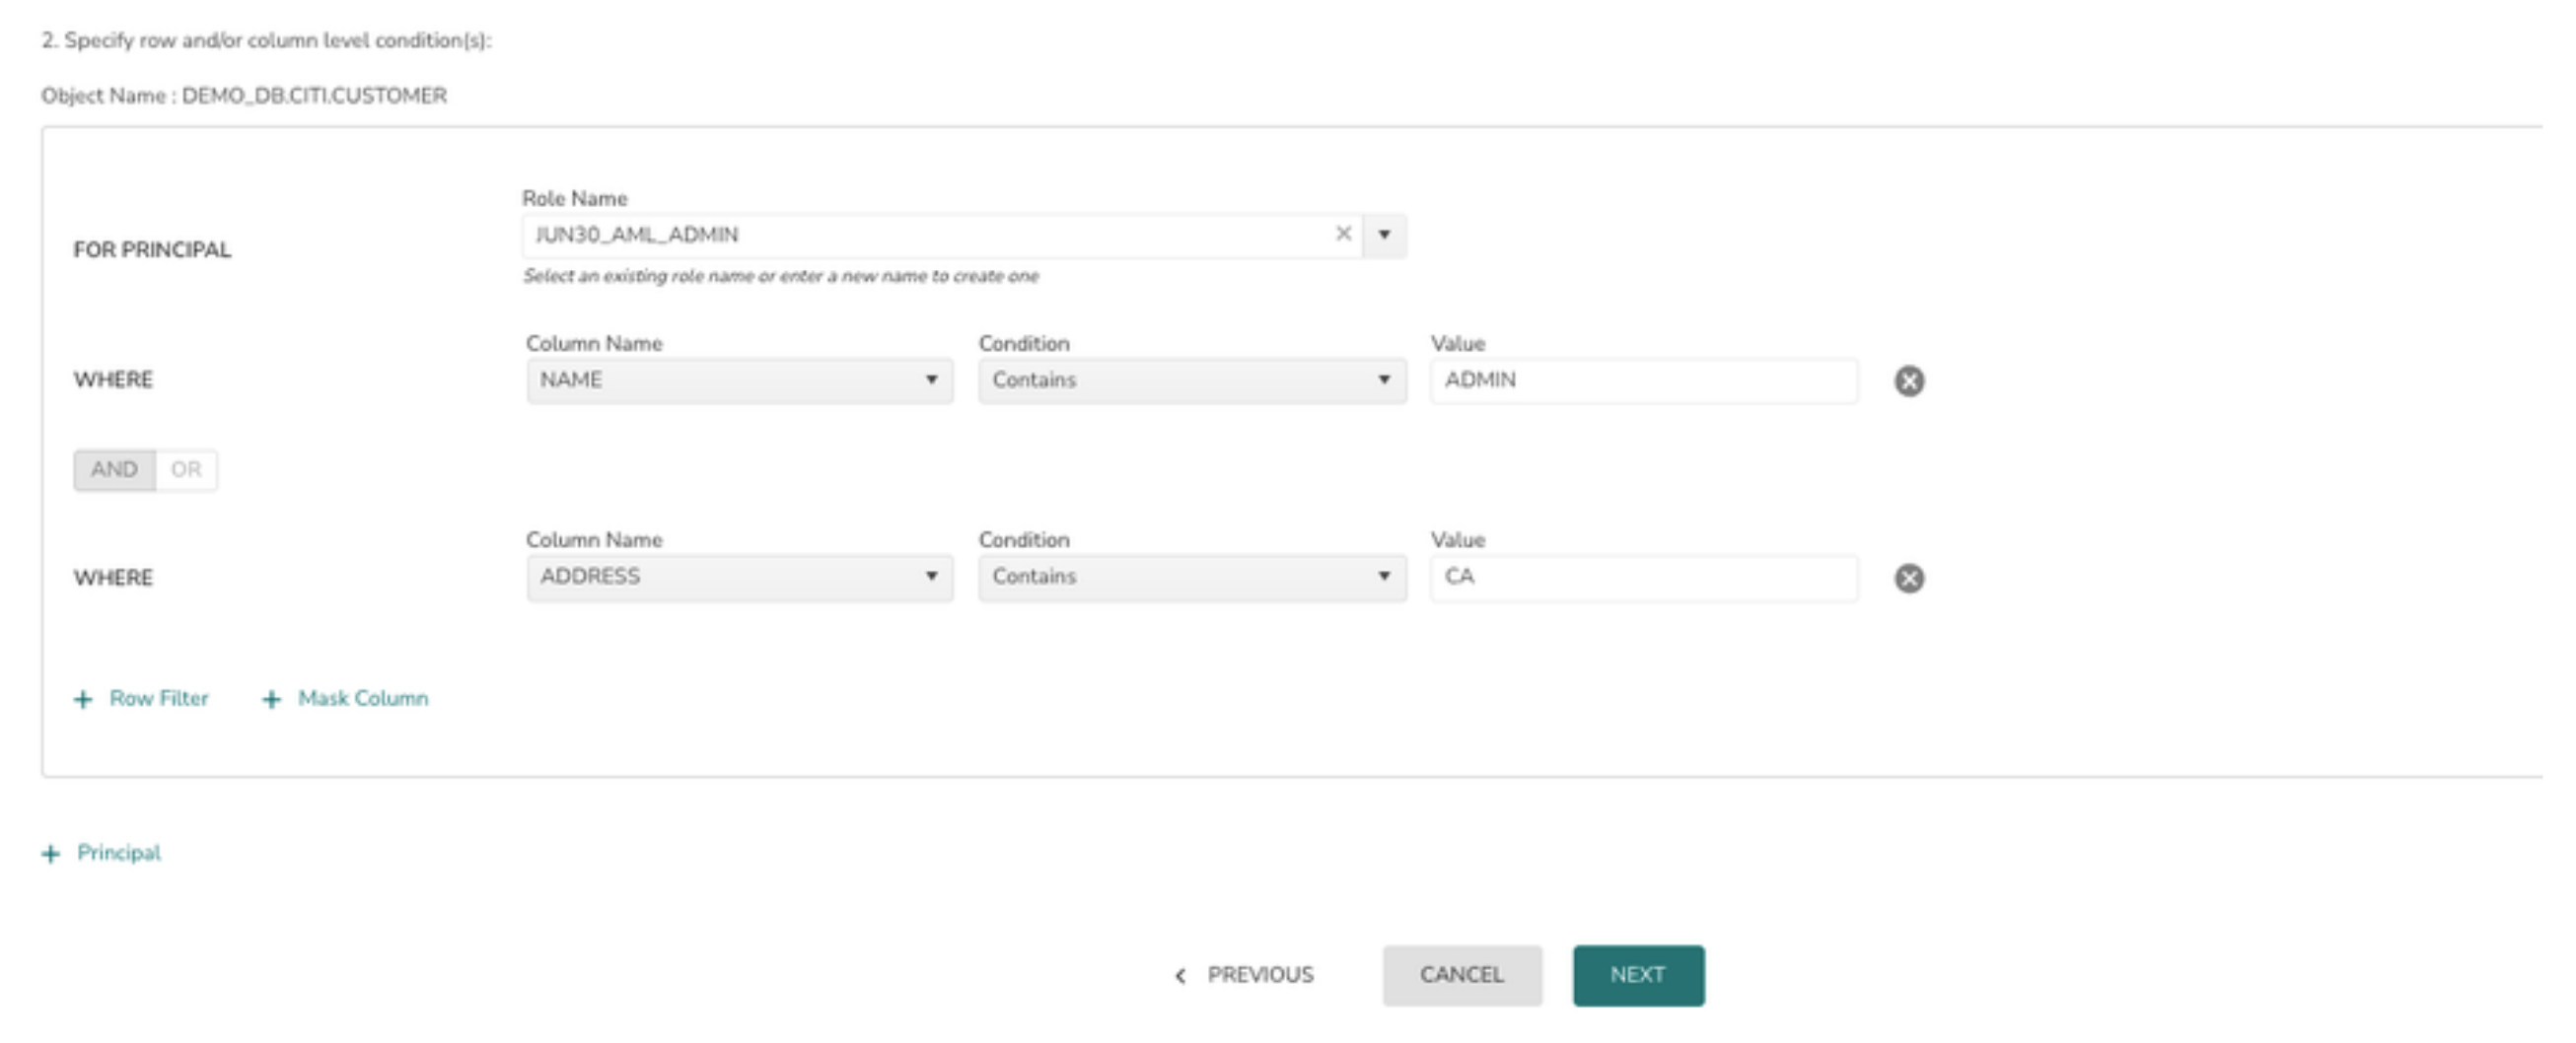
Users can create Row Level Access Policies either by using attributes in the fact table or by joining with the dimension Table (Mapping table)
8> Additional roles can also be added to row access policy by clicking in + Principal
9> Click on the Next button to review the policy details and deploy
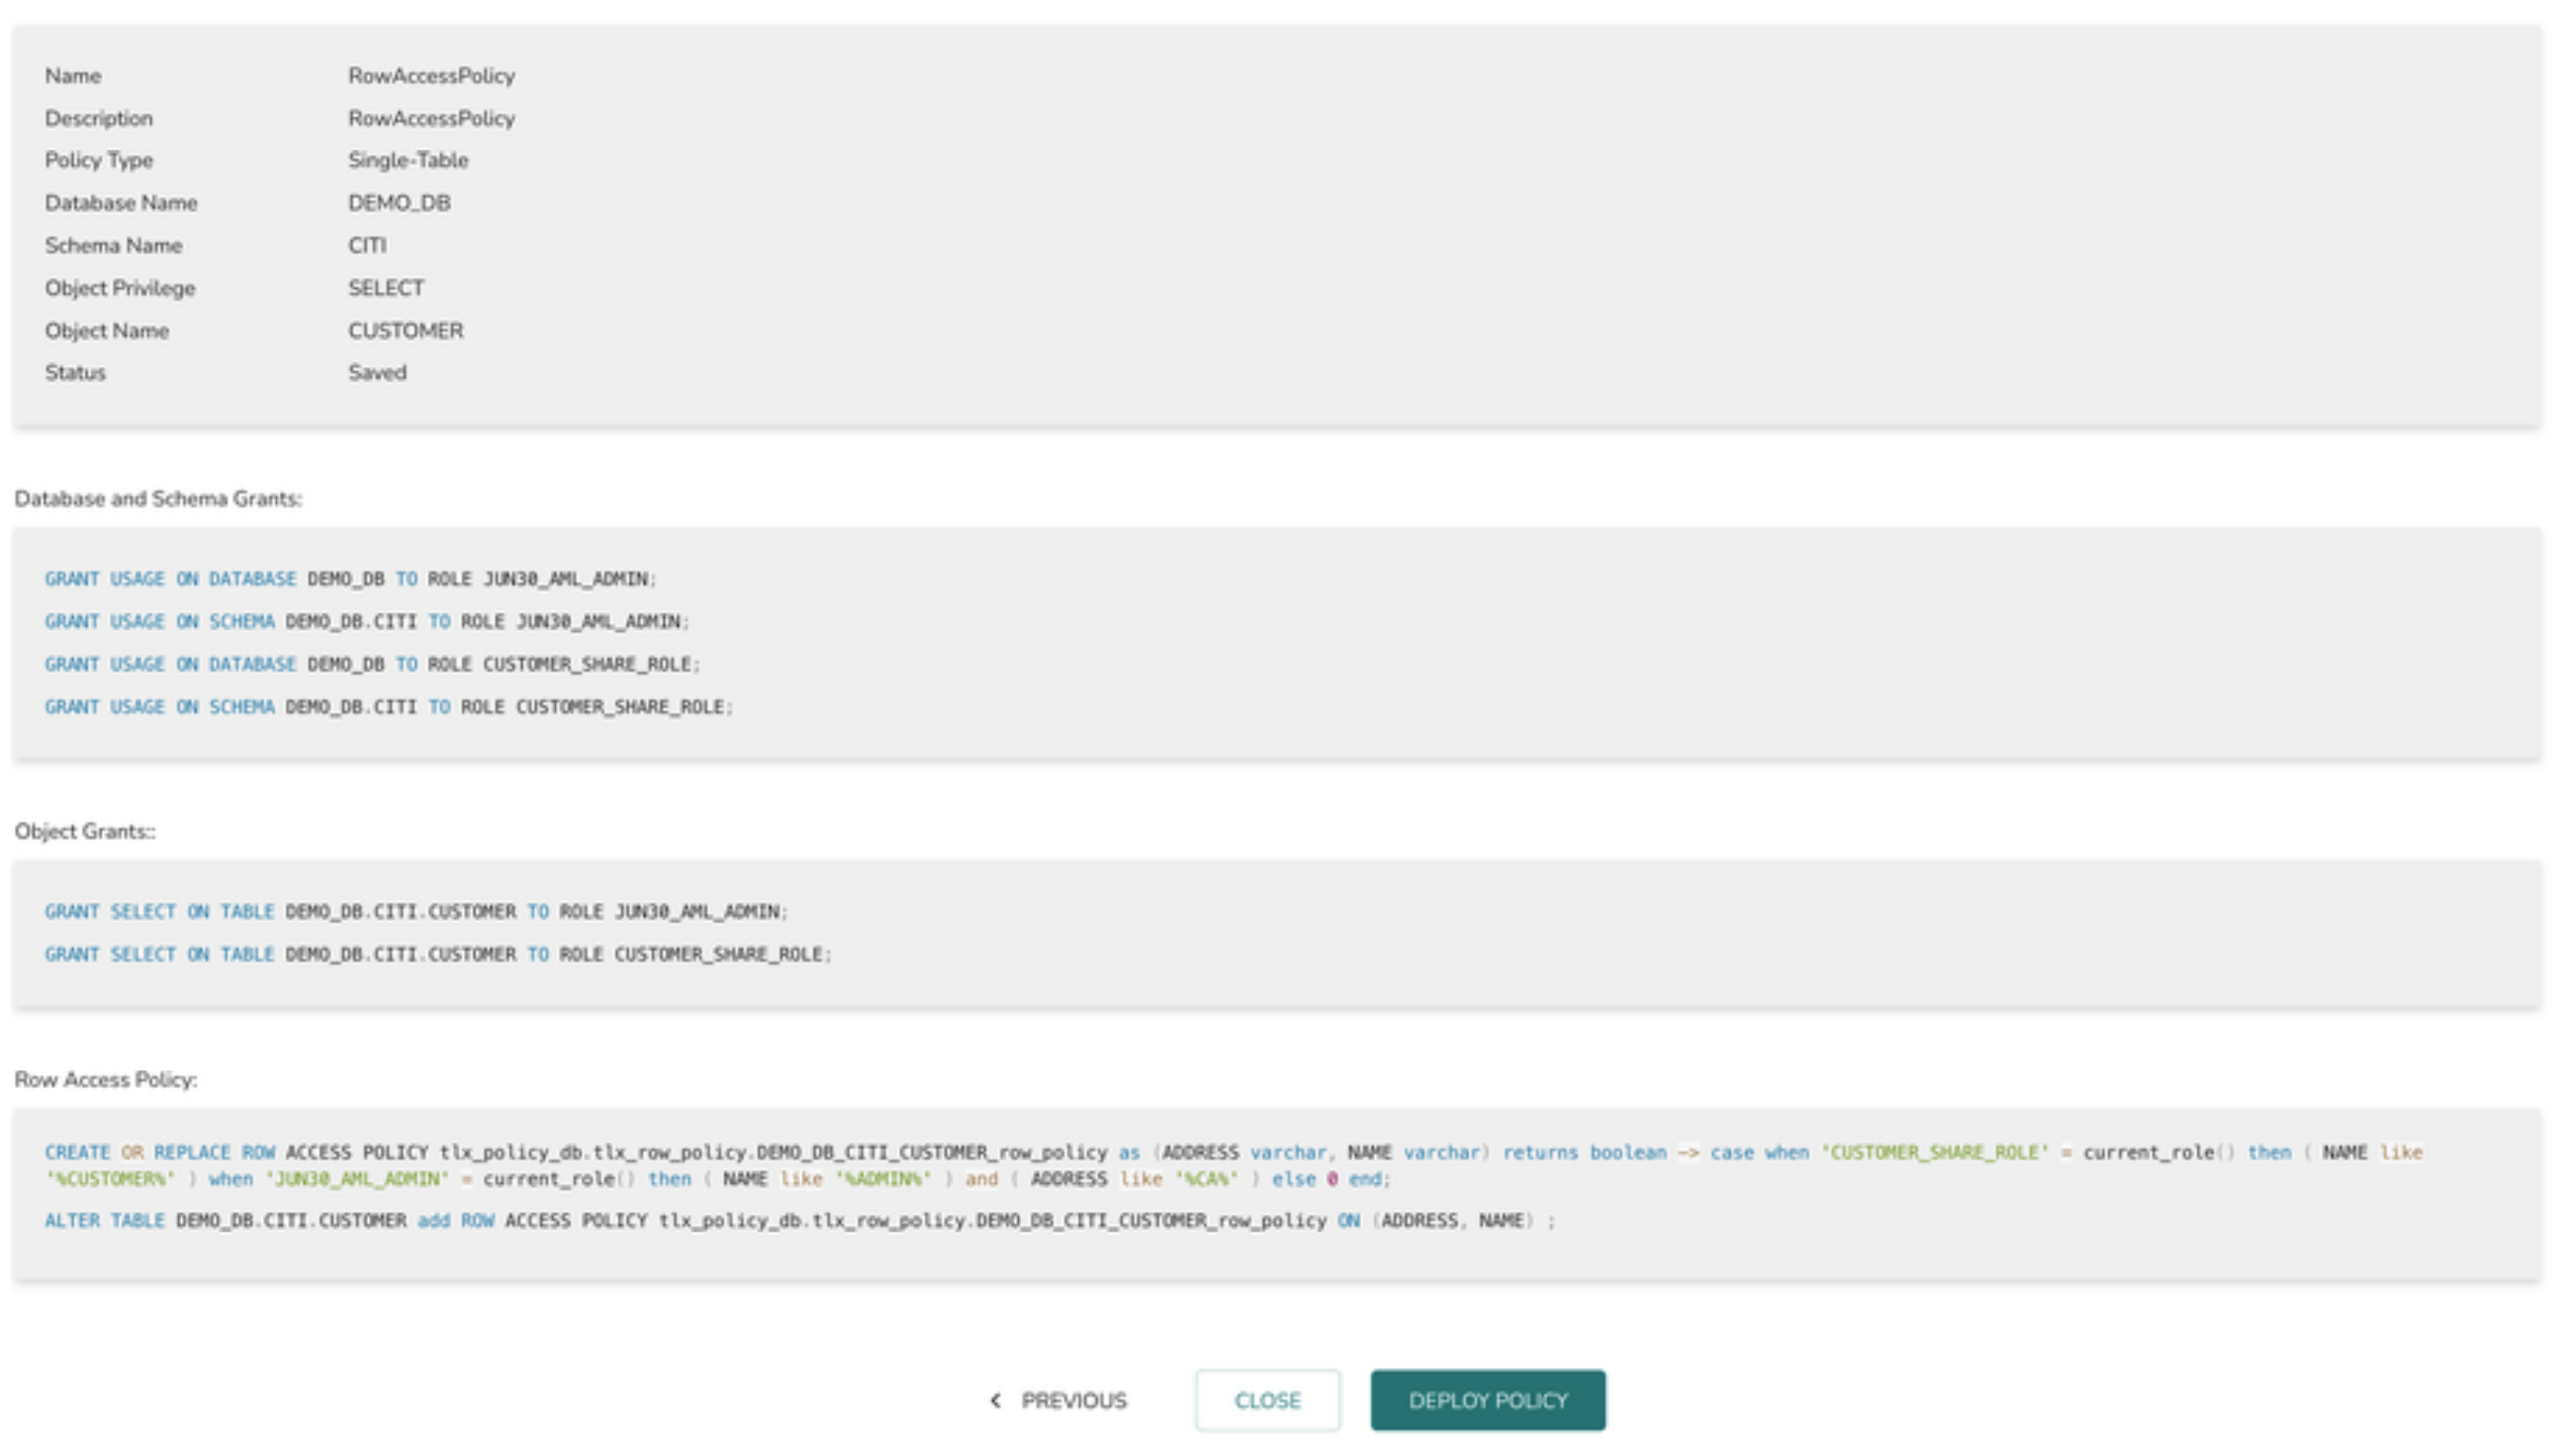
10 > The final page displays the summary view of the policy definition. Click on “DEPLOY POLICY” button to deploy the policy or “SAVE” button to save the policy and deploy it later.
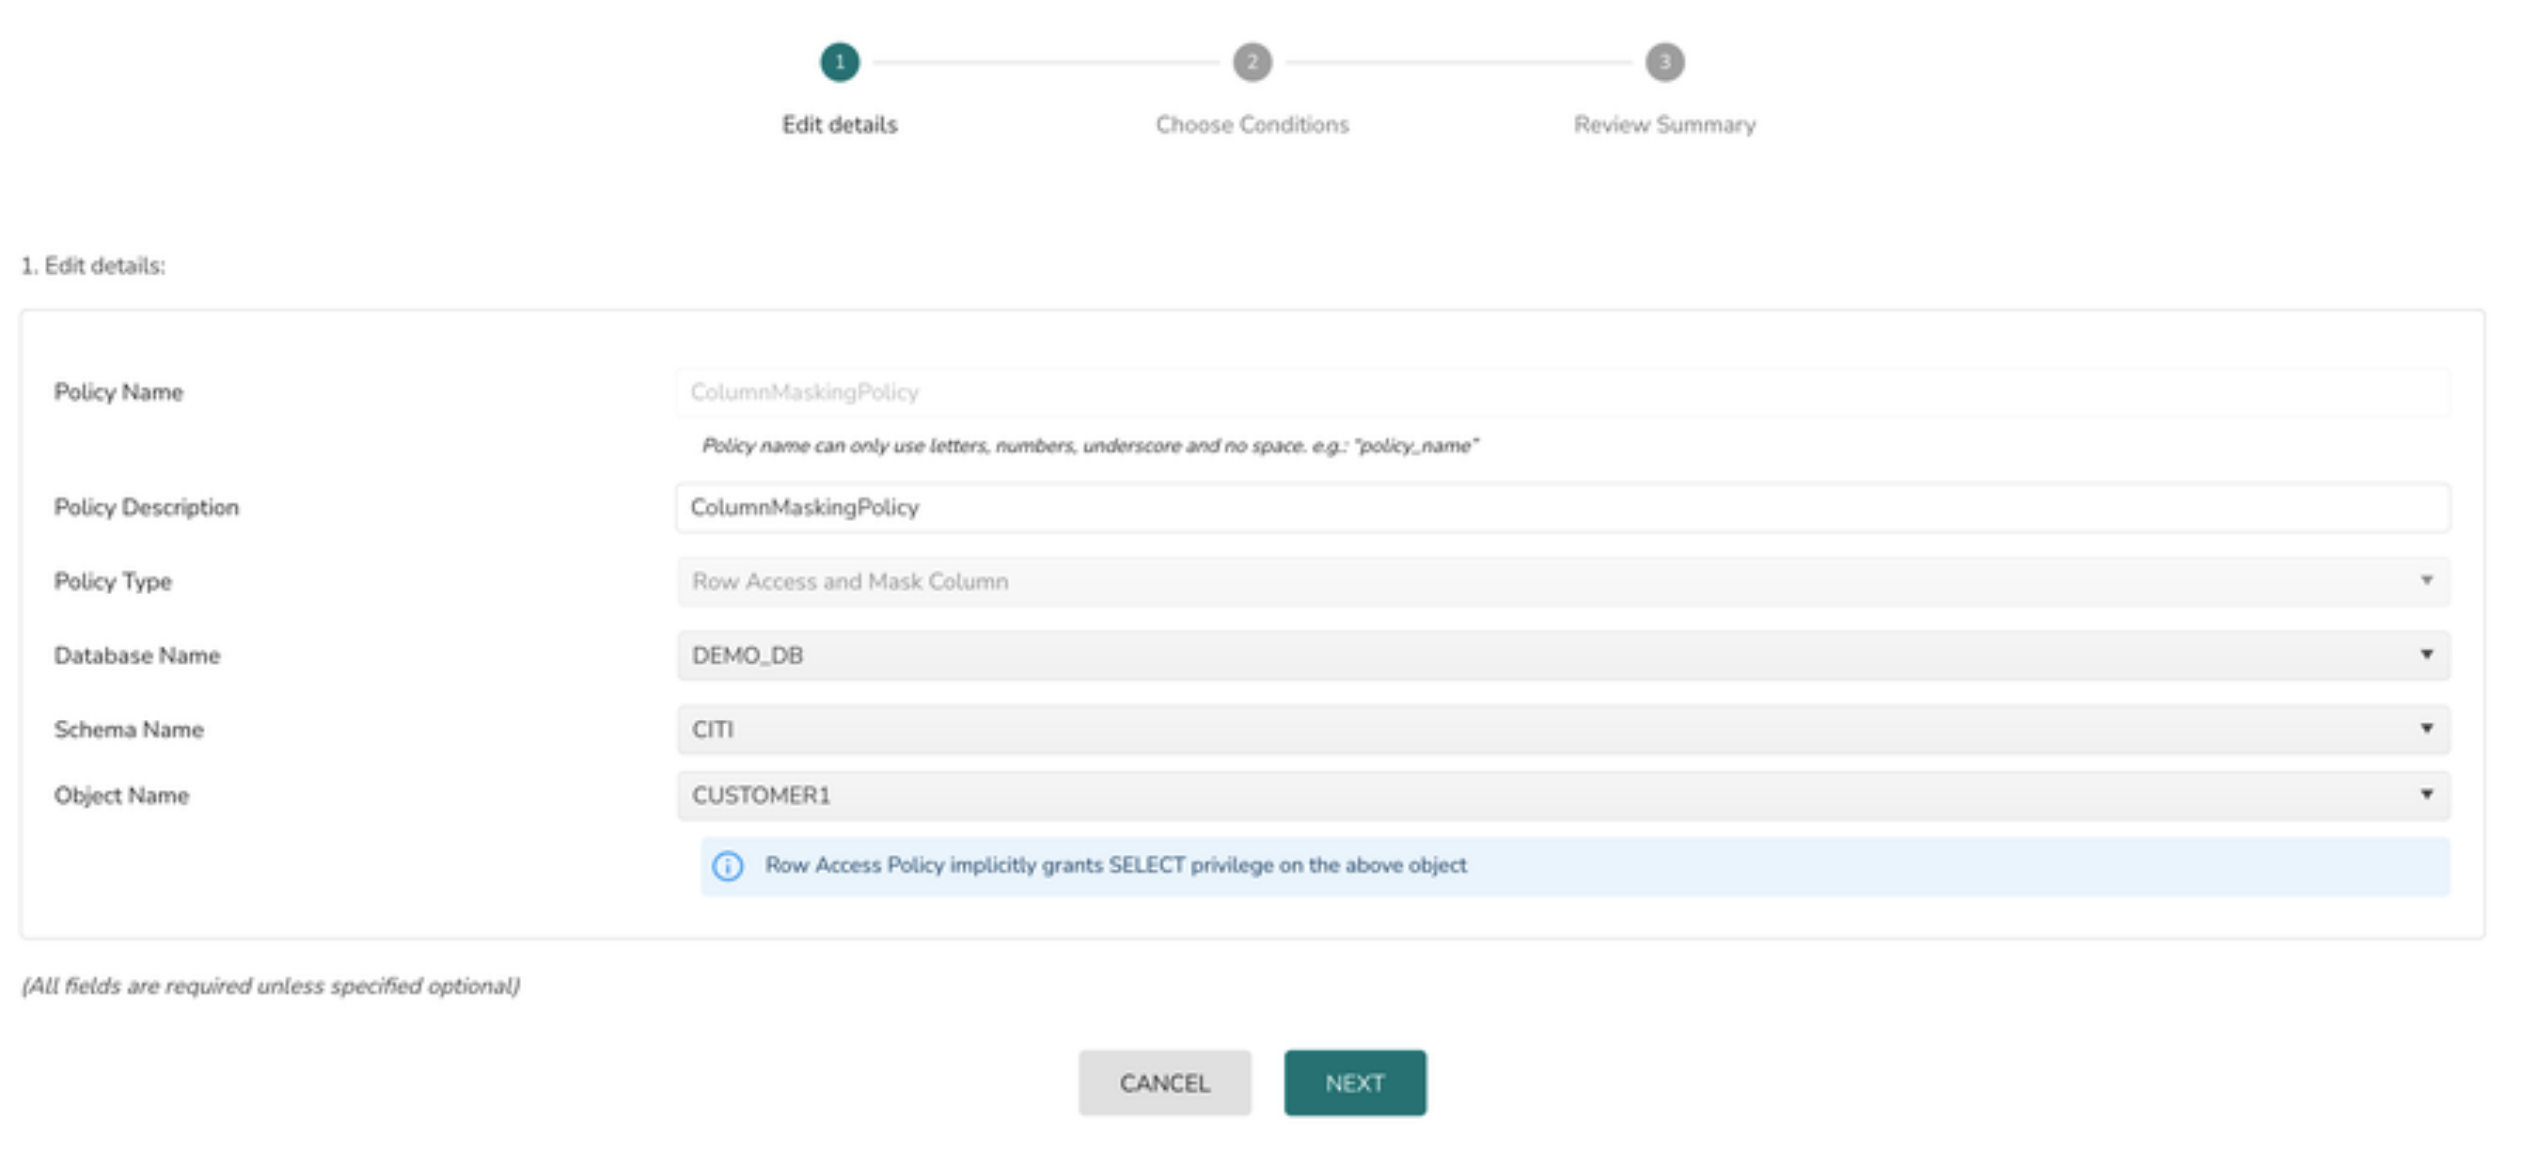
Create a Column Masking Policy
1> Select the Policy Type as Row Access & Masking Policy
2> Select the Database from database drop down
3> Select the Schema from schema drop down
4> Select the object name from Object Name drop down
5> Click on the Next button
6> Select the Role from the drop down and click on the Next button
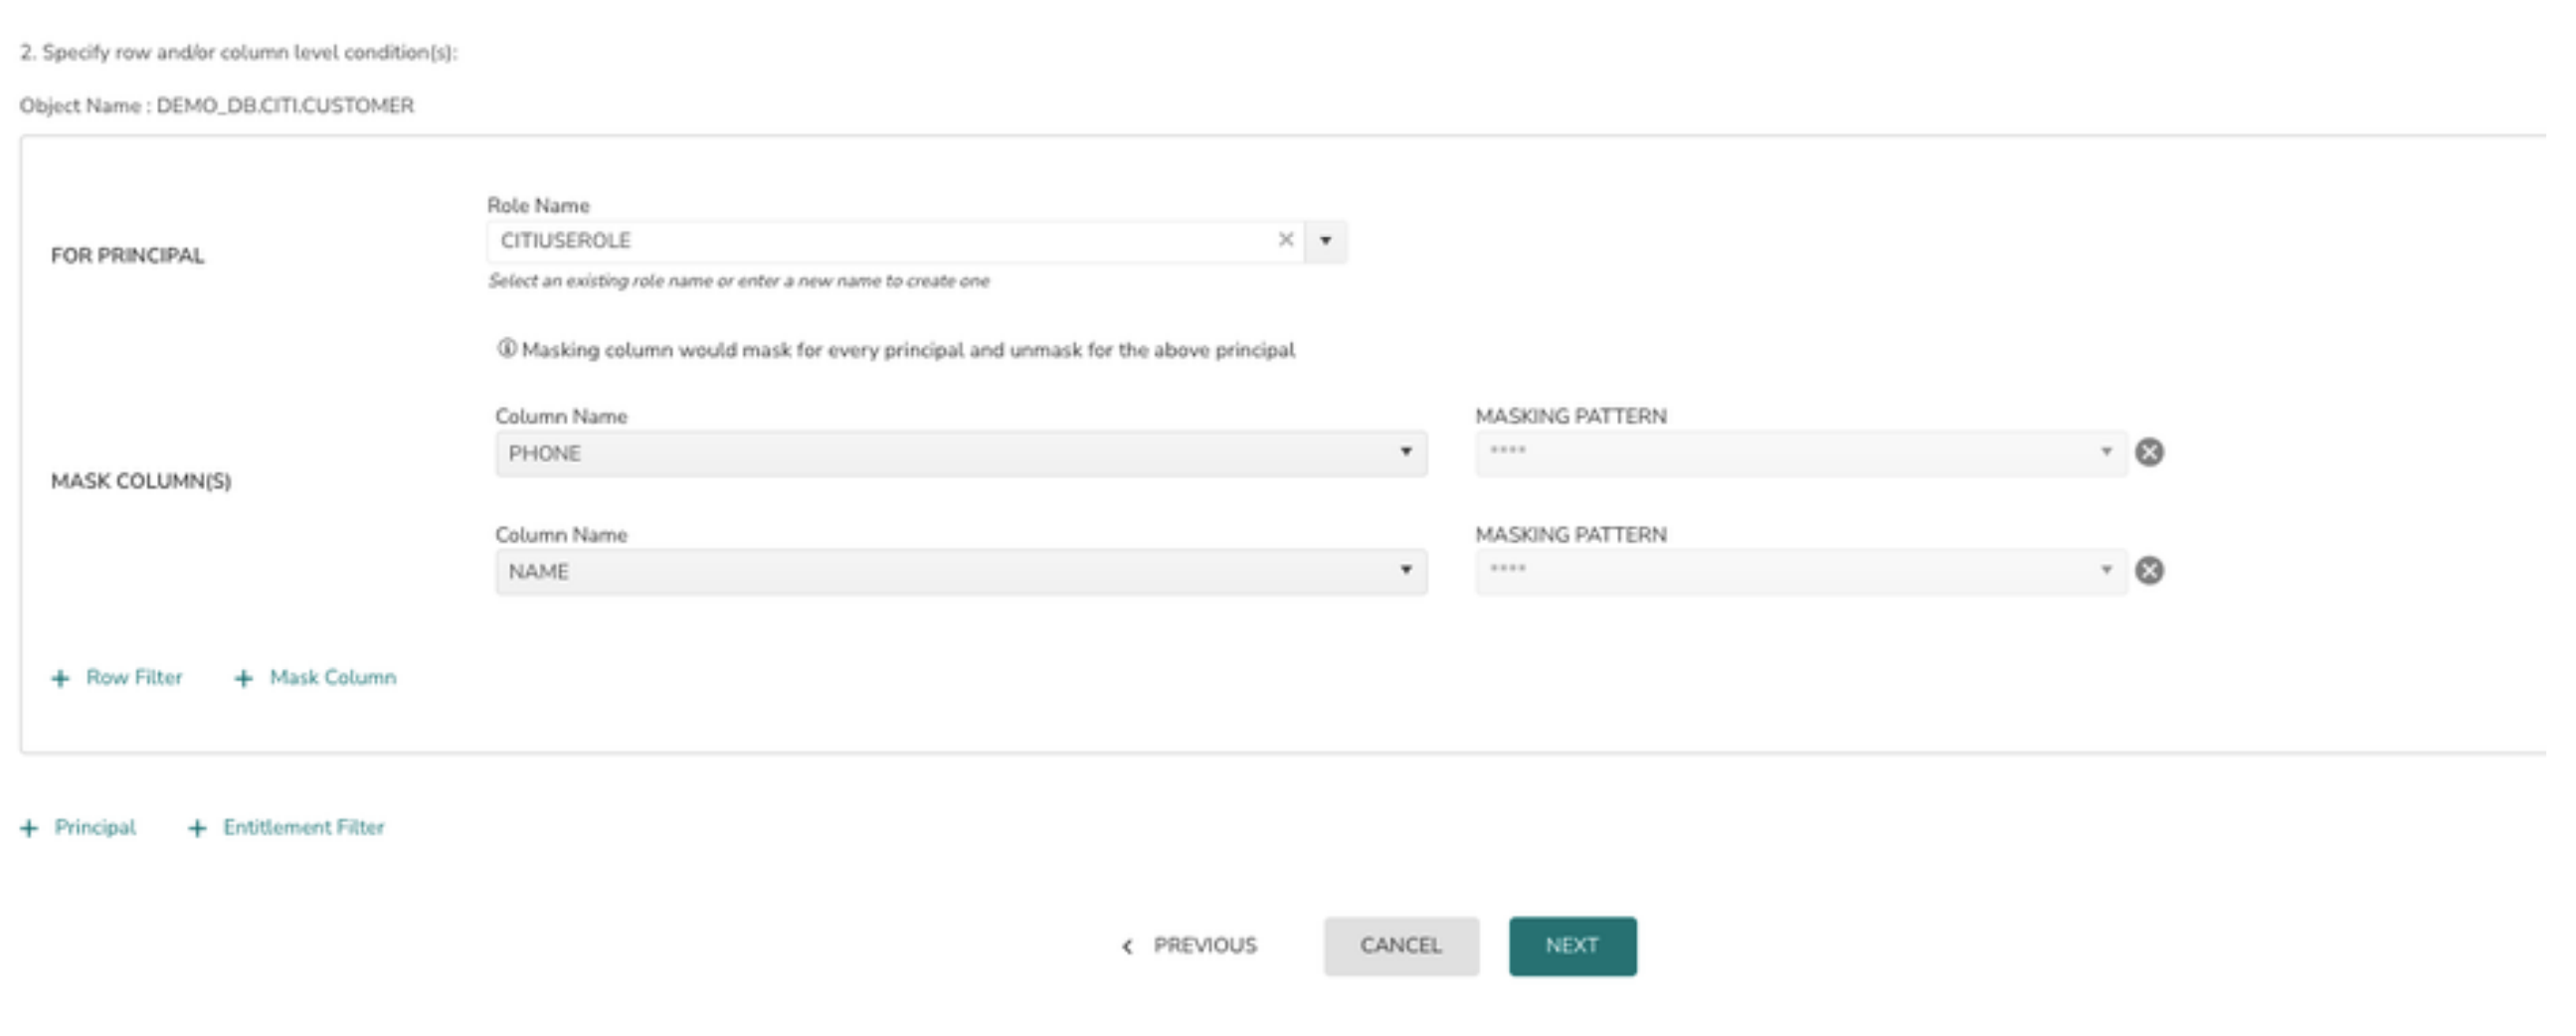
7> To create a Column Masking policy click on + Mask Column
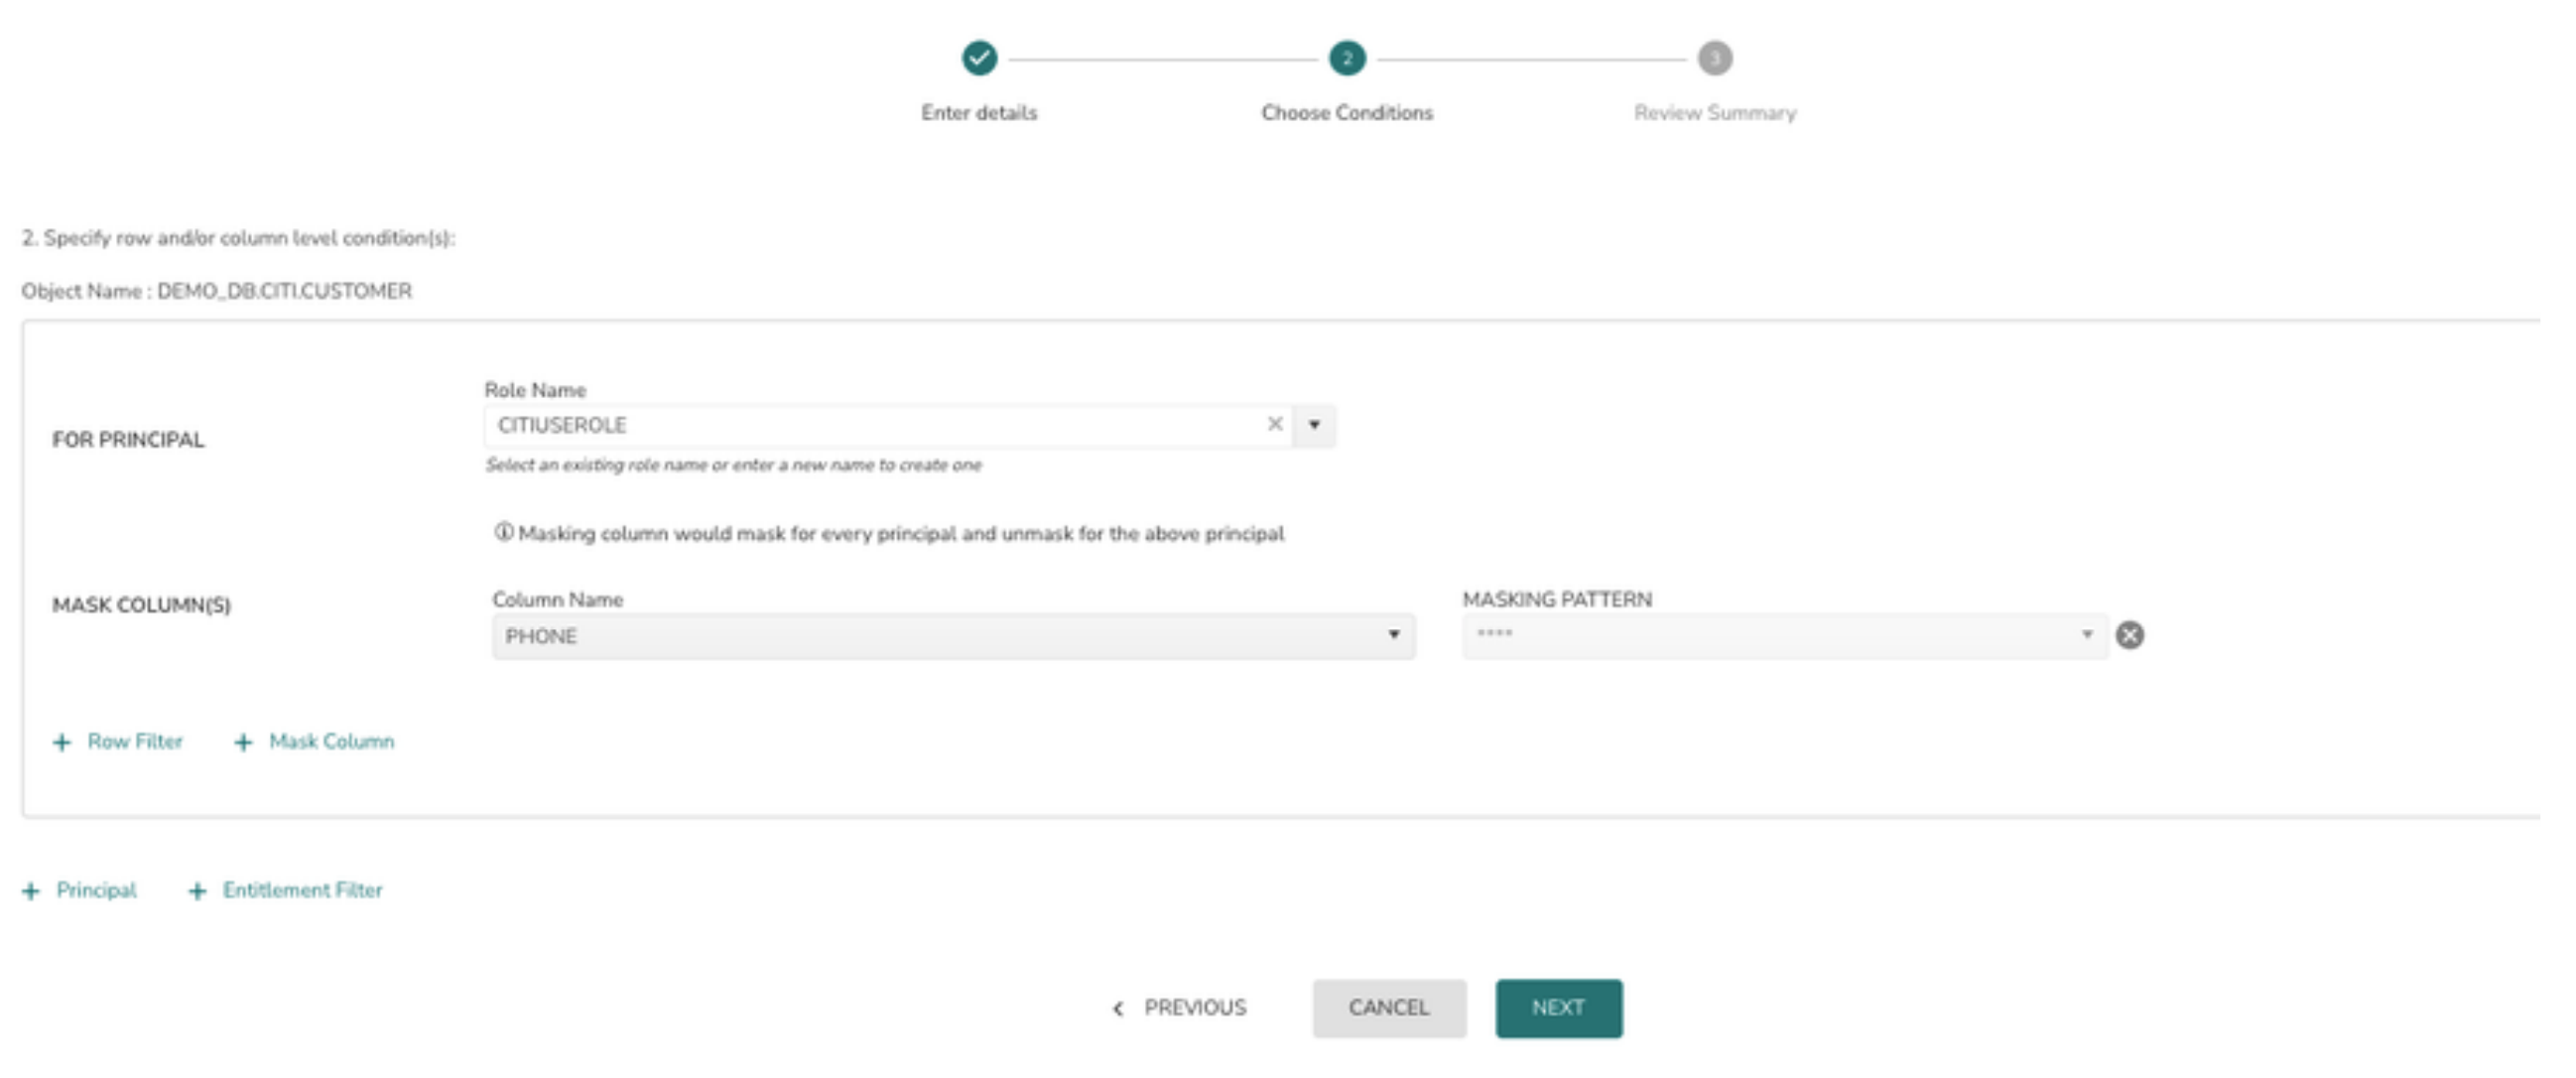
8> Select the column name which needs to be masked. Column data will be masked for all roles except the role selected in the above principal. Eg: Phone column data will be masked for all roles except CITIUSEROLE
9> User can add more columns for the same principal by clicking on + Mask Column
10> Additional Principals can be added by clicking on + Principal.
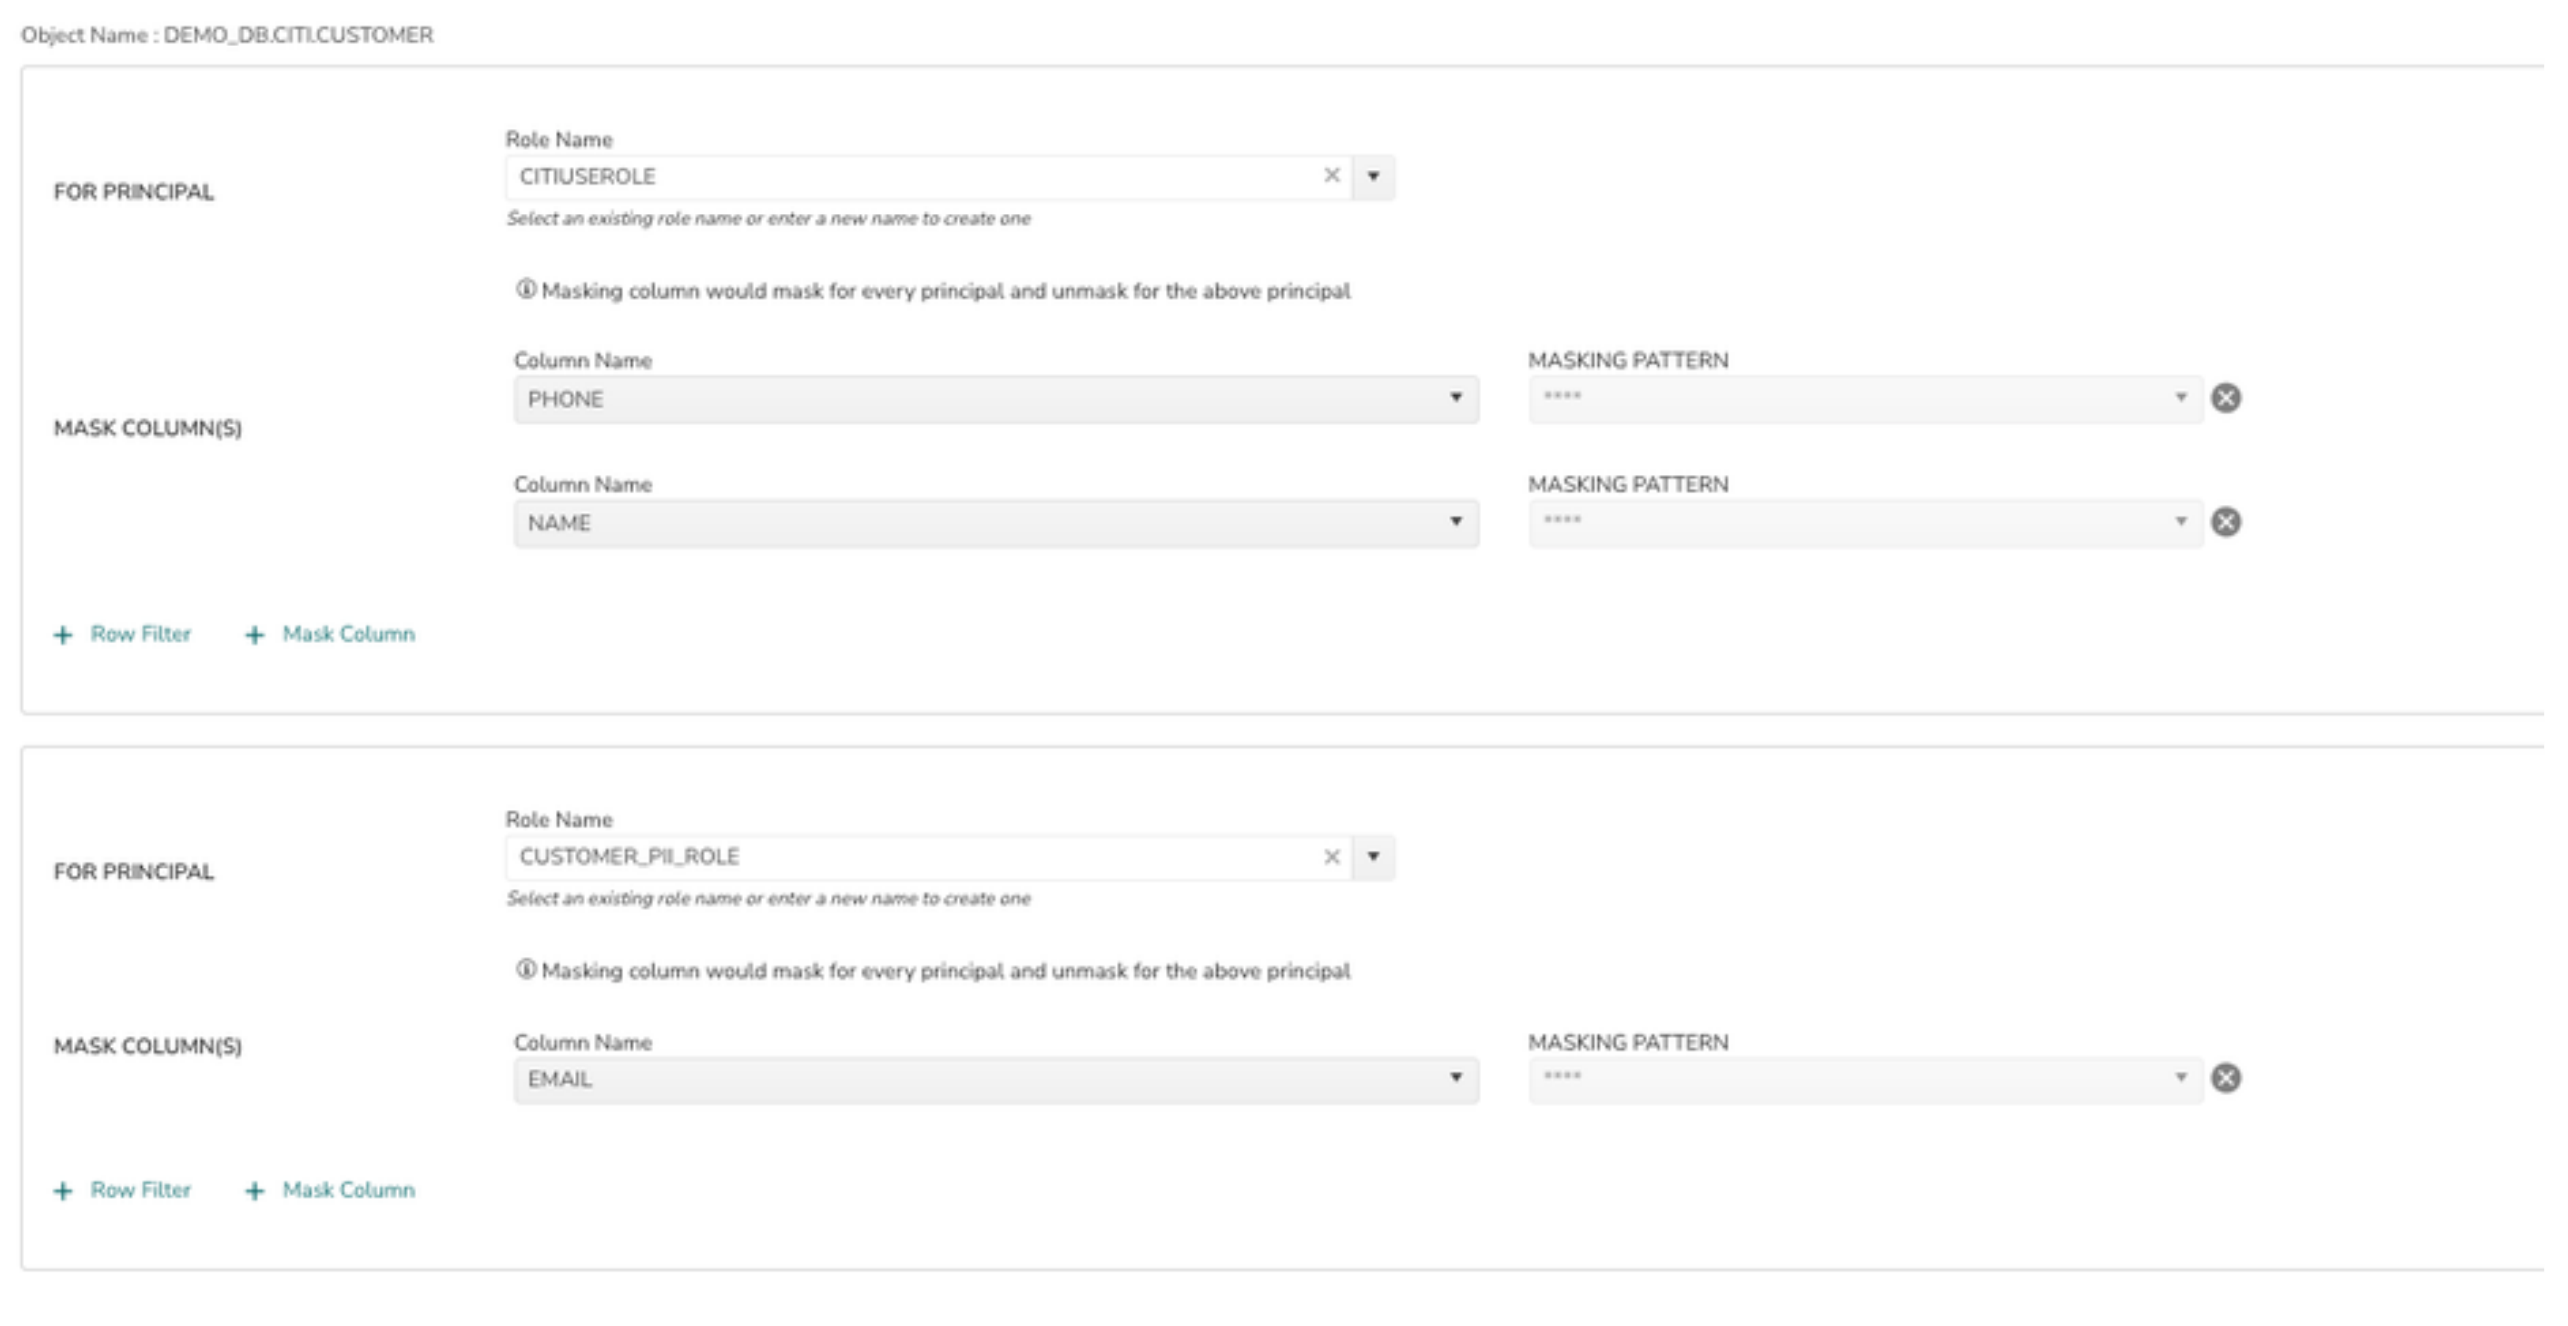
In the above example PHONE and NAME columns data are masked except for CITIUSERROLE and EMAIL data is masked for all roles except CUSTOMER_PII_ROLE.
11> Click on the Next button to review the policy details and deploy
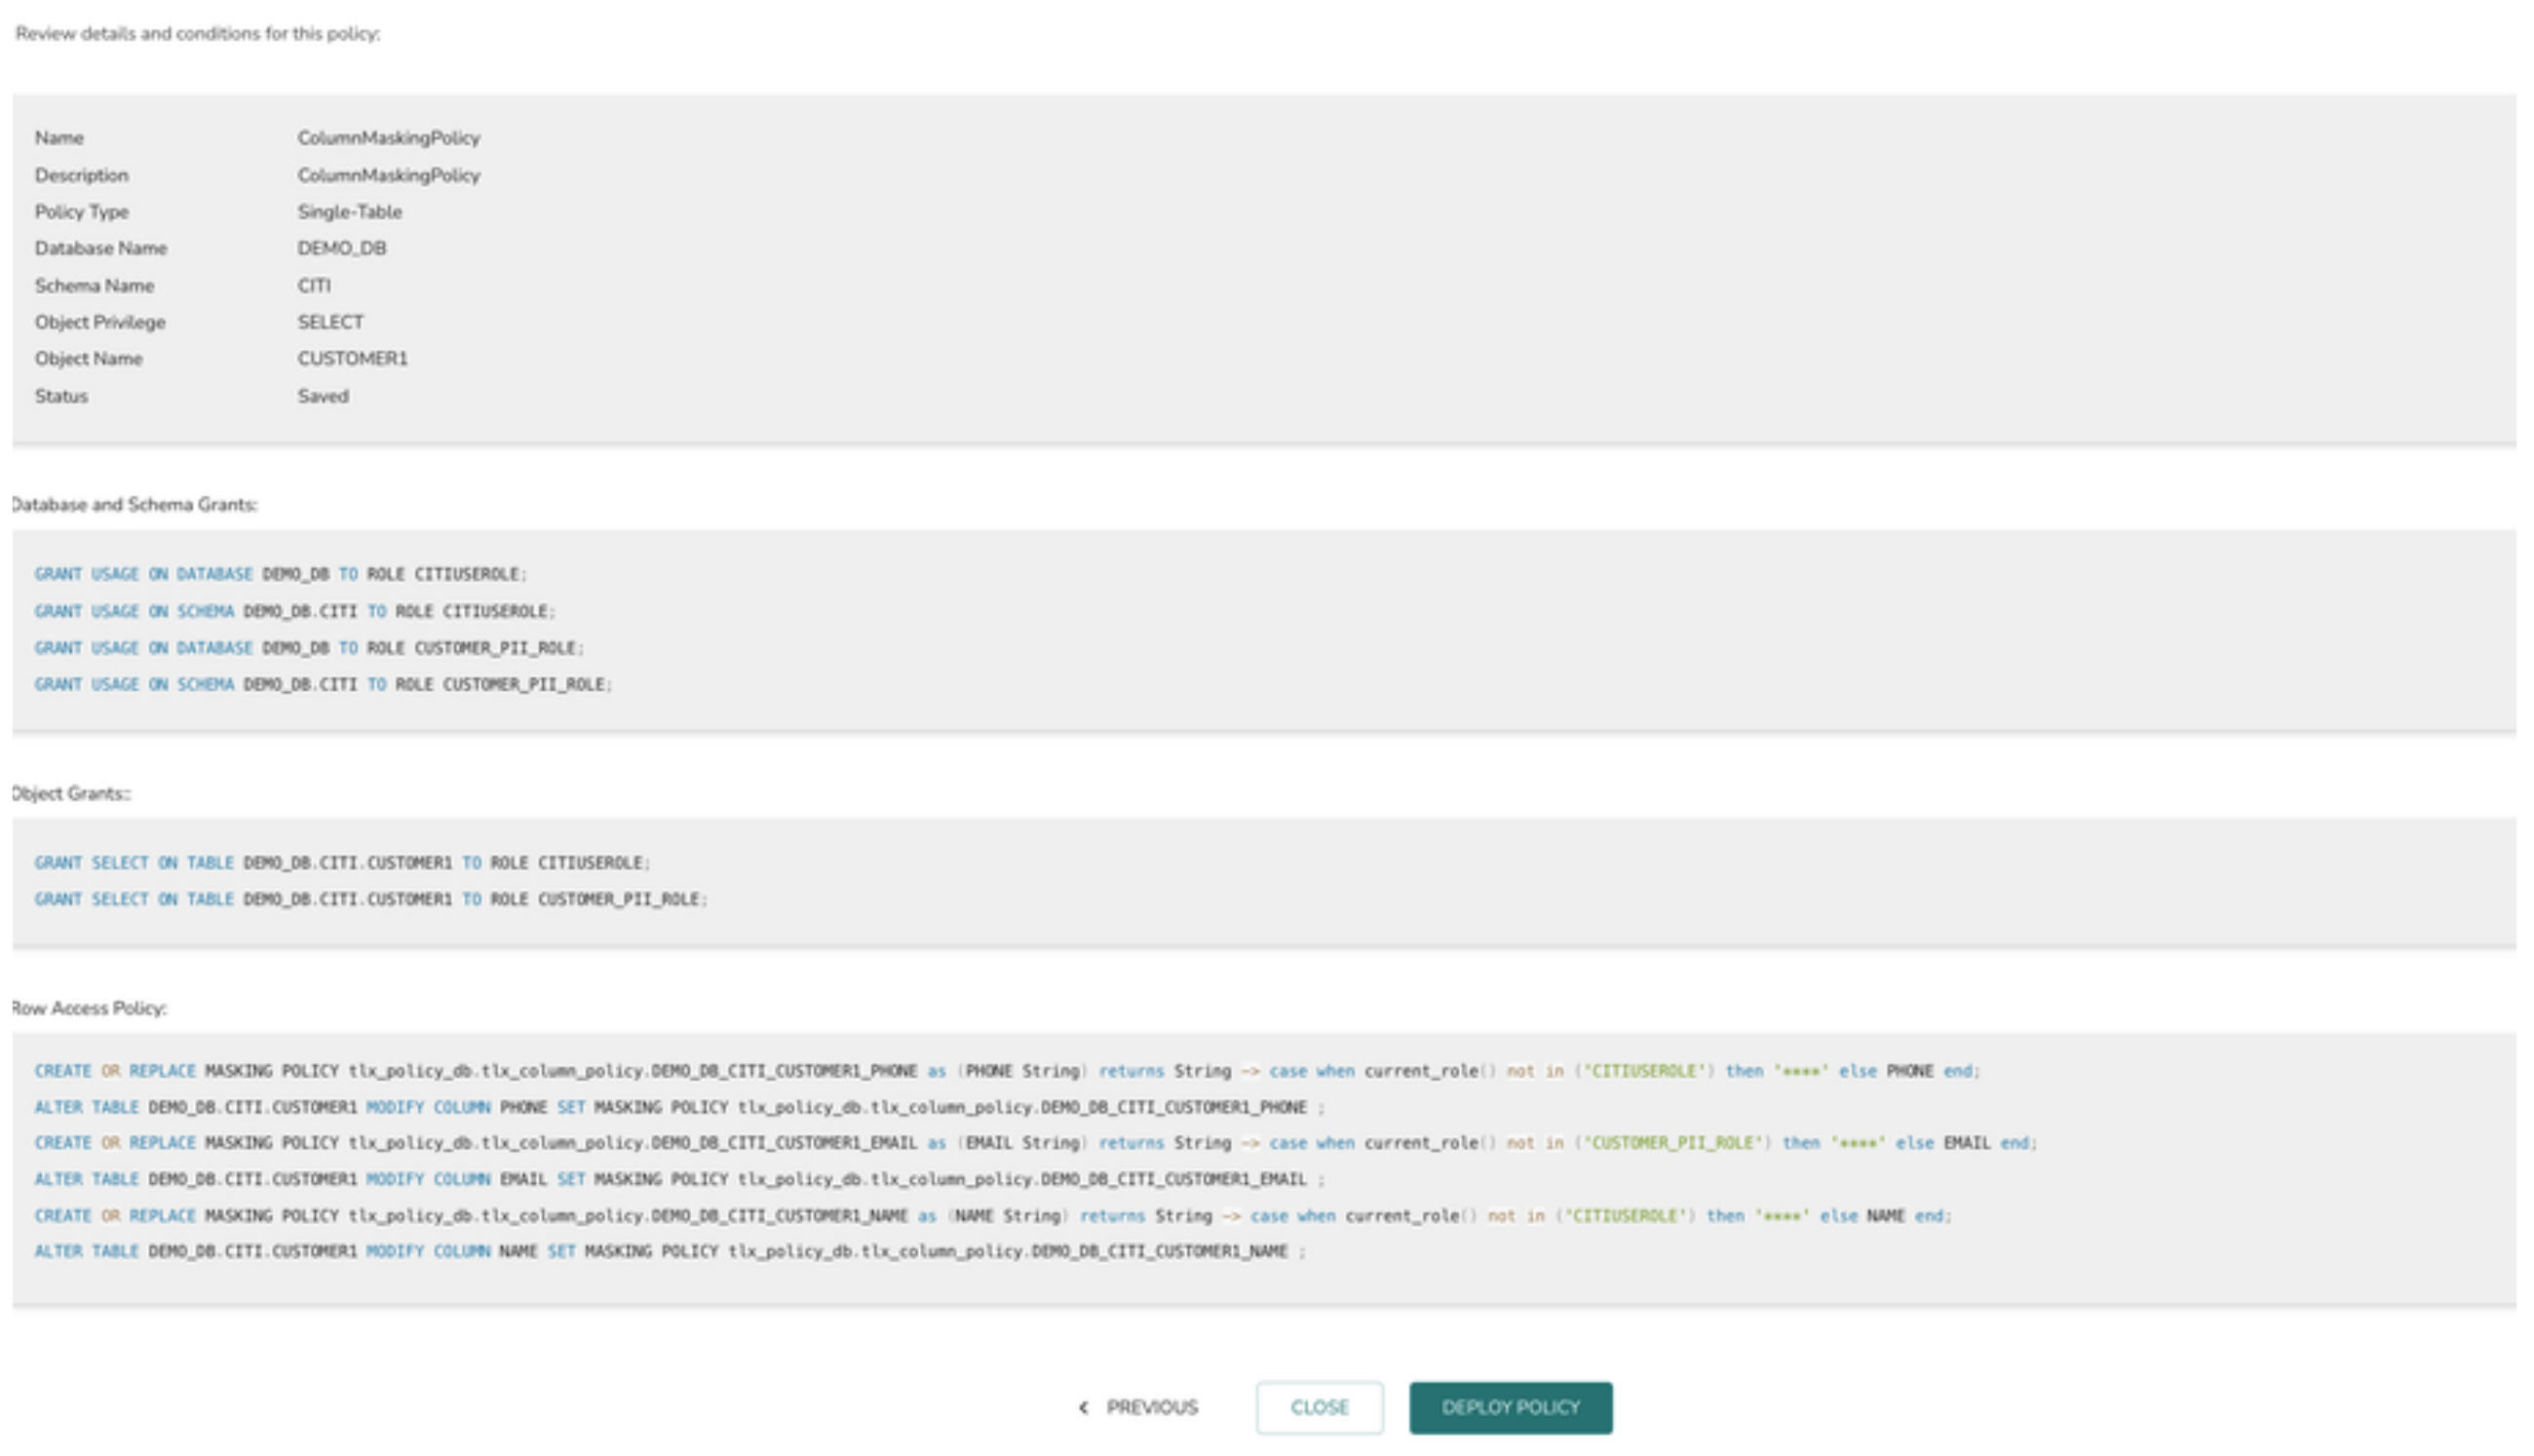
12> The final page displays the summary view of the policy definition. Click on “DEPLOY POLICY” button to deploy the policy or “SAVE” button to save the policy and deploy it later.
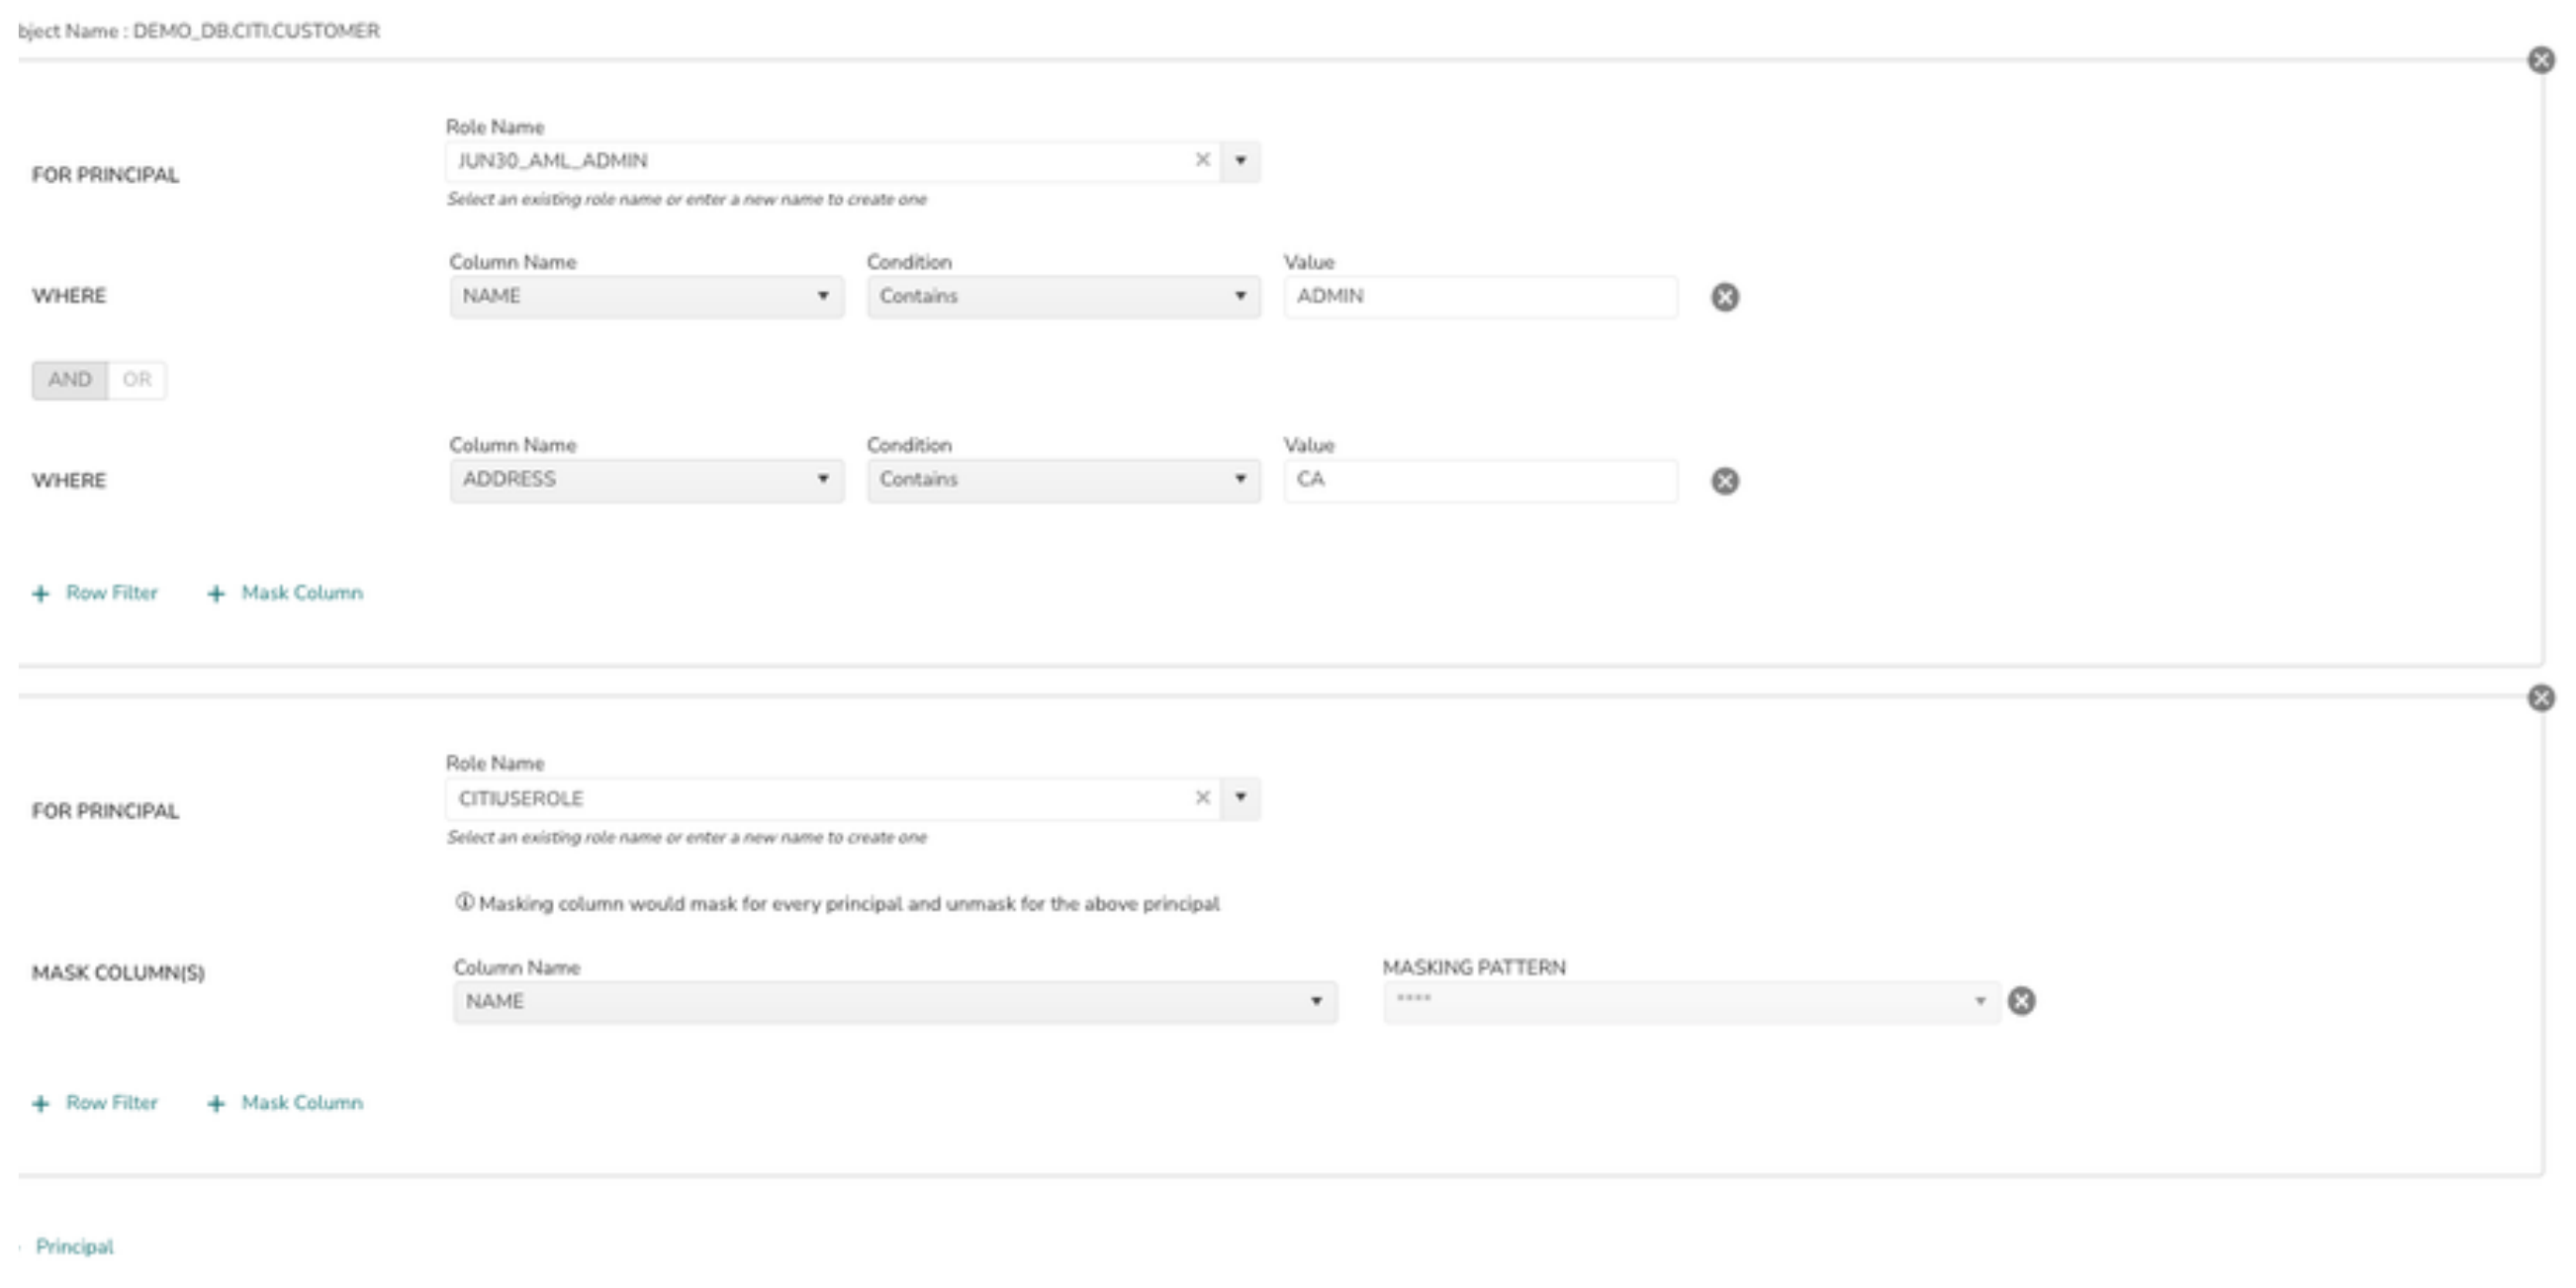
To define row level and column masking policies on the same table, use the same policy to define both the use cases . Example use case given below.
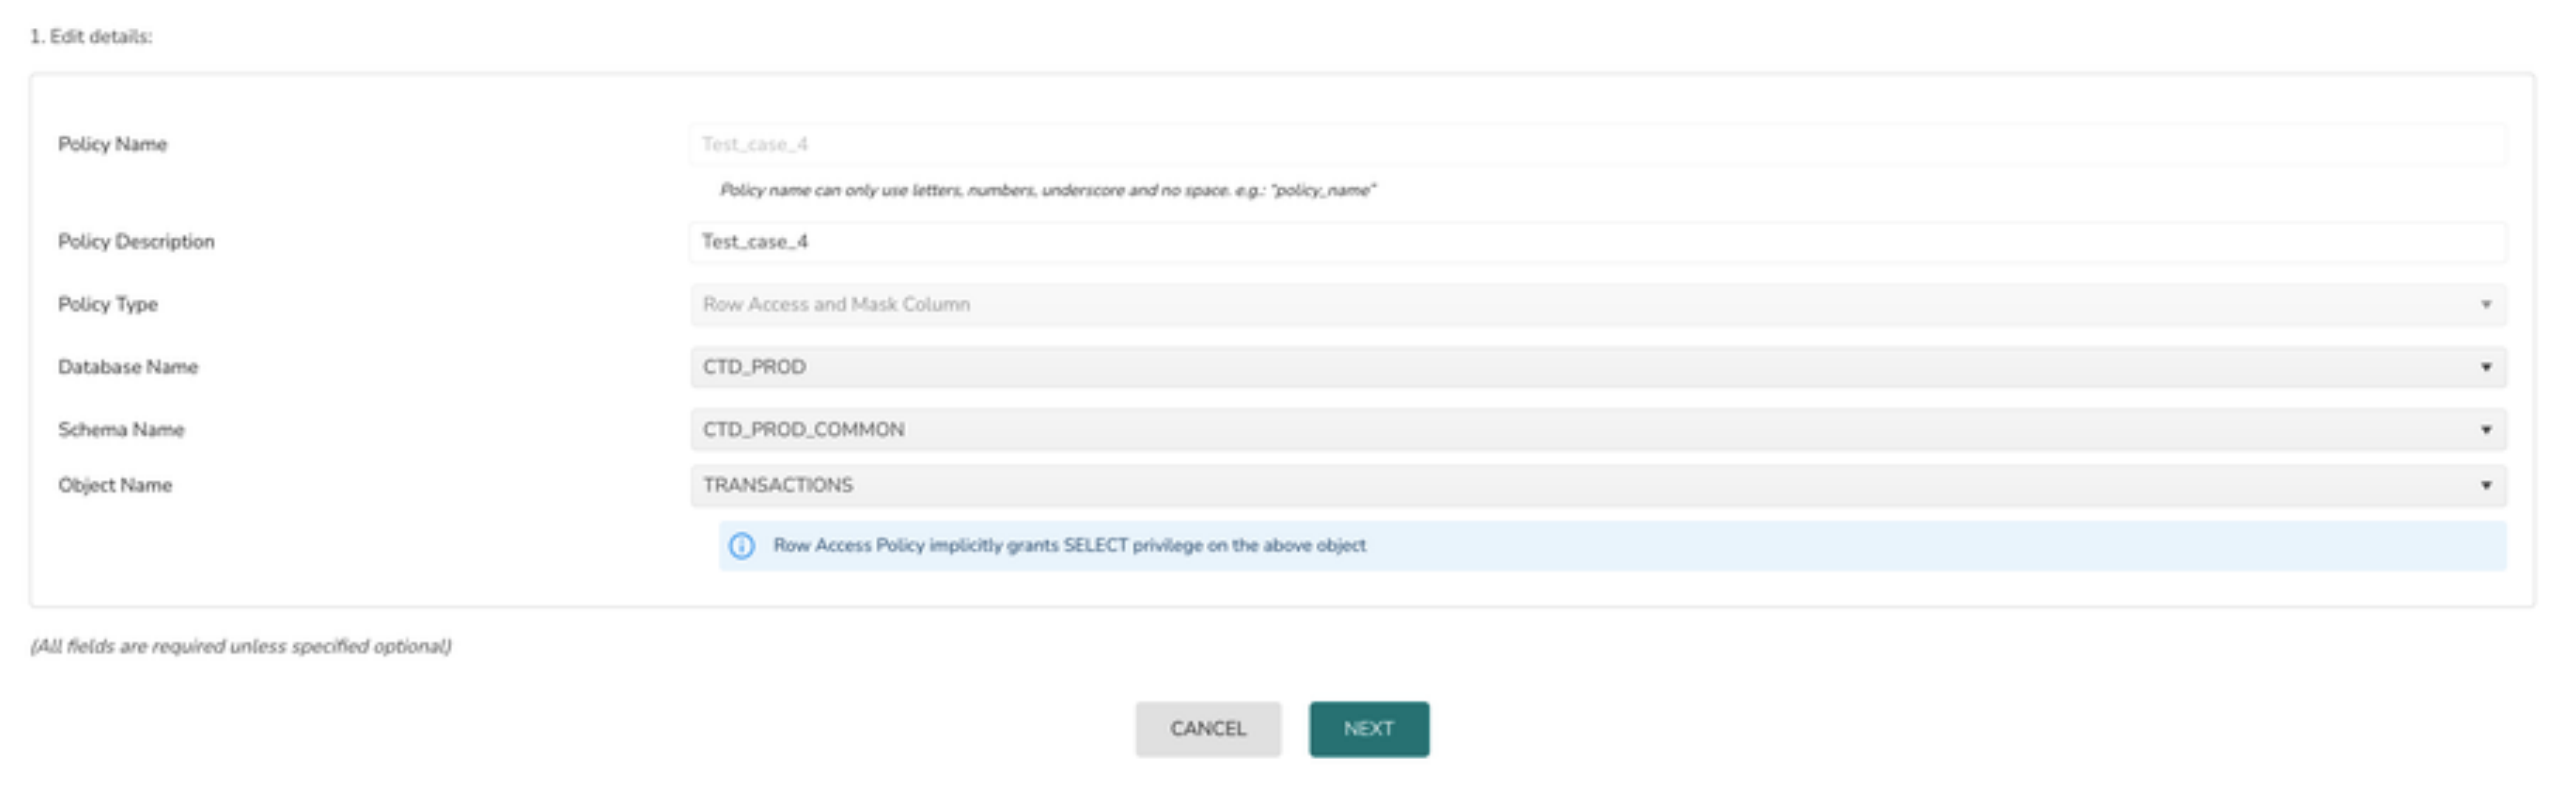
Create an Access Policy using Entitlement Table (Mapping Table)
Create policies that apply Filter conditions on specific rows of data in Fact table by joining with Dimension table.
1> Select the Policy Type as Row Level Access & Column Masking
2> Select the Database from database drop down To define row level and column masking policies on the same table, use the same policy to define both the use cases . Example use case given below.
3> Select the Schema from schema option drop down
4> Select the object name from Object Name drop down
5> Click on the Next button
6> Click on + Entitlement Filter to provide the column list and the entitlement query
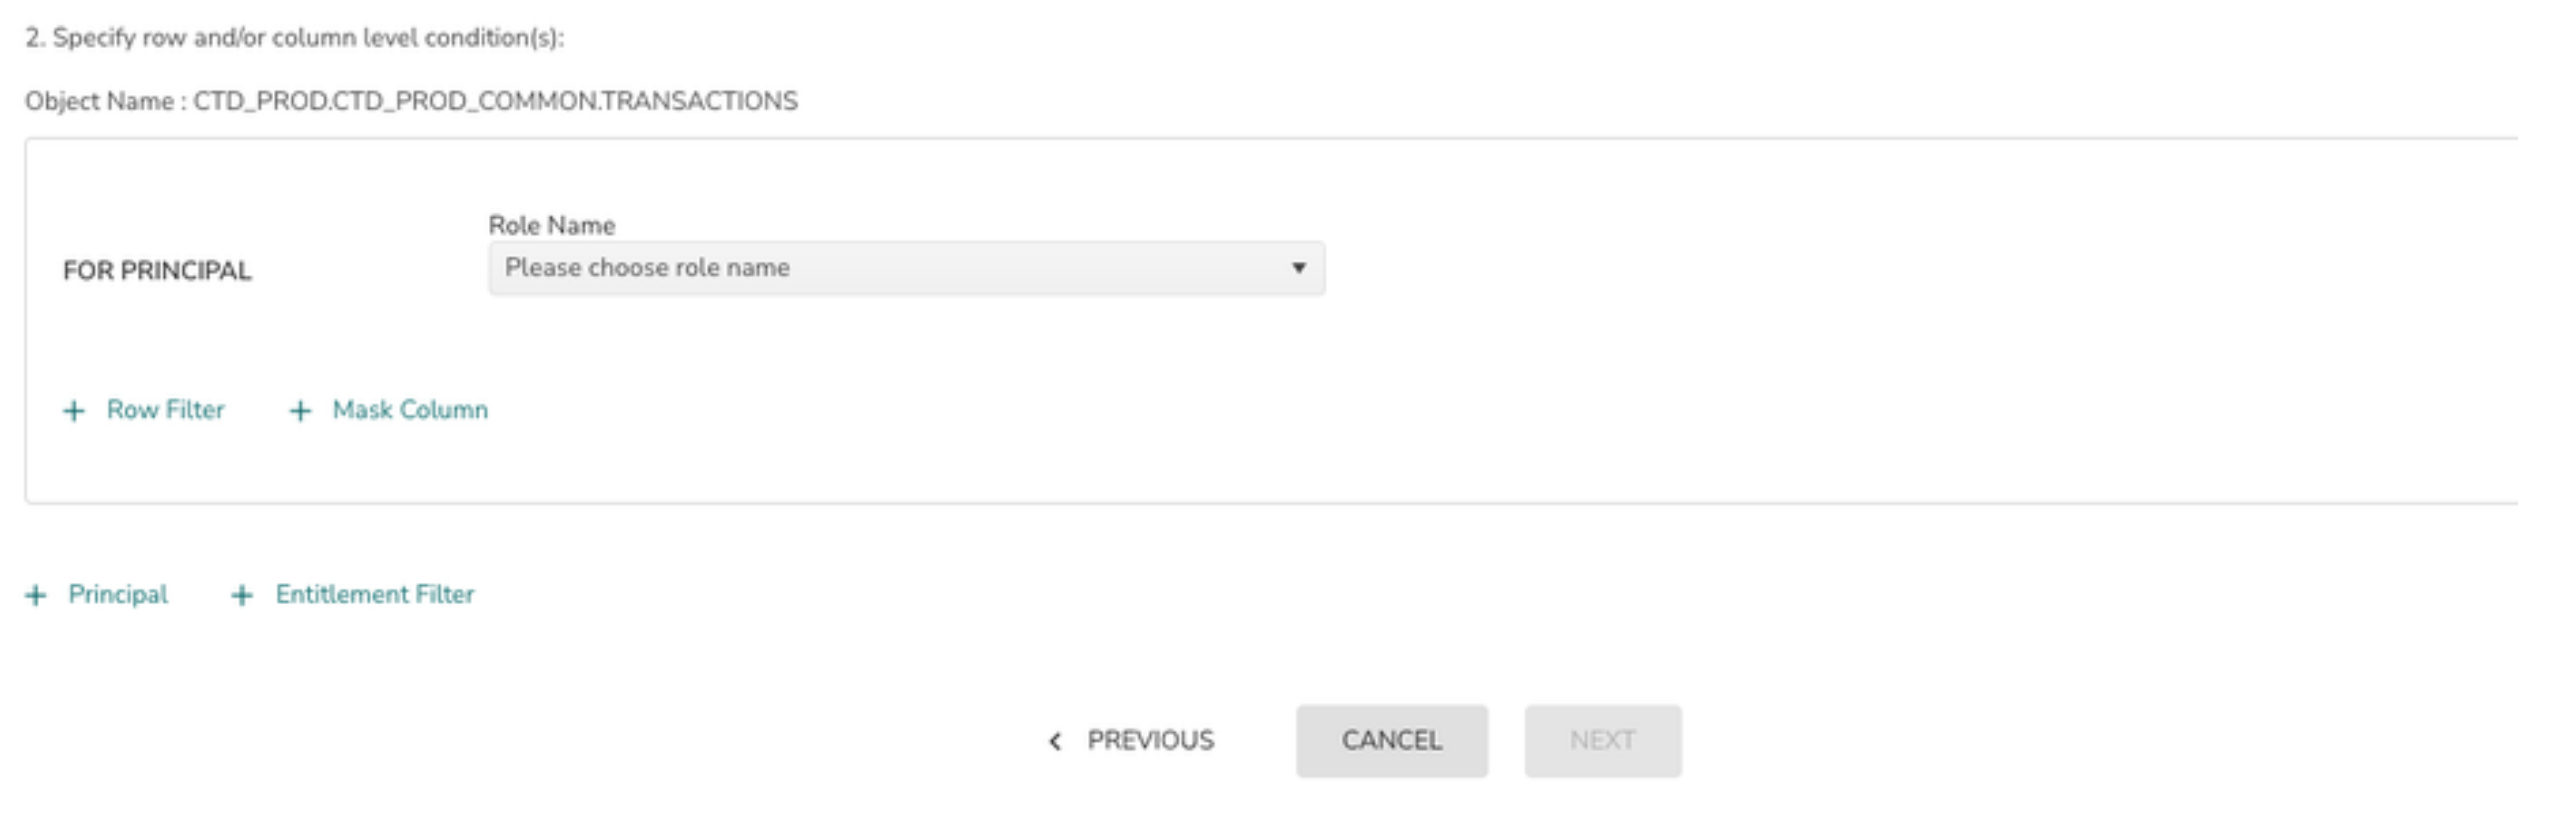
7> Select the column list and enter entitlement query in the provided input elements
Choose the column name that will be used as the join key between the Fact and Dimension Tables
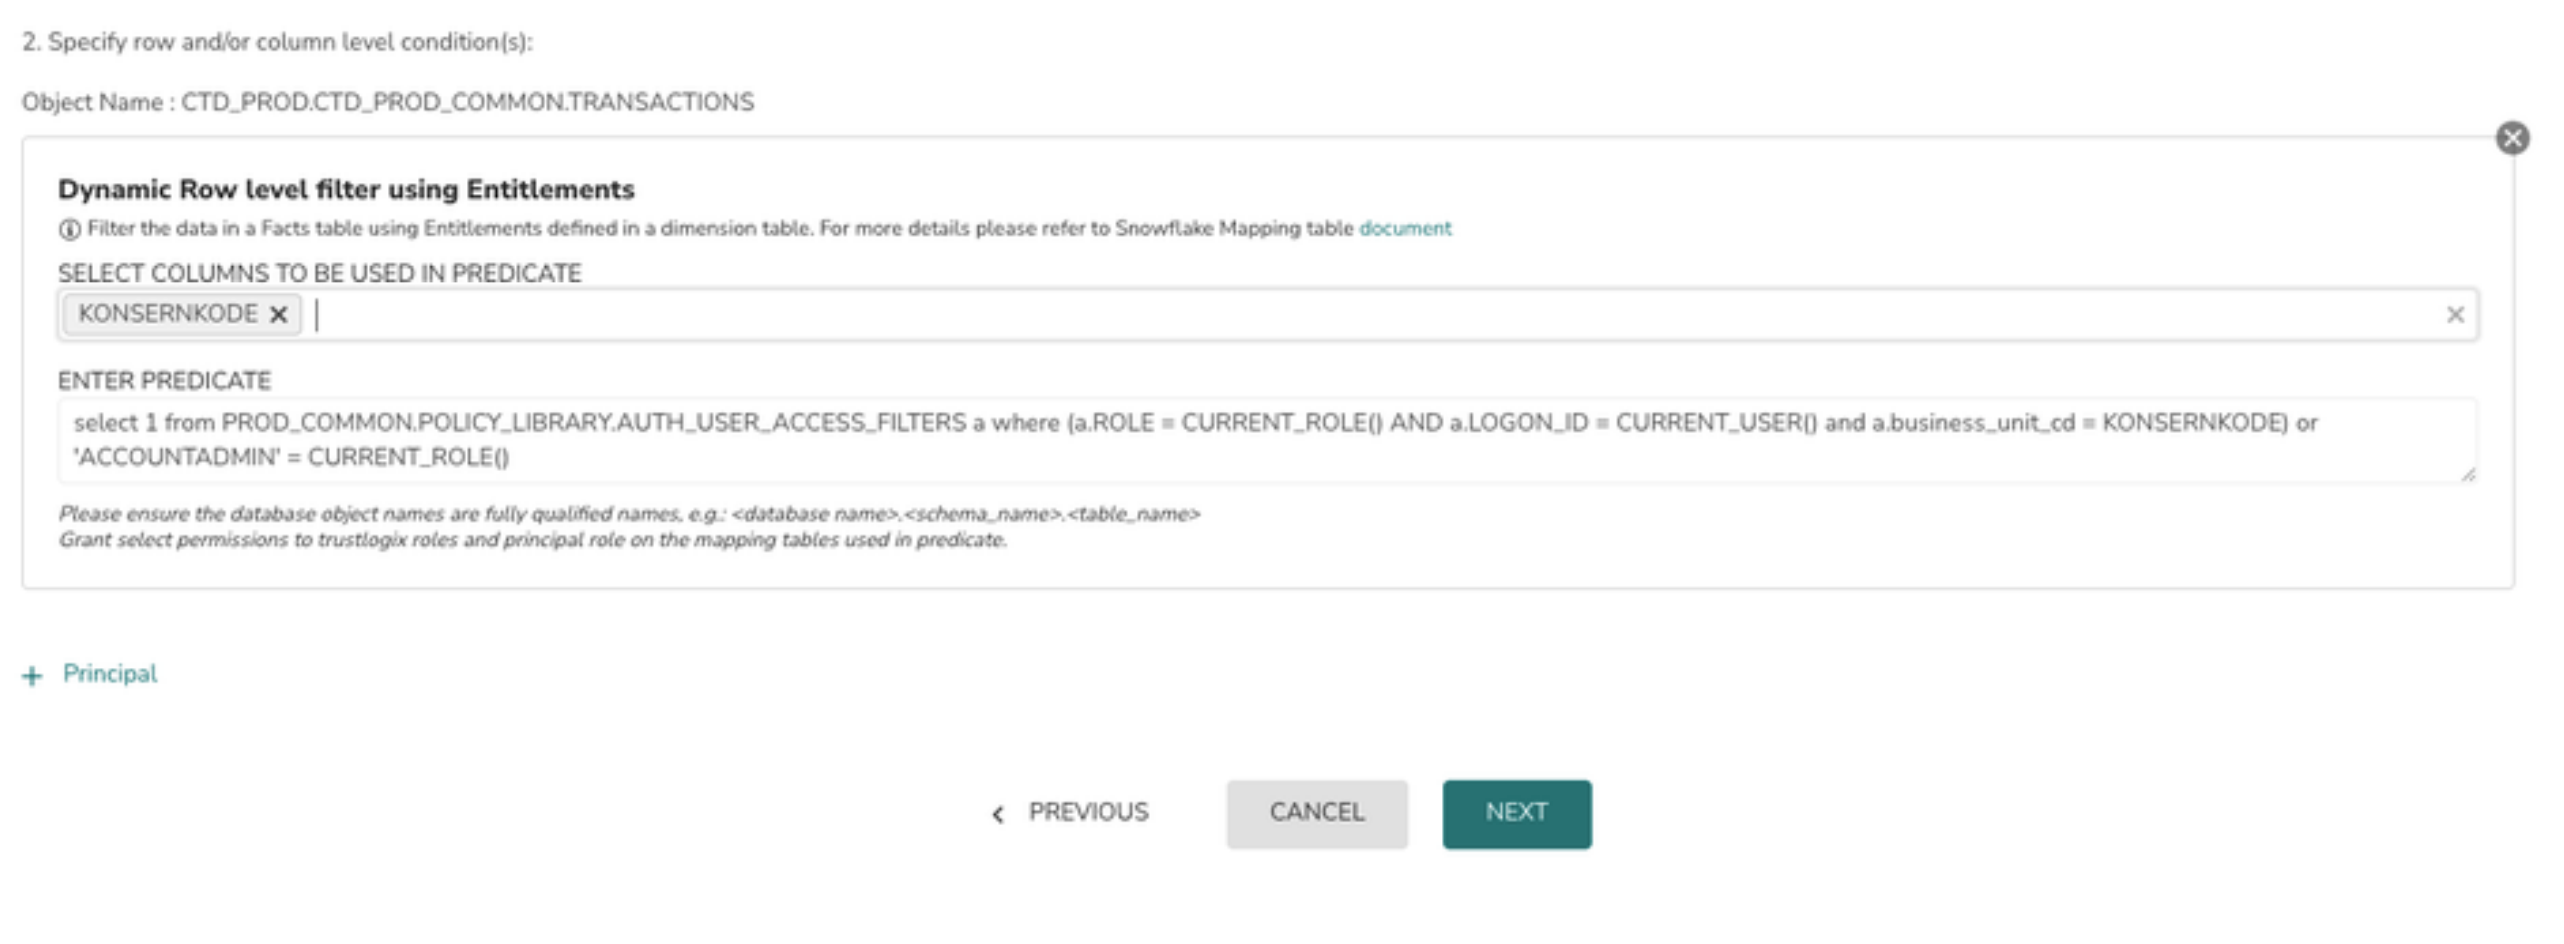
Note:
- Choose the column name that will be used as the join key between the Fact and Dimension Tables
- Ensure the predicate query is using a fully qualified table name including the database and schema names
- Ensure TLX_DP_ROLE has SELECT privilege on the entitlement table used in query for query validation. If the SELECT privilege is not given to the TLX_DP_ROLE then the policy will not be deployed.
- Ensure the fact table is accessible by the public role OR is accessible by all the roles or the users that are mapped in the entitlement table
- Don't use any special characters like : ; in the predicate query
8> Click on the Next button which will validate the query and move on to the next page
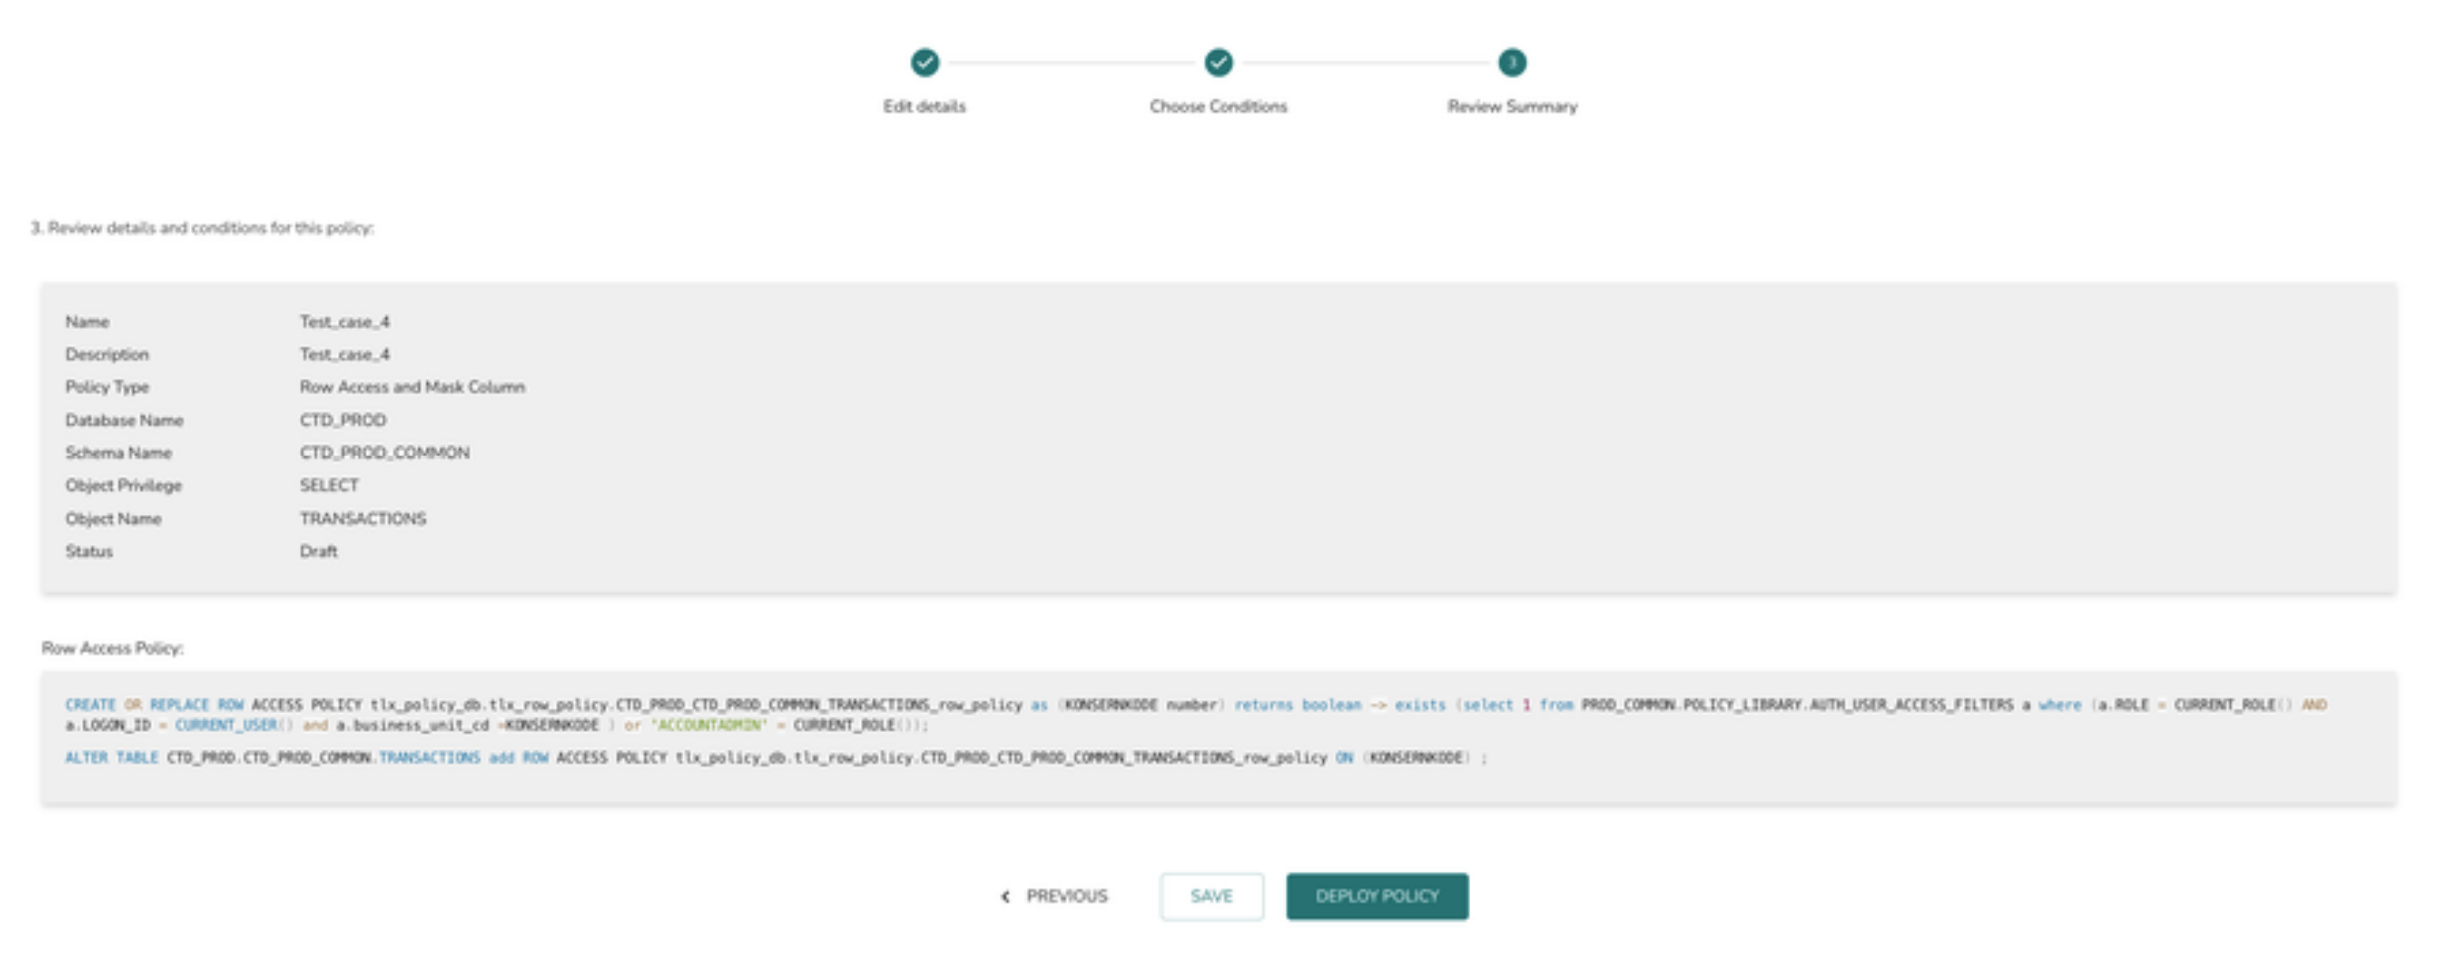
9> The final page displays the summary view of the policy definition. Click on “DEPLOY POLICY” button to deploy the policy or “SAVE” button to save the policy and deploy it later.
Edit an Access Policy
To edit an existing policy
1> Navigate to the Access Polices tab in data source details page
2> Select a policy from the policy list
3> Click on the pencil icon at the right corner to edit the policy
4> Navigate through the steps similar to the policy create flow and update the required fields

Note:
- Policy type cannot be changed for any of the existing policies
- If any of the objects or privileges added or removed during the policy update, the grants will be revoked and granted as applicable
- All the revoke grants will not be shown in the final summary view
Create an Access Policy on Tagged objects
TrustLogix supports creating an access policy based on Snowflake Tags. The objects currently supported as part of the policy creation are
- Database
- Schema
- Table
- View
- Materialized View
Following privileges are granted on the above objects
- Database - All tables, All views, All materialized views in all current and future schemas (USAGE)
- Schema - All tables, All views, All materialized views on all current and future objects
- Table, View and Materialized View – All objects tagged by the chosen tag
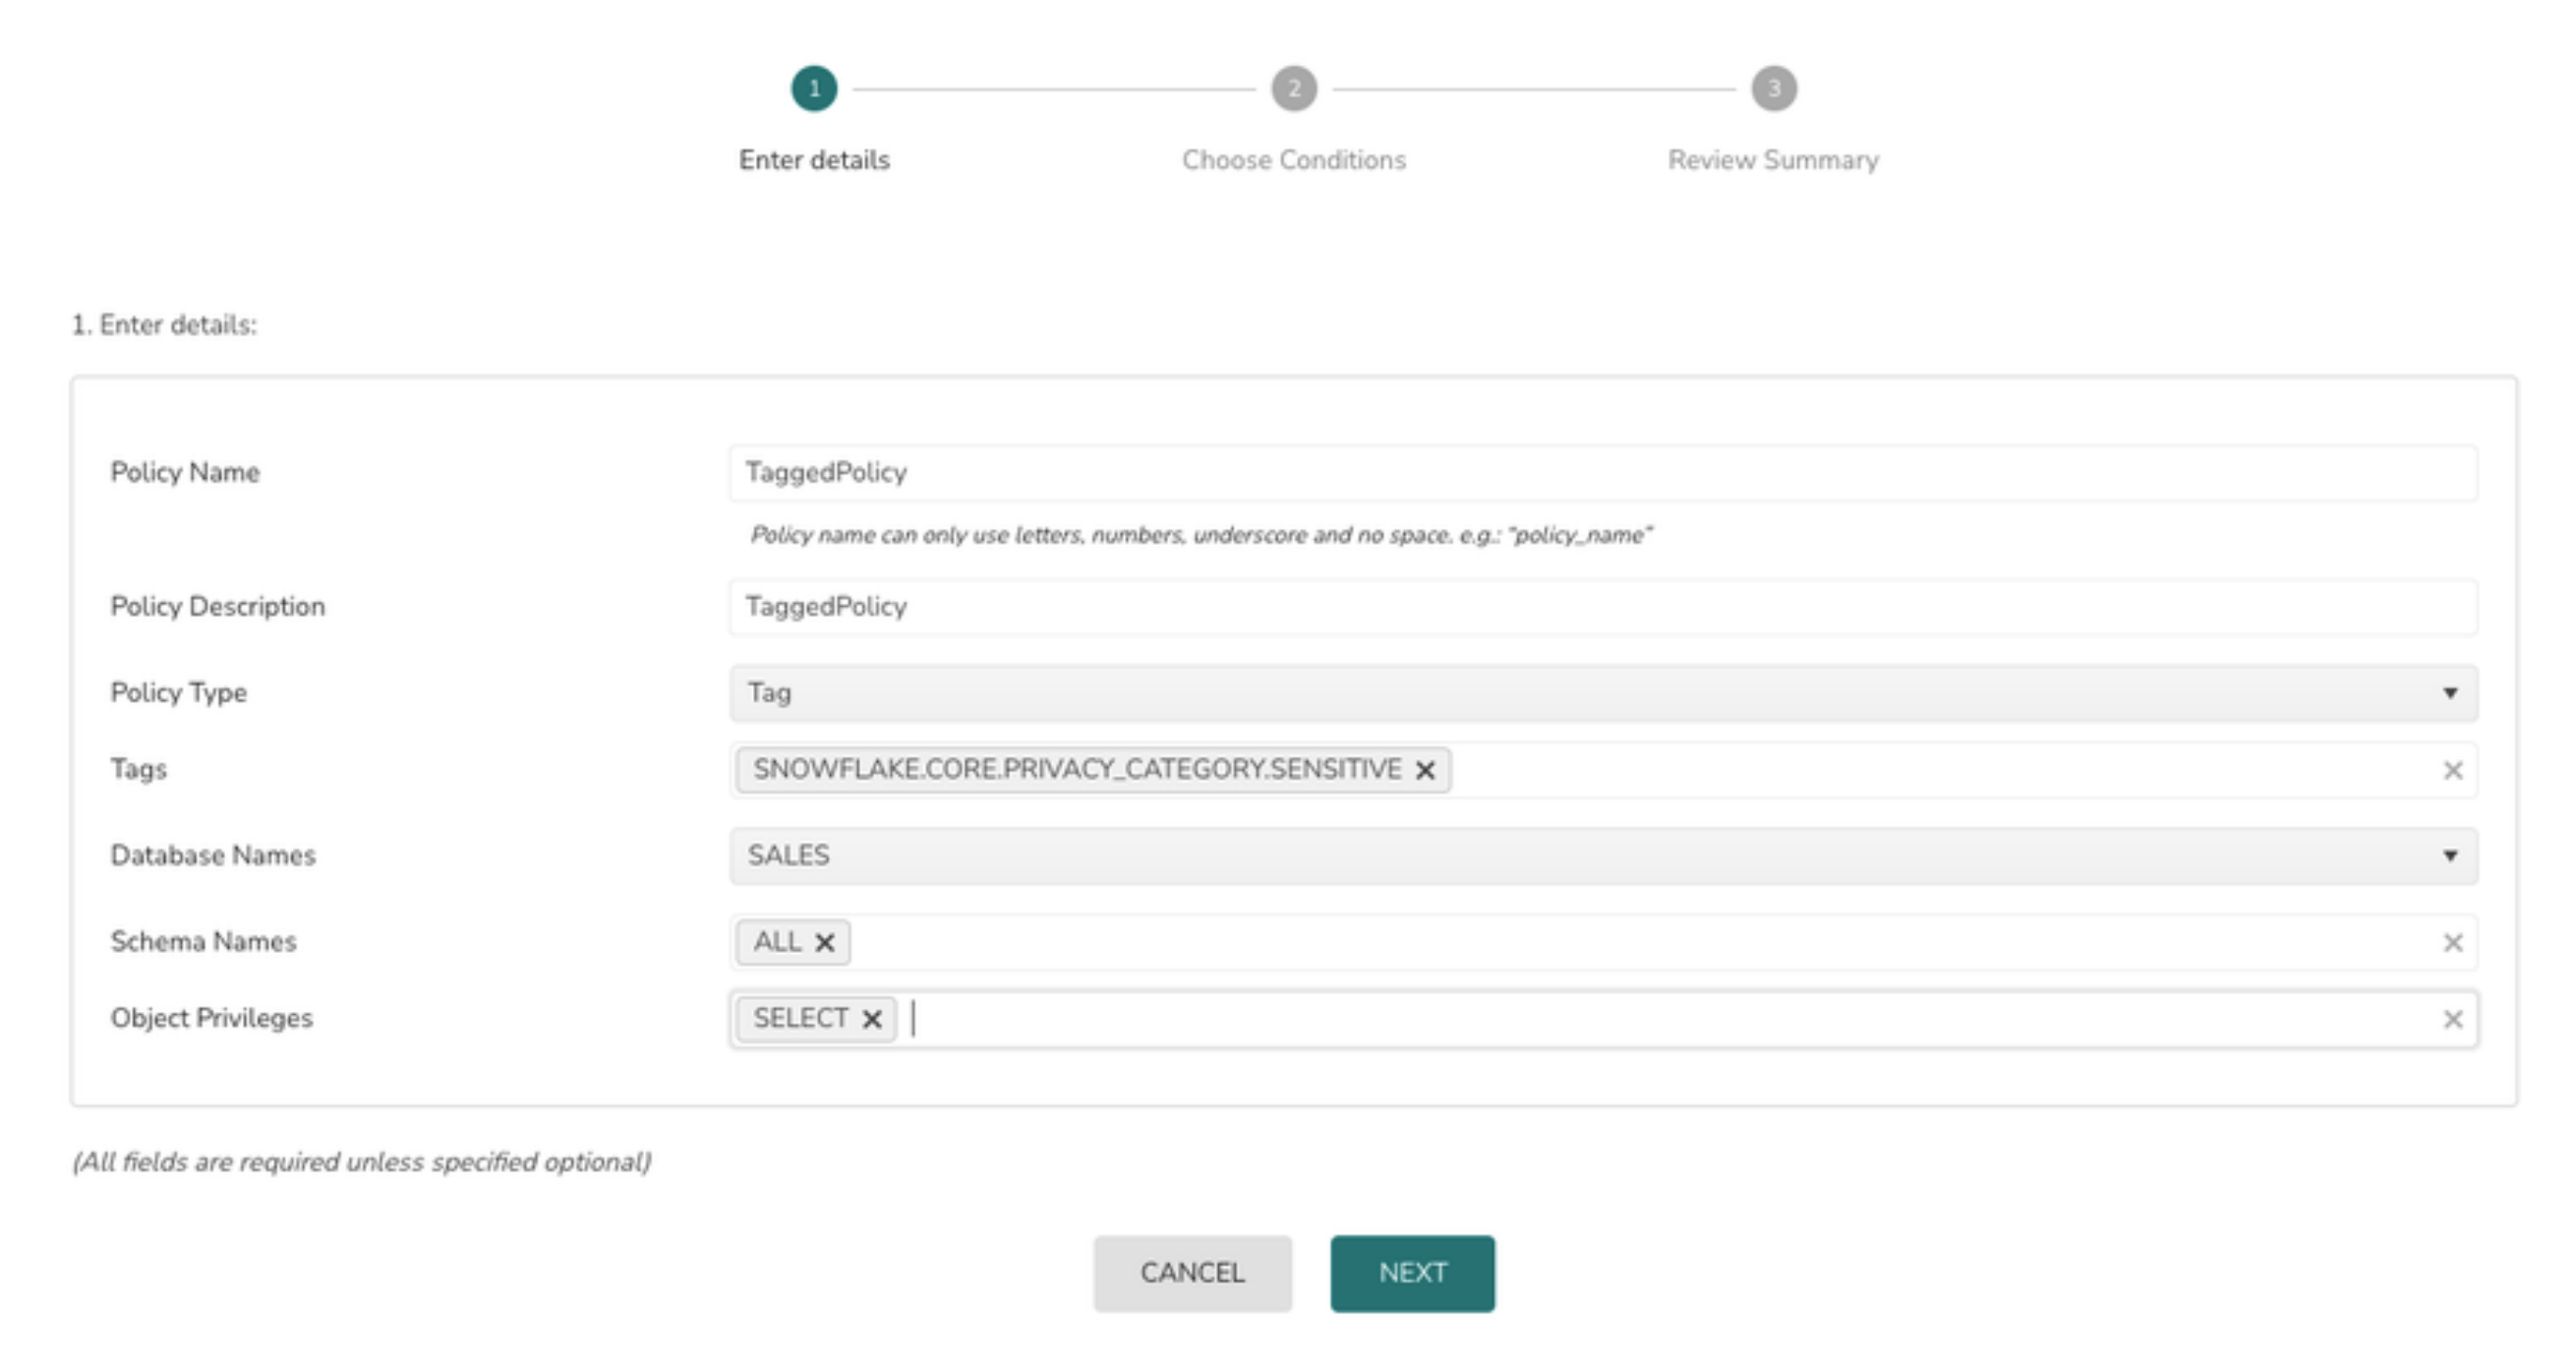
1> Select the Policy Type as Tag
2> Select the Snowflake Tags from the tag dropdown
3> Select the Database from database dropdown
3> Select the schema or All from schema option drop down
4> Select the privileges from object privilege list
5> Click on the Next button
6>Select the Role from the drop down and click on the Next button
To add more roles to the policy (assign grants) click on + Principal and follow #6 again.
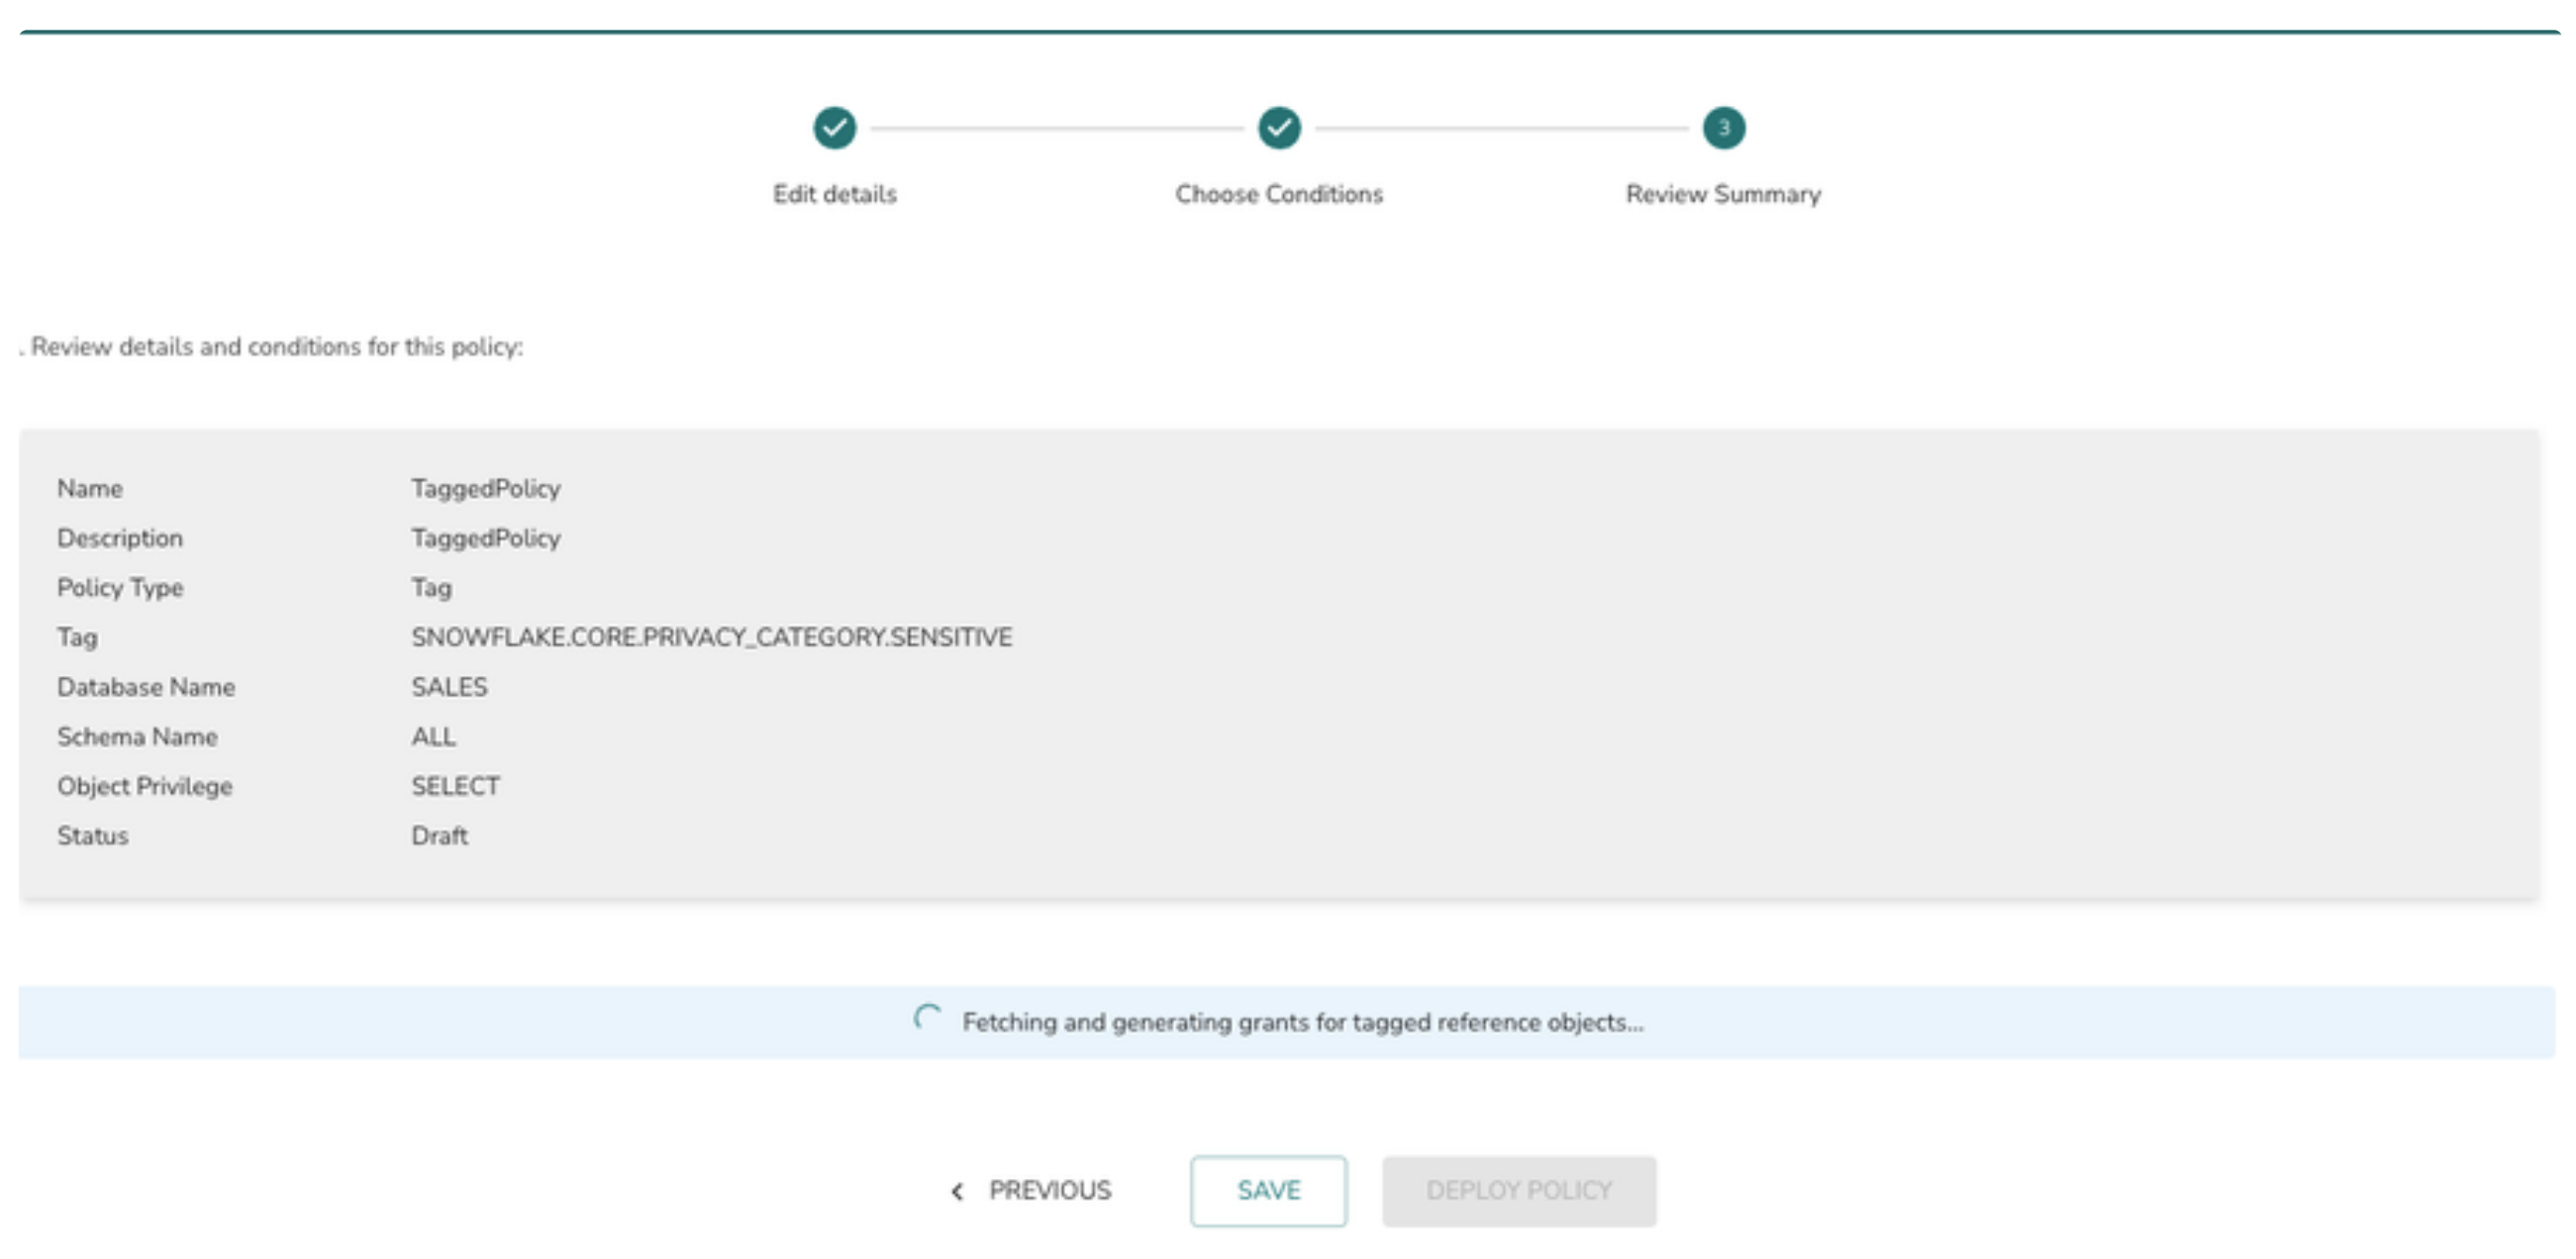
Note: System finds the tagged objects only in the selected database and schema. If there are objects available in other databases and schemas those will not be picked up for access policy generation.
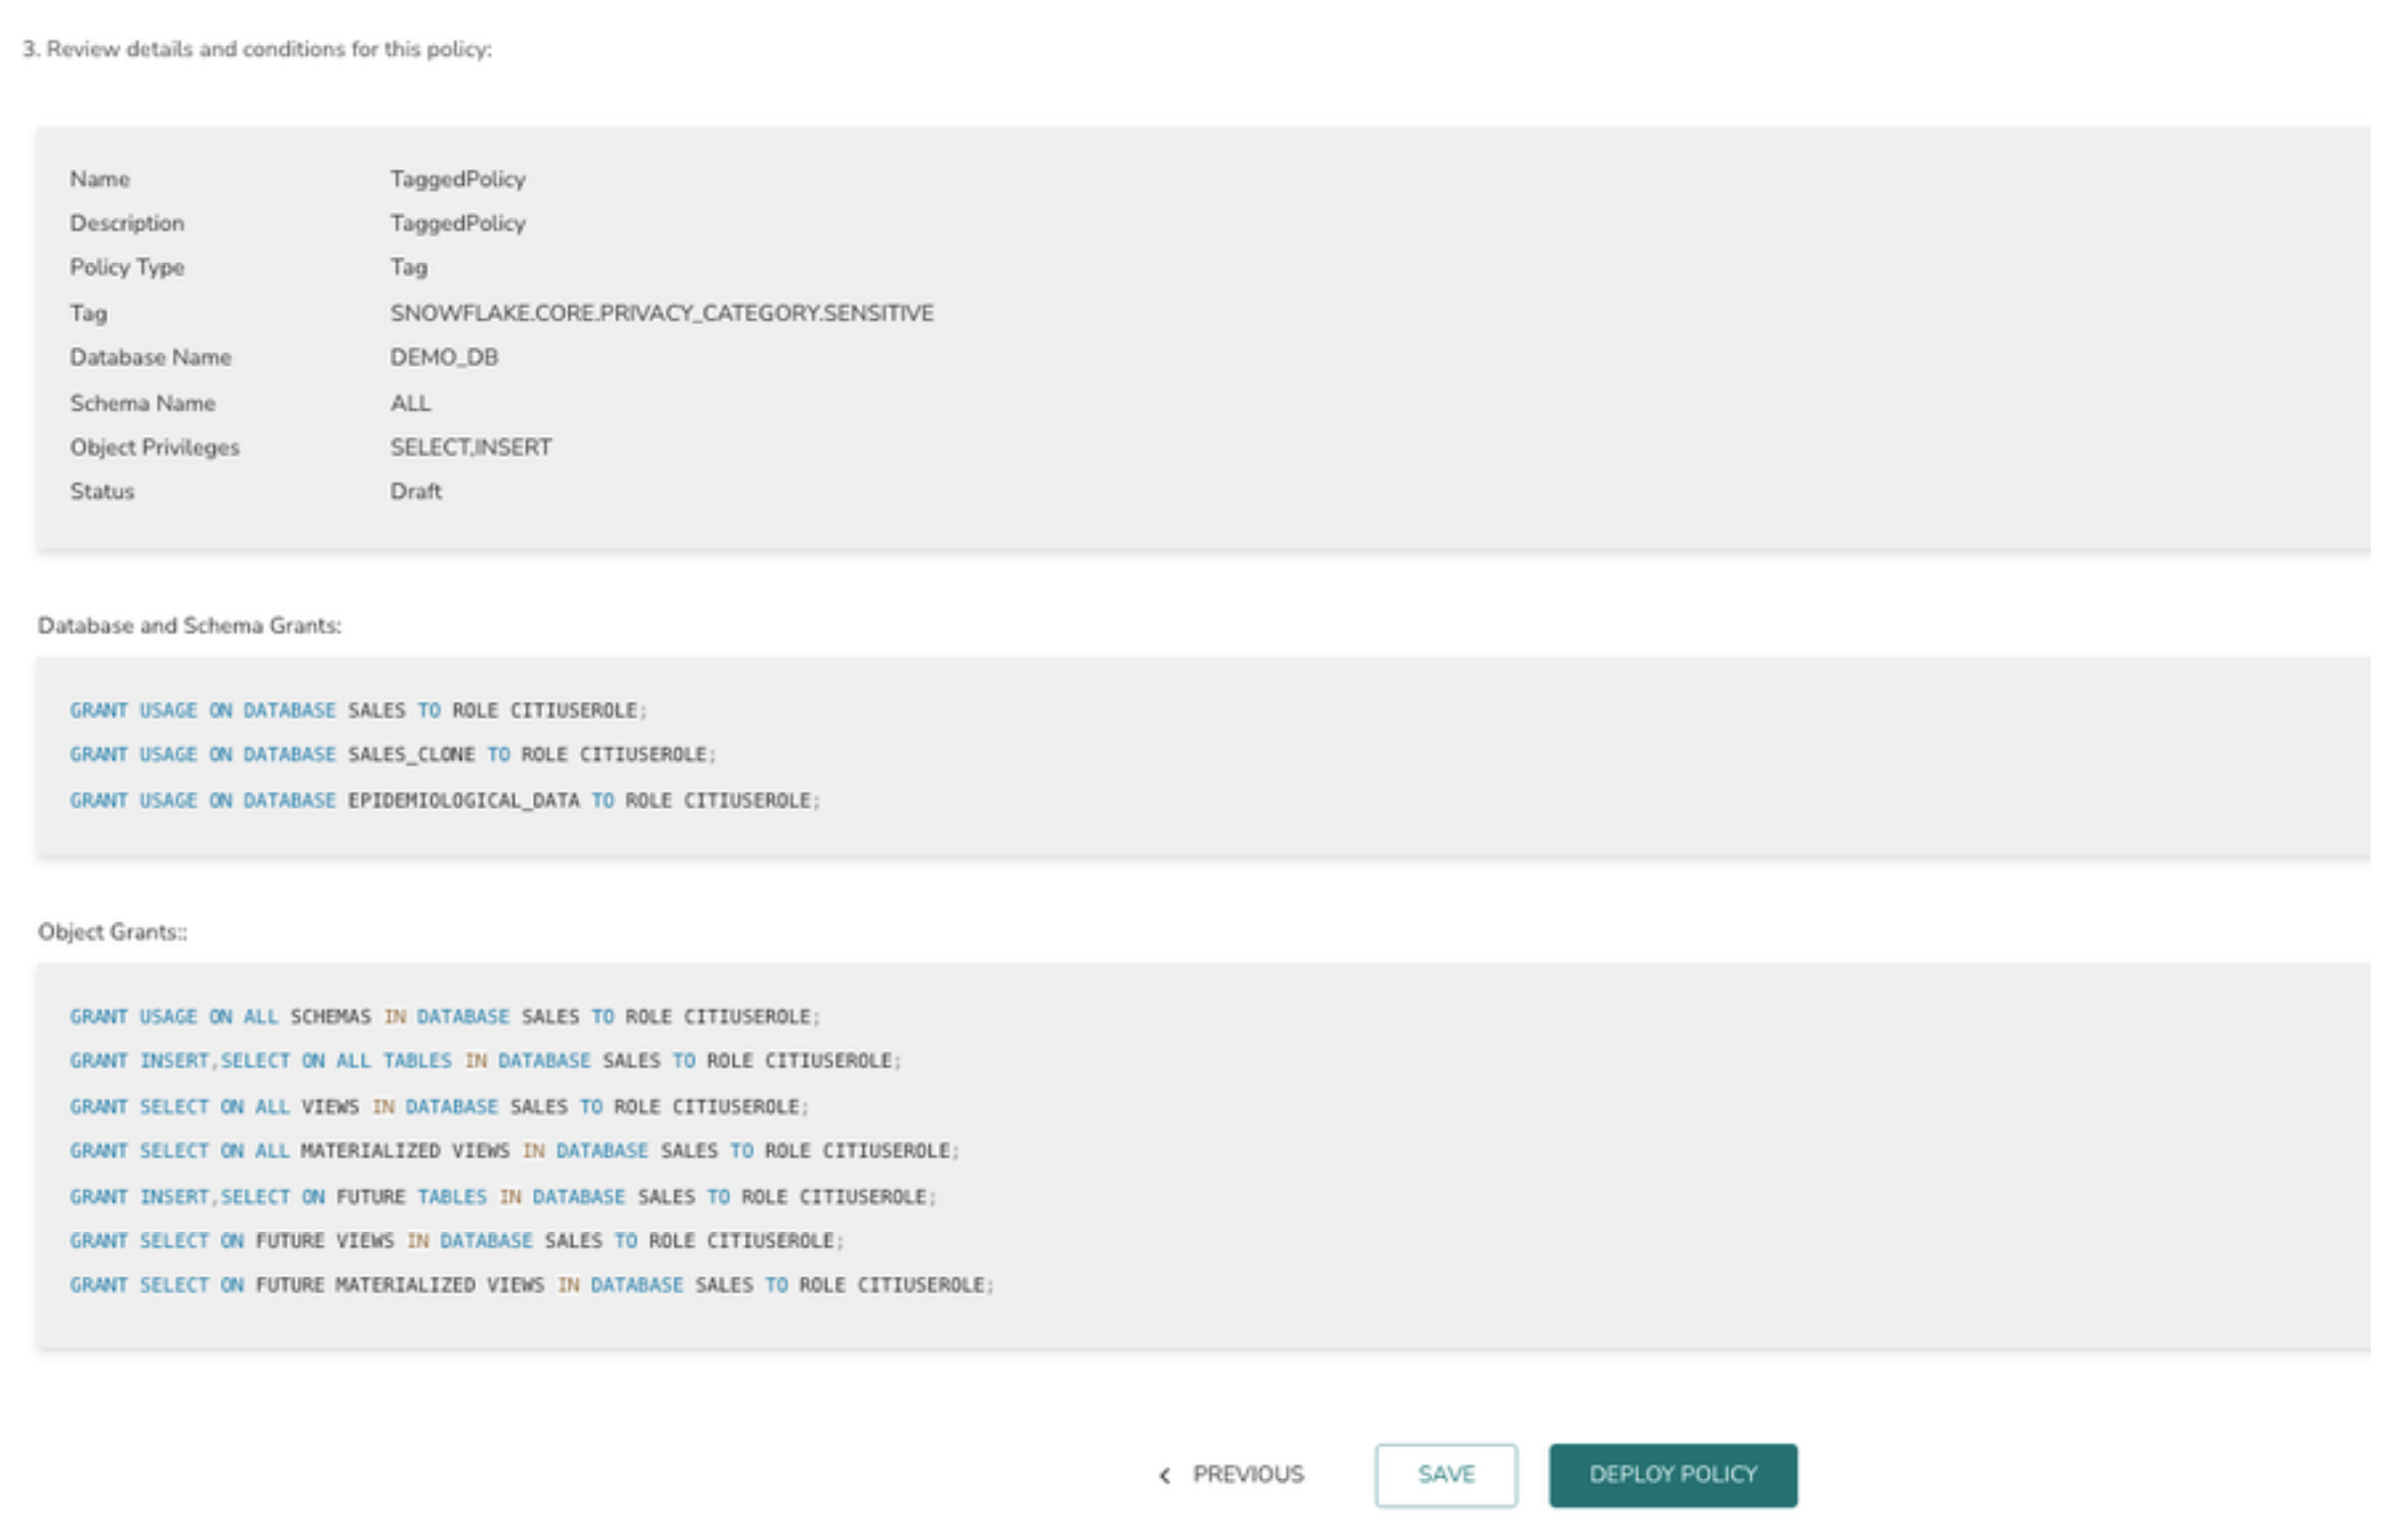
In the above example tagged objects are at the database so grants are generated at the database level.
> The final page displays the summary view of the policy definition. Click on “DEPLOY POLICY” button to deploy the policy or “SAVE” button to save the policy and deploy it later.
Revoke Grants
To revoke grants you can delete an existing policy
1> Navigate to the Access Polices tab in data source details page
2> Select a policy from the policy list
3> Click on Delete icon to delete the policy
Initially, policy goes into deploying state, upon successful deletion, TrustLogix will revoke all the granted privileges.
Note:
Database and schema usage grants will not be removed as there would be other policies that might be referring to them